- Best for
- Homeowners looking for impactful kitchen updates
- Time
- 1-2 weekends
- Difficulty
- Confident DIY
- Cost
- Under $350
Why the Craftsman Kitchen is the kitchen of 2026
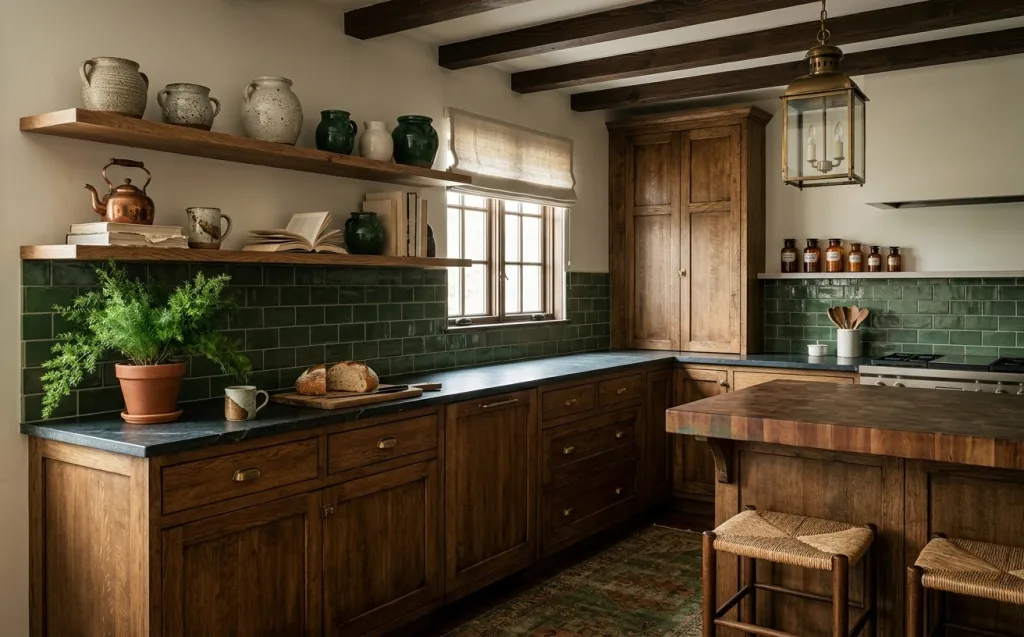
The Craftsman-inspired kitchen, with its emphasis on natural materials and thoughtful detailing, is making a strong comeback as homeowners seek spaces that feel both authentic and functional. Think rich, stained wood cabinetry, handmade-look ceramic tiles, and warm, inviting lighting. This aesthetic, often seen in high-end design magazines, is surprisingly achievable for the budget-conscious DIYer. By focusing on textures like distressed wood, glazed ceramic, and soft linen, and choosing a cohesive color palette (like deep forest green and creamy off-white), you can infuse your kitchen with a sense of enduring quality. Our audience of homeowners, with access to power tools and the freedom to make permanent changes, can leverage these elements to create a space that feels custom-built without needing a contractor or a five-figure budget.
Layer 1 — Floating Shelves ($30) Display your personality with open storage
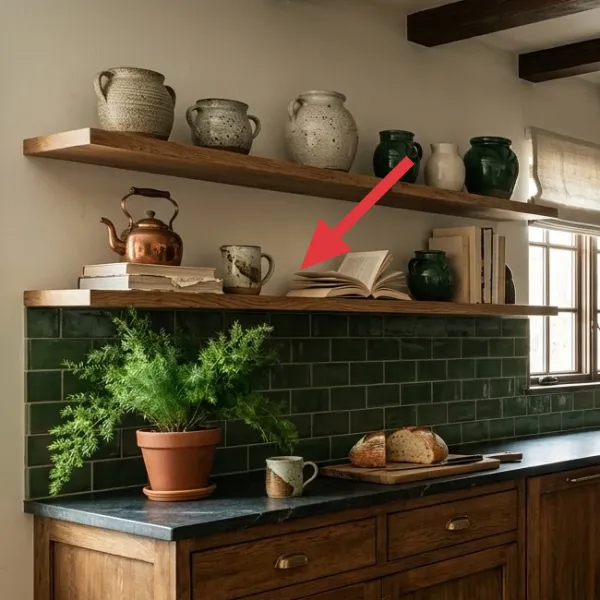
Open shelving offers a fantastic opportunity to bring personality and function to your kitchen. Instead of traditional upper cabinets, these custom-stained floating shelves provide a beautiful display for pottery, cookbooks, and even a small plant, breaking up the wall space and adding warmth. They're perfect for items you use often or simply love to look at.
Choosing a wood tone that complements your existing cabinetry helps create a cohesive look, even if the styles aren't identical. The key is sturdy installation – these shelves are meant to hold substantial items, so proper anchors are crucial.
Make it instead of buying it
Building your own floating shelves offers significant cost savings and allows for a custom look tailored to your kitchen's dimensions and existing wood tones.
- Purchase two 1x8x6' common pine boards from Home Depot or Lowe's. Select boards that are straight and free of major knots.
- Measure and cut your boards to desired lengths using a miter saw or circular saw. For this look, a 48-inch and a 36-inch shelf work well.
- Sand all surfaces and edges with 120-grit sandpaper, then finish with 220-grit for a smooth feel. Wipe clean with a tack cloth.
- Apply one coat of Minwax Wood Finish Penetrating Stain in "Dark Walnut" with a rag, wiping off excess after 5-10 minutes. Let dry for 6-8 hours.
- Apply two coats of Minwax Polycrylic Protective Finish (satin finish) with a brush, sanding lightly with 220-grit between coats. Allow 2 hours drying time per coat.
- Install heavy-duty floating shelf brackets (e.g., from Amazon, rated for 50+ lbs) into wall studs or with toggle anchors. Slide your finished shelves onto the brackets.
Total DIY cost: ~$30 — saves about $70-$150 over buying pre-made floating shelves.
Layer 2 — Backsplash Tile ($100) A pop of color with a handcrafted feel
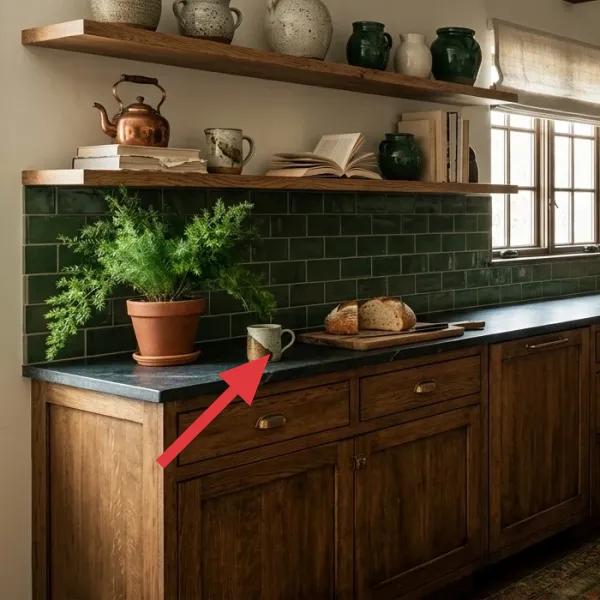
The dark green subway tile backsplash is a standout feature, providing a rich, earthy color that contrasts beautifully with the warm wood and light walls. Its slightly uneven, handmade-look texture adds character and depth, avoiding the sterile feel of perfectly uniform tiles. This is an area where a budget-friendly peel-and-stick option can genuinely mimic a more expensive installation.
Extending the tile up to the bottom of the floating shelves or even higher behind the range creates a more impactful, cohesive look than just a minimal strip.
Choose the right finish for authenticity
When selecting peel-and-stick tiles, look for options with a glossy, slightly irregular surface or 'pillowed' edges to mimic the look of traditional handmade ceramic tiles. Avoid overly flat or perfectly uniform options if you're aiming for a Craftsman-inspired aesthetic.
Layer 3 — Wood Cabinetry / Base Cabinets ($0) The foundation of natural warmth
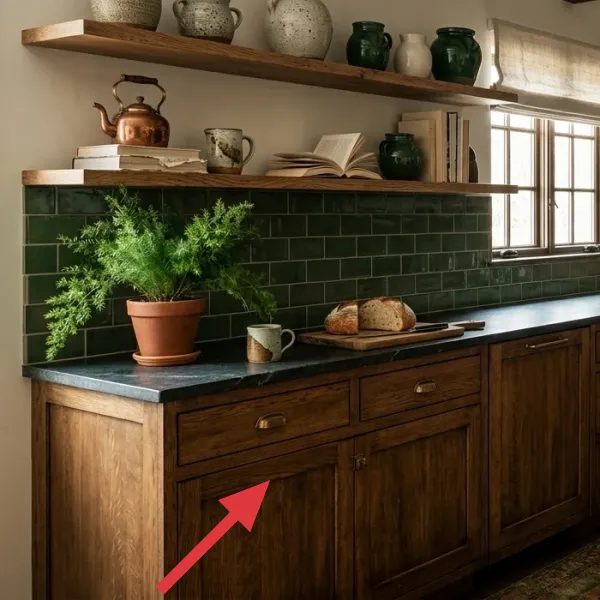
The existing dark-stained wood cabinetry forms the robust, grounding element of this kitchen. Its traditional style and paneled doors provide a sense of history and craftsmanship. While we're not replacing these, their presence dictates the overall warm, earthy palette and encourages complementary choices for other layers.
The brass hardware adds a touch of classic elegance and ties into the other metallic accents in the room. This base allows lighter elements, like the wall color and open shelving, to truly shine.
Leveraging existing features for design coherence
This project assumes existing cabinetry that grounds the space. If your cabinets are painted, consider a deep green or a creamy off-white to achieve a similar feel. If they're a different wood tone, choose a stain for your DIY shelves that harmonizes rather than clashes.
Layer 4 — Kitchen Island / Butcher Block ($0) Functional beauty and warmth
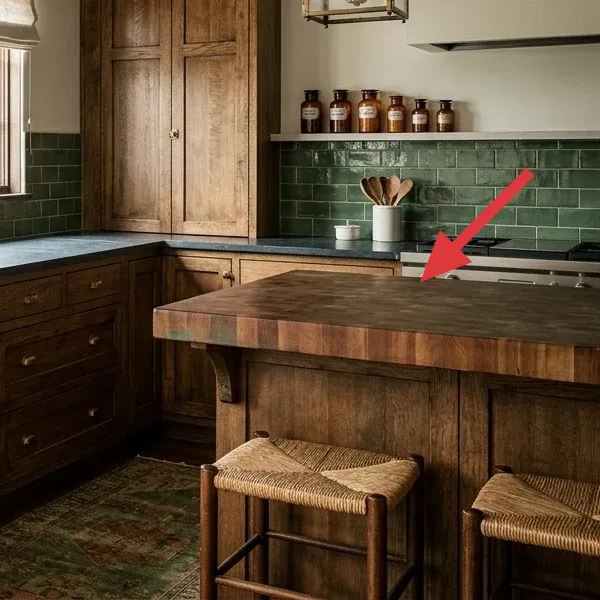
The substantial kitchen island, topped with a rich butcher block, serves as a central hub for prep, dining, and gathering. Its solid wood construction and the visible grain of the butcher block reinforce the natural, handcrafted theme of the kitchen. The integrated bar stools with woven seats add texture and a relaxed, inviting feel.
A butcher block top is not only aesthetically pleasing but also highly functional, offering a durable and food-safe surface that ages beautifully with proper care.
Maintain your butcher block for lasting beauty
To keep a butcher block countertop looking its best, regularly apply a food-safe mineral oil or beeswax conditioner. This prevents drying, cracking, and staining, ensuring a long lifespan and a beautiful sheen that deepens over time.
Layer 5 — Window Treatment ($40) Soft light and understated elegance
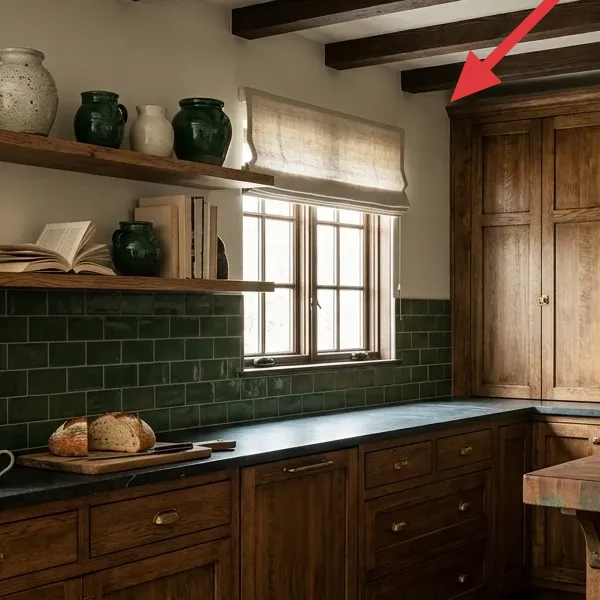
A simple, natural linen Roman shade above the window softens the light and adds a touch of understated elegance. Its neutral tone blends seamlessly with the wall color, allowing the rich greens and woods to remain the focal points. The texture of the linen introduces another organic element, contributing to the room's warm and inviting atmosphere.
Roman shades offer privacy and light control without the bulk of curtains, making them ideal for a functional kitchen space where cleanliness and simplicity are often preferred.
Measure carefully for a perfect fit
Getting the right measurements for a Roman shade is critical for a polished look. Decide if you want an inside mount (fits within the window frame) or an outside mount (overlaps the frame). Measure the width at three points (top, middle, bottom) and use the narrowest measurement for inside mount, or add 2-4 inches for outside mount.
Layer 6 — Pendant Light ($80) Vintage charm overhead
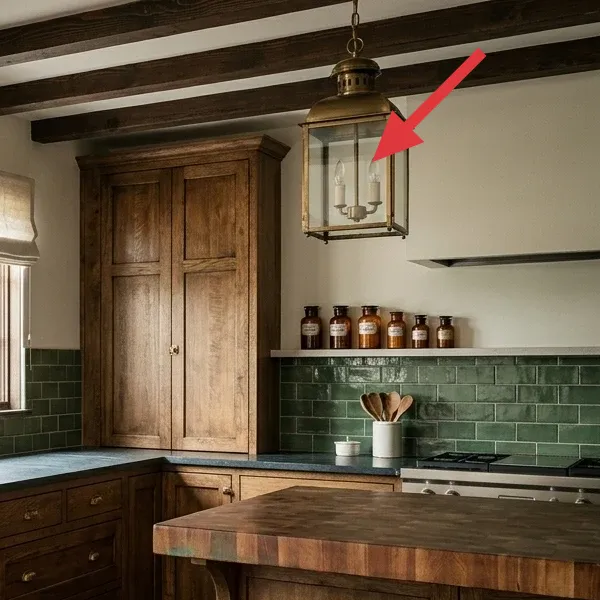
The brass lantern pendant light is a beautiful focal point, casting a warm glow and reinforcing the kitchen's vintage-inspired character. Its classic design and metallic finish add a touch of antique charm, creating an inviting ambiance, especially in the evenings.
Choosing a pendant that complements the room's hardware and other fixtures ensures a cohesive design. For homeowners, swapping out a basic ceiling fixture for something with more personality is a high-impact upgrade.
Enlist professional help for electrical work
While homeowners can often handle light fixture swaps, if you're uncomfortable with wiring or need to hard-wire a new sconce or pendant, it's always best to call a licensed electrician. Safety comes first, and a professional ensures correct and safe installation.
Layer 7 — Area Rug ($70) A soft landing with a touch of pattern
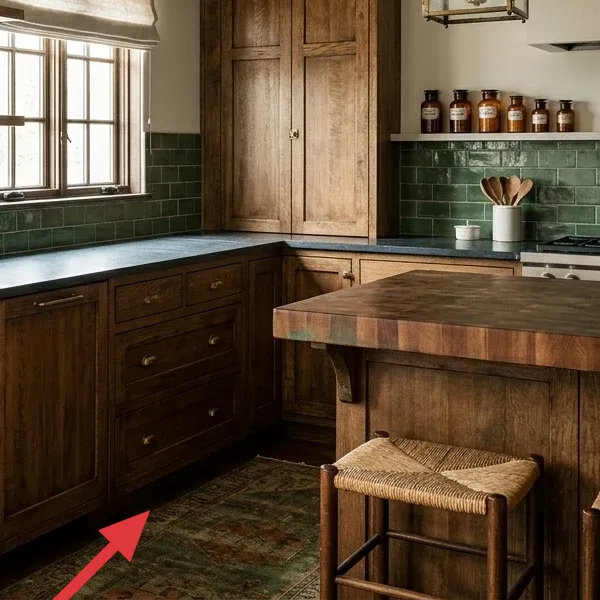
A small, distressed area rug introduces a soft texture and a subtle pattern to the floor, breaking up the expanse of wood and adding another layer of visual interest. The muted greens and earthy tones in the rug tie into the backsplash and overall color palette, enhancing the cozy, lived-in feel.
In a kitchen, a rug can also provide comfort underfoot during long periods of standing, making the space more functional and inviting.
Choose durability and easy cleaning for kitchen rugs
In a high-traffic area like a kitchen, opt for a rug made from durable, low-pile materials like wool or a synthetic blend that can withstand spills and frequent cleaning. Consider a rug pad to prevent slipping and add extra cushioning.
The cost, layer by layer
| Layer | Item | Cost |
|---|---|---|
| 1 | DIY Floating Shelves (wood, stain, sealant) | $30 |
| 2 | Peel-and-stick subway tile (20 sq ft) | $100 |
| 3 | Wood Cabinetry / Base Cabinets | $0 |
| 4 | Kitchen Island / Butcher Block | $0 |
| 5 | Linen-blend Roman Shade | $40 |
| 6 | Vintage-style lantern pendant light | $80 |
| 7 | Small distressed area rug (3x5 ft) | $70 |
| Total | $320 | |
For an even cheaper variant, consider using only one floating shelf instead of two, or opting for a less expensive, smaller area rug. You could also find a similar pendant light second-hand and rewire it yourself, potentially saving $20-30 more.
What worked, what didn't (across the whole room)
This kitchen refresh really brought a cohesive, custom feel to the space, balancing the traditional cabinetry with fresh, impactful updates. Here’s a rundown of what hit the mark and where we faced a few snags.
What worked
- The DIY floating shelves look genuinely custom and add much-needed display space for beautiful ceramics and cookbooks.
- The dark green backsplash tile provides a strong, earthy color anchor that makes the whole room feel richer.
- The choice of a simple Roman shade keeps the window area clean and bright while softening the light.
- The vintage-style pendant light instantly elevates the room's character, feeling much more expensive than it was.
- Combining the existing wood tones with the new green and brass accents created a warm, inviting, and timeless palette.
- Focusing on textures like the tile, wood grain, and linen added depth without needing more patterns.
- The project's phased approach made it manageable over a couple of weekends without feeling overwhelming.
What didn't
- Installing the floating shelf brackets perfectly level and into studs took more time and precision than anticipated.
- Peel-and-stick tile, while convenient, required careful alignment to avoid visible seams, especially with the slightly irregular edges.
- Finding the right shade of green tile that wasn't too bright or too dark was challenging; samples were essential.
- The existing kitchen island, while beautiful, felt a little isolated before the rug tied it into the rest of the floor.
- The initial plan for a larger area rug felt too dominant and made the space feel smaller; downsizing was the right call.
What we'd skip if we did it again
If we were to tackle this project again, we'd definitely skip the temptation to rush the backsplash installation. While peel-and-stick is faster than traditional tiling, taking the extra time for precise measurement and alignment of each piece, especially around corners and outlets, pays off significantly in the final look. A rushed job can lead to noticeable gaps or crooked lines that detract from the overall effect.
We'd also pass on trying to source a truly vintage pendant light without professional inspection or rewiring. While the charm is undeniable, the peace of mind that comes from a new, compliant fixture (even a vintage-style replica) that's safely installed outweighs the allure of a potentially faulty antique. It's an area where cutting corners on safety is simply not worth the risk.
Frequently asked
Can I use this budget for a full kitchen renovation?
No, this guide focuses on high-impact decorative and functional upgrades for under $350, not a full renovation which typically costs thousands of dollars. It's perfect for a refresh, not a rebuild.
Are power tools required for this project?
Yes, for the DIY floating shelves, a miter saw or circular saw is recommended for clean cuts. A drill is also essential for mounting brackets and wall anchors securely.
How durable is peel-and-stick tile for a kitchen backsplash?
Modern peel-and-stick tiles are surprisingly durable and water-resistant, making them suitable for backsplashes. Ensure the wall surface is clean and smooth for best adhesion, and avoid direct exposure to high heat from a commercial range.
What if my kitchen cabinets are a different color or material?
You can adapt this look by choosing a stain for your DIY shelves that complements your existing cabinetry, or consider painting your cabinets a deep green or creamy white to achieve a similar aesthetic, though cabinet painting would add to the overall budget.
Is it safe to install a new pendant light myself?
If you're comfortable with basic electrical wiring and can safely turn off power at the breaker, swapping a fixture is manageable. However, if you're unsure, or if new wiring is needed, always consult a licensed electrician for safety.
How can I make my DIY floating shelves look professionally installed?
The key is precise measurements, smooth sanding, and careful staining/sealing for a furniture-grade finish. Most importantly, use heavy-duty floating shelf brackets and ensure they are perfectly level and securely anchored into wall studs whenever possible.