
- Best for
- Shared-housing bedrooms that need to pack up
- Time
- 2–4 hours setup + optional DIY pressing time
- Total cost
- $400 for 7 layers
- Renter-safe
- No drilling; everything is removable/boxable
Why this bedroom is the bedroom of 2026
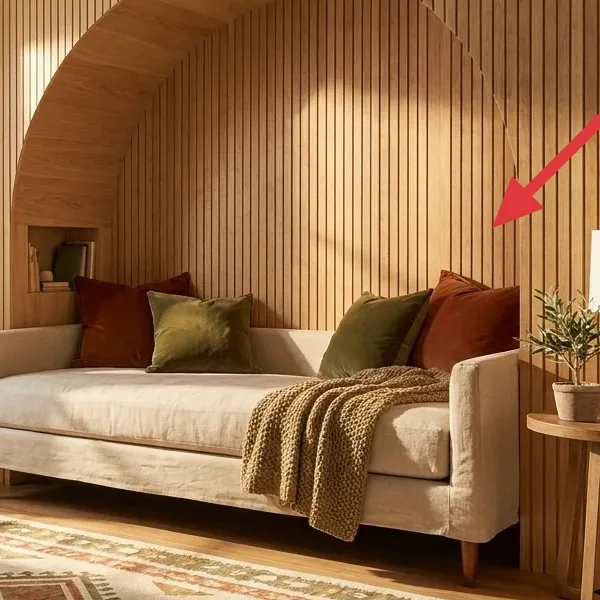
In this photo, the existing setup feels warm from the start—wood tones, gentle curves, and that arched headboard vibe—so the real job is adding “soft proof” that you live here. The 2026 look I keep seeing in design spreads (and in real shared houses) is texture-on-texture: woven rugs, linen-ish bedding, and drapery that hangs with weight rather than stiffness. Here, you get rattan/woven light overhead, a patterned floor anchor, and that easy-to-style green curtain color that reads calm in daylight. For shared-housing folks, the constraint is the opposite of a traditional renovation: everything must dismantle quickly and move with you, ideally in cardboard boxes. The good news? Rugs, curtains, lamps, frames, and plants are some of the most practical “pack-first” wins you can make.
The first time I tried to copy a similar look in college, I bought a gorgeous duvet—but it was too thin, and the whole bed looked like it belonged in a dorm photo, not a home. What changed my mind was swapping in a thicker cover and treating the bed like a layered outfit: base textile, then two pillow sizes, then one grounded throw that matches the rug. I also learned not to overthink the “theme.” If you keep repeating just one or two tones—like the olive-green in the curtains and the warm earth in the rug—you can mix pieces from thrift and mainline stores without it looking random. That’s what makes this style achievable for shared housing: it’s forgiving, and it packs.
Layer 1 — Area rug ($80) Pattern-first anchor for the whole room
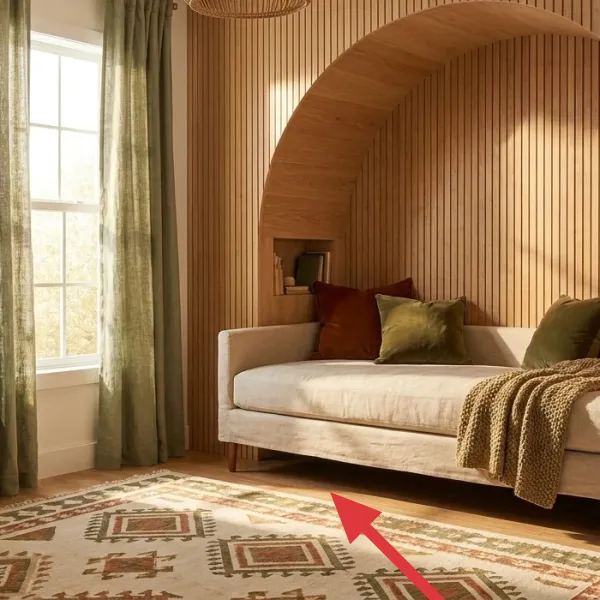
This patterned area rug sits across the bottom half of the room, with warm beige ground and earthy motif blocks in tan, olive, and rust. The pile looks low-to-medium, which matters in rentals because it stays easy to vacuum under and doesn’t trap every crumb like a shag. It’s also the layer that visually ties the bed zone to the window and the bedside.
In a shared apartment where you move soon, I’d rather spend on the rug than on “matching” furniture sets. A rug like this does double duty: it covers wear, adds pattern without you having to commit to wall painting, and it looks intentional even if everything else is thrift-mixed. The trade-off is practicality—choose a flat weave style so you can roll it for transport instead of fighting thick edges in a van.
Roll it, don’t fold it
Roll the rug with the pattern facing out, and tape it only with painter’s tape or removable fabric tape so you’re not stuck with sticky residue later.
Layer 2 — Curtains ($30) Sage-green drape that reads “soft”
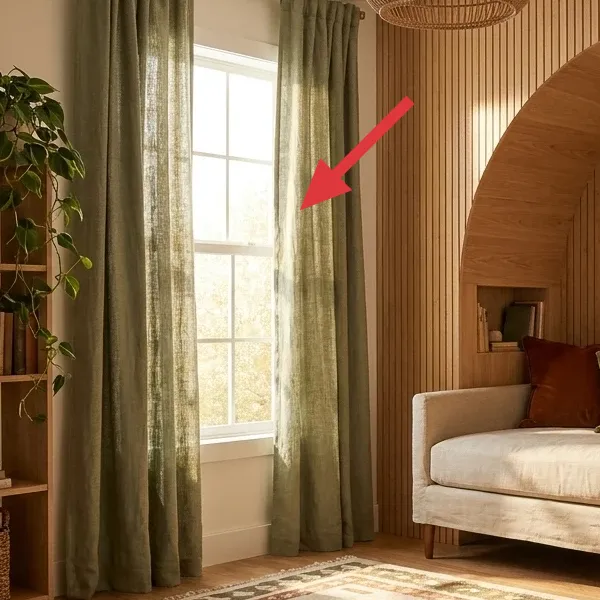
Two full-height curtains in a muted olive/sage green frame the window. They look semi-sheer at the brightest parts and more textured where the fabric overlaps, creating that calm, diffused effect behind the light. The way they pool slightly at the floor makes the room feel finished without adding anything heavy to carry.
I’d choose curtains over a decorative wall shelf here because curtains give you instant color and privacy while staying easy to box. The obvious alternative is blinds or roman shades, but those aren’t as flexible for a temporary room vibe. The trade-off: measure for length before you buy. Curtains that are too short make the whole room feel “off,” even if your bedding and rug are perfect.
Go for weight, not stiffness
Look for drapery fabric that hangs with a gentle bend. It photographs warmer and makes the window look taller.
Layer 3 — Bedding ensemble ($120) Duvet + two pillow scales + throw
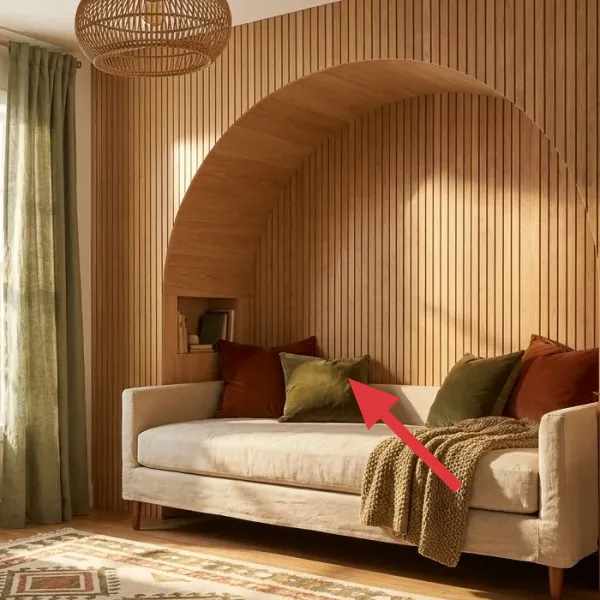
The bed styling is the heart of the photo: a light neutral duvet/bed cover, a cluster of pillows in rust and green tones, and a chunky textured throw draped near the foot. The bedding reads layered rather than matchy, which is why it looks styled even without complicated decor. Because the bed is the largest horizontal surface in your bedroom, small choices here change everything.
If you’re copying this look, skip the “all-white everything” approach. Instead, use one neutral base and add two accent colors that echo the rug and curtains—here, the green and rust tones show up again. The trade-off is laundry rhythm: layered bedding means more items to wash, but it’s still easier than moving bulky furniture. In shared housing, this is one of the best comfort-to-effort ratios you can make.
Match by tone, not by exact pattern
The pillows don’t need to be the same print as the rug—just repeat the olive/earth palette so the layers feel cohesive.
Layer 4 — Bedside table + lamp ($65) Plug-in glow with a warm wood footprint
On the right side, there’s a small wood bedside table and a cream/off-white lamp with a rounded shade. The lamp sits beside the bed linens, adding a warm, grounded vertical shape against the lighter wall and curtains. The table’s simple lines keep the look clean, so the rug pattern and bedding texture can do the visual work.
I prefer a separate bedside table and plug-in lamp in shared housing because it’s swap-friendly. The obvious alternative is relying on overhead light only, but you end up with harsh shadows when you’re reading, studying, or winding down. The trade-off is bulb choice: use a warm bulb so the lamp keeps that cozy tone instead of making the room feel flat.
Don’t buy a lamp with a cool-toned shade
If the shade is too gray/blue, it can clash with green curtains and make the bed look sallow in evening light.
Layer 5 — Pressed flower frame ($20) One botanical moment you can make in an afternoon
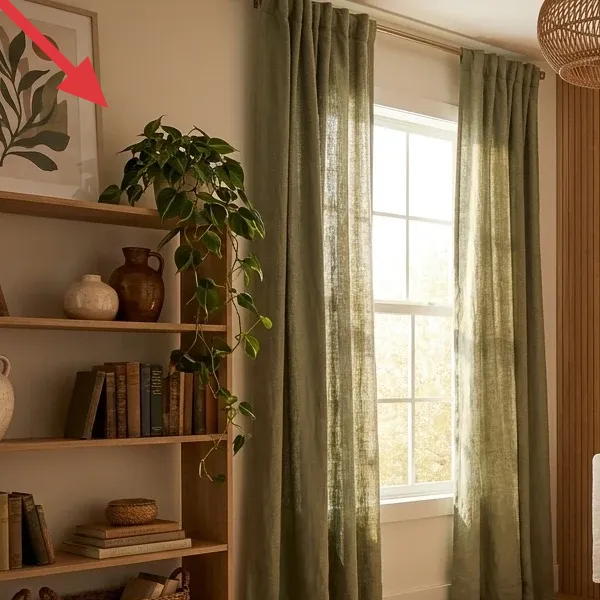
On the left wall shelf area, the framed botanical artwork brings a graphic, plant-inspired element to the room. It’s a light background with darker green leaf shapes, so it reads airy instead of heavy. As a layer, wall art is also one of the easiest things to pack: it’s flat, it boxes well, and it gives your bedroom that “I chose this” identity.
I’d pick a pressed-flower look over buying a new gallery set because it’s personal and you can scale it to your budget. The trade-off is that real flowers are seasonal, so your “design” is really a composition you build from what you can source. The upside? A DIY frame gives you a story for the room, and it doesn’t lock you into expensive wall decor that won’t survive moving day.
Make it instead of buying it
Build a simple pressed-flower print on cardstock, then slide it into a lightweight frame so it’s packable for the next lease.
Materials
- Cardstock (8.5x11, off-white) — 1 pack — Target — $6
- Frame (8x10, lightweight) — 1 — IKEA — $10
- Clear tape or tape runner — 1 roll — Walmart — $4
- Pressed leaves/flowers (saved or thrifted) — 1 small bundle — Etsy — $0
- Foam board or backing sheet — 1 sheet — Michael’s — $0
Steps
- Trim cardstock to fit behind the frame opening so it sits flat without buckling.
- Arrange pressed leaves on the cardstock first, moving them until the negative space looks balanced.
- Secure each leaf with tiny pieces of tape along the stem so nothing lifts when you move it.
- Place the finished cardstock into the frame backing and close the frame carefully to avoid shifting the botanicals.
- Check alignment by holding the frame at eye level; adjust any leaf that looks crooked.
- Wipe the glass lightly if needed and pack the frame in a towel-lined box for moving.
Total DIY cost: ~$20 — saves about $5 over buying a new framed print.
Layer 6 — Indoor plant on the shelf ($20) Trailing green that softens the corners

The plant appears on the left shelf area, with trailing vines spilling down toward the books. The leaves are glossy and medium green, which echoes the curtain color without looking like a perfect match. Visually, it breaks up the straight lines of books and shelves, adding an organic texture that makes the room feel lived-in.
I’d use a trailing plant here instead of another decorative object because greenery changes with time—new growth makes the shelf feel current, even when everything else stays the same. The trade-off is maintenance: plants need a basic watering routine, and in shared housing you want something that tolerates brief schedule gaps. Choose a plant that’s easy to propagate or share with a roommate later.
Prioritize portability
If you can, pick a pot with a stable base and keep it in the same container you’ll move. Soil spills during moving are not the vibe.
Layer 7 — Woven pendant light ($65) Warm overhead glow without new wiring

Above the bed zone, there’s a woven/raffia-style pendant shade with a dome shape. It creates a soft pattern of light, adding warmth to the room and making the ceiling area feel intentionally styled. This layer does a lot of mood work while remaining visually light—unlike bulky fixtures that require heavy installation.
I’m including this because lighting is where the “rented room” look often falls apart. Relying on one harsh ceiling source makes everything feel temporary; a warm pendant (or a plug-in hanging option) gives you a centered glow for studying, reading, and winding down. The trade-off: make sure the shade scale fits the bedroom so it doesn’t dwarf the bed area.
Use a warm bulb
Pick a 2700K warm bulb so the woven texture reads honey-golden instead of gray.
The cost, layer by layer
| Layer | Item | Cost |
|---|---|---|
| 1 | 5x7 area rug (flat weave) | $80 |
| 2 | Curtain panel pair (84 in) in sage/olive | $30 |
| 3a | Duvet cover (queen/light neutral) | $70 |
| 3b | Textured throw (woven/knit) | $25 |
| 3c | Pillow covers (2) | $25 |
| 4a | Bedside table (small wood) | $45 |
| 4b | Table lamp with cream shade | $20 |
| 5 | Pressed flower frame (8x10, lightweight) | $20 |
| 6 | Indoor trailing plant (small pot) | $20 |
| 7 | Woven pendant shade (replaceable) | $65 |
| Total | $400 | |
If you want a cheaper variant, swap the rug for a runner plus a small 3x5 grounding rug ($55 total) and keep the rest the same. You’ll lose some pattern impact, but the curtains, layered bedding, and one botanical frame still carry the “intentional bedroom” feeling. For shared housing, this is the kind of cut that doesn’t break the look.
What worked, what didn't (across the whole room)
The strongest wins here are the layers that create “depth” without permanent changes: the rug anchors the palette, the curtains add vertical softness, and the bed styling makes the room feel complete. The only places I’d tweak are where lighting and wall art can become either too matchy or too dark.
What worked
- The patterned rug ties the bed, window, and shelf into one zone, so mismatched pieces feel curated instead of random.
- Green curtains add a calm color note and make the window feel taller, even when the rest of the room stays neutral.
- Layered bedding with two pillow scales gives a hotel-like look without needing more furniture.
- The bedside lamp glow makes nighttime studying and reading less harsh than relying on overhead lighting alone.
- The pressed-flower frame brings a botanical accent that repeats the plant energy from the shelf.
- A trailing plant softens straight shelf lines and makes the room feel inhabited, not staged.
- The woven pendant adds cozy texture overhead, which helps the wood tones feel intentional.
What didn't
- If your rug is too high-pile, it won’t roll nicely for moving and becomes harder to vacuum around.
- Short curtains shrink the perceived window height, so the room can feel cramped even if the space is fine.
- Cool-toned bulbs under a warm-colored shade can make the green curtains look slightly gray.
- Buying a matching pillow set can look “boxed” instead of layered, especially with a patterned rug.
- Too many framed pieces in a small bedroom competes with the bed; one clear botanical moment reads better.
What we'd skip if we did it again
Skip the “everything matches” pillow strategy. When the rug is patterned and the curtains already bring color, a fully coordinated pillow set can erase the depth that makes this look feel lived-in. I’d rather keep two accent pillows in the palette and let the throw do the texture work. It’s one of those decisions you can feel immediately in person: the bed should look styled, not uniform.
Skip cheap curtains that don’t drape. Ultra-thin panels can look fine in daylight but fall flat at night because they don’t create the gentle folds you see here. If you only have a small budget, it’s better to buy fewer curtain inches (or one extra pair of fabric) than to choose a fabric that hangs like a bedsheet. Drapery fabric is one of the most noticeable “quality tells” in a rental.
Skip relying on overhead light alone. Even a pretty ceiling fixture can’t replace the cozy shadows from a lamp near the bed. The first time I got this wrong, I ended up reading on my bed with a glare that bounced off the duvet cover. A small bedside lamp is usually cheaper and more renter-safe than trying to add complicated lighting, and it changes how the room feels every day.
Frequently asked
How long does this refresh take?
Plan for 2–4 hours if your main steps are rug placement, bedding styling, and setting up curtains and a lamp. The pressed-flower frame can be an afternoon DIY if you already have flowers to press; if you’re starting from scratch, budget a separate day for pressing and drying. The overall timeline stays fast because you’re not replacing fixed fixtures—everything in the room updates through soft goods and portable decor.
What if I can’t change anything in the house?
This look is built around items you can take with you: a removable rug, curtains that hang without permanent installs, a framed print you can pack, and plants you can repot into your own container. If your lease is strict about wall hanging, you can rest the art on a shelf or use a frame-hanging method that matches your building rules. The goal is consistency: keep changes visible in your area, but reversible.
Will this work in a smaller bedroom?
Yes—just scale down thoughtfully. Use a rug that still anchors the bed zone (front edge or under the bed’s footprint), and keep curtains long so the window reads taller. For wall decor, one single botanical frame beats multiple small prints in tight spaces. The bed should remain the focal point, with accents that echo the rug and curtains so the room feels cohesive rather than cramped.
How do I scale this for a bigger room?
In a larger bedroom, start by increasing the rug size so the pattern supports the bed instead of stopping too short. For curtains, choose more fabric fullness so the drape still looks soft and “intentional,” not skimpy. You can also add one extra textured element to the bed styling—like an additional throw placement—so the bed doesn’t look minimal at a bigger scale.
Where would you shop differently in 2026 to stay renter-safe?
In 2026, I’d shop like this: mainline stores for reliable fabric fit (curtains and bedding), and thrift or independent sellers for the personal pieces (plants, frames, and sometimes even rugs if you can inspect pile and backing). The key is to avoid trend-driven wall decor that you can’t rehome later. Your best move is one DIY moment plus a few high-impact textiles.
What’s the single biggest mistake people make with this bedroom style?
The most common miss is not repeating tone across layers. If the rug’s colors don’t relate to the curtain green or your pillow accents, the room looks busy even when each item is individually pretty. Pick two anchor tones—like olive/green and warm earth/rust—and make sure bedding, curtain fabric, and the rug motif all orbit them.
What’s the best low-budget version of this look?
If you’re cutting the budget, prioritize the rug and bedding first. They set the mood and make the space feel “finished” even before you add everything else. Then keep the botanical frame as a DIY—pressed flowers are budget-friendly and personal—so you still get that wall moment without paying for framed art at full retail.
