
- Best for
- Adding warmth to a bright tile bathroom
- Cost
- Under $700
- Difficulty
- Confident DIY
- Time
- 2 weekends
Why bright white tile and terracotta accents is the bathroom vanity nook of 2026
The mix here is already doing the hard work: crisp white subway tile, a cool green mosaic shower surround, and warm wood from the vanity and shelf. Where most bathrooms go bland is at the floor and the “landing zone” around the sink, so that’s the part worth upgrading first. A brown terracotta bath mat adds color that echoes the wood tones, while the linen towel gives that lived-in texture you don’t get from décor alone. You’ll also notice how the open vanity shelf and wicker basket create breathing room instead of clutter.
My own mistake in a past bathroom refresh was going too matchy—trying to blend everything into the tile. The room looked neat, but it didn’t feel finished. What changed my mind was adding one warm textile and one natural texture that repeat the same warmth as the wood. Once I did that, the white tile stopped feeling cold and the whole corner started reading as one cohesive spot.
Layer 1 — Brown terracotta bath mat ($50) Grounds the floor in warm color
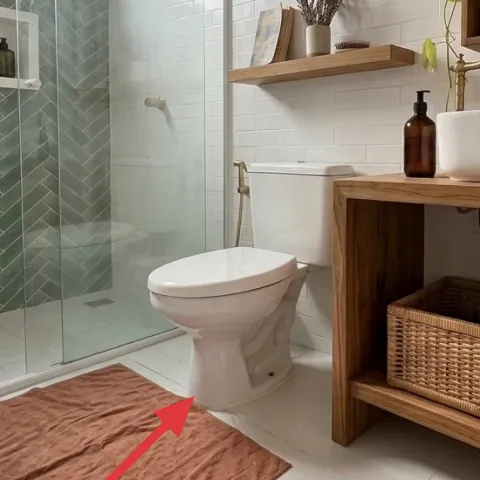
This brown terracotta bath mat sits right where your feet land, so it’s the fastest way to soften the look of the white tile. It also bridges the gap between the cool green shower surround and the warm wood vanity, which helps the whole bathroom feel intentional instead of “pick-a-theme.” The key trade-off is practical: you want a mat that’s flat enough to stay put and not curl at the edges after washing. If you’re buying, prioritize a fabric that wipes clean easily and feels substantial when you step on it.
Pick a mat with a low pile
Low pile stays tidy on tile and won’t fight the edges of the shower area.
Layer 2 — Wood-framed mirror ($120) Brings the warm cue to eye level
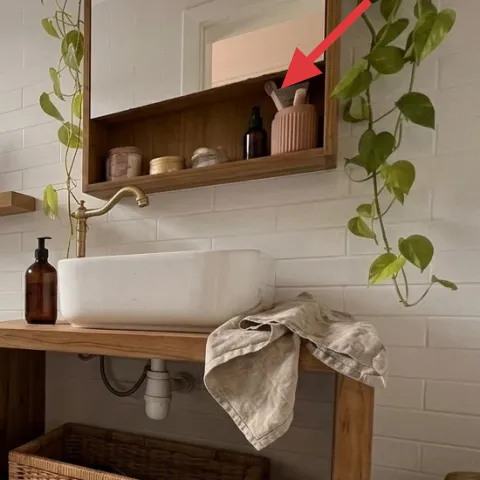
The wood-framed mirror is what turns the vanity nook into a “moment” rather than just plumbing and tile. Because it’s at eye level, it reflects both the white subway tile and the warm tones from the vanity shelf, making the space feel brighter without adding more objects. The trade-off vs. a frameless mirror is space: a frame is a little visually heavier, so it only works when the wood matches or complements the vanity and shelf. Here, the brass faucet and warm shelf styling make that cohesion effortless.
Match the finish, not the exact wood
A slightly different wood tone can still look right if the undertones (warm vs. cool) line up.
Layer 3 — Wood vanity with open lower shelf ($300) The centerpiece you can refresh with paint
This wood vanity is the whole room’s warmth engine: it anchors the brass faucet, ties into the wood shelf, and gives you that natural texture contrast against slick white subway tile. The open lower shelf plus wicker basket also creates a practical “storage but still airy” zone, which is perfect for bathrooms that never stay perfectly tidy. The big trade-off is that wood shows every scuff and water mark, so it’s worth treating the surface as a finishing project. Painting the vanity lets you keep the structure you already have while changing the tone to feel fresher and cleaner.
Make it instead of buying it
Give the wood vanity a new painted finish so it reads brighter and more intentional, without replacing the whole piece.
Materials
- Bonding primer (for wood) — 1 qt — home center — $70
- Cabinet-and-trim paint (semi-gloss or satin) — 1 qt — home center — $60
- Sandpaper (medium + fine) — assorted — hardware store — $12
- Tack cloth — 1 pack — hardware store — $8
- Angle brush + foam mini roller — 1 set — hardware store — $10
Steps
- Clean the vanity thoroughly with a degreaser, then let it fully dry.
- Scuff-sand to rough up the surface for primer adhesion.
- Wipe with tack cloth to remove dust.
- Apply bonding primer in thin, even coats and let it cure.
- Lightly sand the primed surface for a smooth topcoat.
- Roll and brush on the first paint coat, then let it cure.
- Add a second paint coat for full coverage and crisp edges.
- After final cure, reinstall any towels/accessories and test wipe-clean.
Total DIY cost: $160 — saves about $140 over buying.
Layer 4 — Brass faucet on sink ($80) Adds warm shine without changing tile
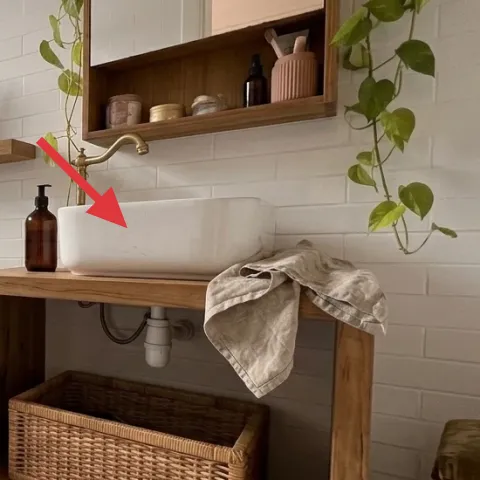
The brass faucet is a small object, but it acts like jewelry for the vanity nook. Warm metal catches the light that bounces off white subway tile, so the whole sink area feels more polished even when the rest of the room stays simple. The reason to keep or upgrade it here is simple: it repeats the warm wood tone and balances the cool green shower tiles. If you swap it, go for a consistent finish (brass or brushed brass) so you don’t end up with mixed metals. The trade-off is that brass shows water spots—quick wipes after use will keep it looking intentional.
Don’t mix metal finishes unless the room has a reason
If the rest of the bathroom is silver, brass can start looking accidental instead of coordinated.
Layer 5 — Wood bathroom wall shelf with bottles ($60) Gives the corner a styled top layer
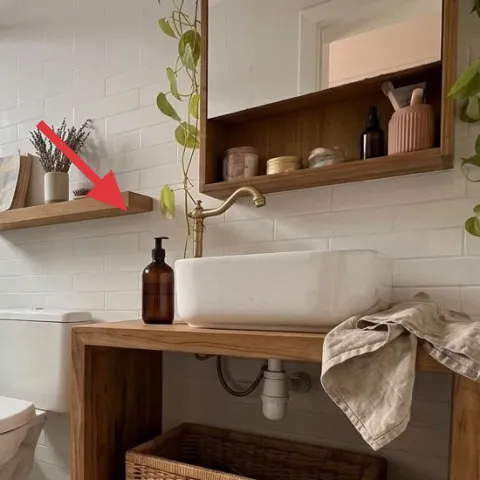
This wood wall shelf is the vertical “pause” above the sink, and it’s what turns storage into décor without adding clutter to the countertop. The glass bottles and the small ceramic vase bring different shapes, so the shelf reads styled even when you’re only keeping everyday items up there. Choosing a shelf like this is about scale: too small feels unfinished, too large blocks the mirror. The trade-off is spacing—shelves collect moisture and splashes, so wipe the underside and keep heavy items toward the back edge.
Style in odd numbers across the shelf depth
Grouping three items with one taller piece helps the shelf look balanced.
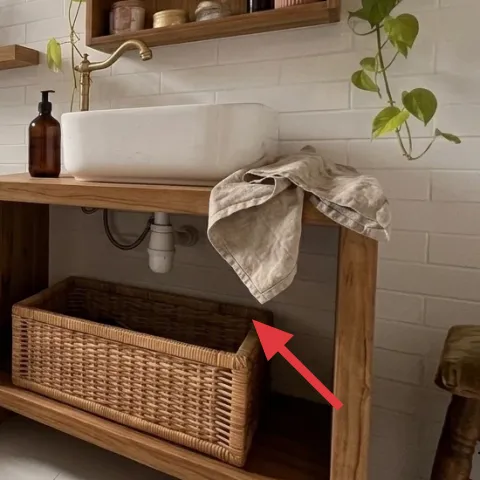
Layer 6 — Wicker basket on vanity shelf ($35) Stores small stuff with texture
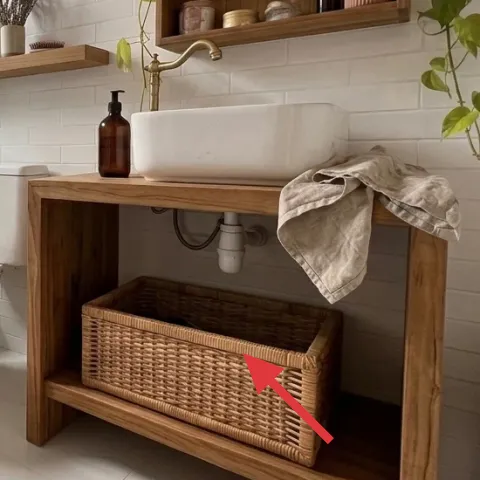
The wicker basket on the open lower shelf is where practicality meets texture. It hides the “bathroom extras” so you’re not relying on perfect folding, but it still looks light thanks to the open weave. That’s important in compact bathrooms: closed bins can make a vanity feel bulky, while wicker keeps the nook airy. If you’re buying, pick a basket that fits the shelf depth so it doesn’t snag on towels or drift forward. The visual trade-off is that wicker is more delicate than plastic—avoid overloading it with wet items.
Use it for dry, grab-and-go items
Think backups, spare cloths, and toiletries you reach for daily.
Layer 7 — Trailing vine plant with green leaves ($35) Softens the hard lines

The trailing vine plant drapes over the right edge, and that movement is the antidote to all the hard edges in this bathroom—tile lines, glass panels, and the flat planes of the vanity. It also ties the green shower surround to the styling, so the bathroom looks like it’s meant to have color instead of accidentally matching. This is the layer that makes the nook feel lived-in, not staged. The trade-off is light and maintenance: bathrooms can be bright, but they can also be humid, so choose a hardy plant and wipe leaves if steam builds up.
Pin the vine so it trails the same way every day
Lightly train the stems toward the corner for a consistent drape.
The cost, layer by layer
| Layer | Item | Cost |
|---|---|---|
| 1 | Brown terracotta bath mat | $50 |
| 2 | Wood-framed mirror | $120 |
| 3 | Wood vanity with open lower shelf | $300 |
| 4 | Brass faucet on sink | $80 |
| 5 | Wood bathroom wall shelf with bottles | $60 |
| 6 | Wicker basket on vanity shelf | $35 |
| 7 | Trailing vine plant with green leaves | $35 |
| Total | $680 | |
If you want a cheaper version, keep the mirror and vanity and spend on textiles first: a slightly bolder bath mat, a fresh towel, and a simpler basket. You can also swap the plant for a lower-maintenance tabletop option and keep the shelf styling minimal.
What worked, what didn't (across the whole room)
The overall win is how the warm wood and wicker textures balance the bright white tile and cool green shower surround. Focusing upgrades around the vanity nook made the space feel finished without touching anything structural.
What worked
- The terracotta bath mat warms the white tile so the floor doesn’t feel stark.
- The wood-framed mirror brings the warm cue to eye level and brightens the sink area.
- Painting the vanity (instead of replacing it) keeps the layout and changes the tone fast.
- Brass hardware repeats the wood warmth and adds light-catching detail.
- The wicker basket keeps everyday items contained while staying visually light.
- The trailing vine adds organic softness that matches the green shower color family.
What didn't
- Too much product on the wall shelf quickly looks messy against glossy tile.
- Overloading the wicker basket can tip it forward and snag when grabbing towels.
- Mixed metal finishes can read accidental next to brass details.
- Skipping quick wipes after use makes brass look spotty against bright surfaces.
What we'd skip if we did it again
Skip changing the shower tile or doing any bathroom-demo projects on a weekend. This room already has a strong base with white subway tile and a green mosaic surround; the payoff comes from styling and one focused finish change.
Skip a second mismatched hardware finish. If brass is already in the faucet and hook area, keep everything in the same family so the nook reads coordinated instead of busy.
Skip extra décor that crowds the countertop. With a vanity that already has open storage, the better move is one warm textile (bath mat + towel) and a single styled shelf arrangement.
Frequently asked
How long does this kind of bathroom refresh take?
Plan for about 6–10 hours of shopping, swaps, and styling, plus extra time if you’re painting the wood vanity. Painting usually works best across two sessions: prep one day and let coats cure between. If you’re keeping the same mirror and faucet, the project timeline stays very weekend-friendly.
What if I rent and can’t paint the vanity?
In a rental, skip the painted-vanity DIY and still get most of the look with textiles and styling: a terracotta bath mat, a refreshed linen towel, and a wicker basket that keeps small items hidden. You can also keep the wood shelf and simply re-style the bottles and vase in a tighter arrangement.
My bathroom is smaller—can I still do the same layers?
Yes, but keep each layer low-profile. Prioritize the bath mat, mirror, and faucet shine, then use only one storage texture (the wicker basket). For the plant, choose a vine that trails without sprawling, or keep the plant just out of the direct splash zone.
What if my bathroom has a different tile color than the photo?
Use the same logic: repeat one warm cue and one natural texture. If your tile is cooler, keep the warm wood and terracotta textile contrast. If your tile already feels warm, go lighter with the mat color and let the brass/hardware detail supply the “spark.”
Where should I shop for the mirror, mat, and basket?
For under-$700 projects, mix sources. Look for the mat and basket in home goods stores or online marketplaces with washable options. For the wood-framed mirror and brass faucet, check home-improvement retailers first, then browse local thrift or salvage for the mirror frame if you want to save.
What’s the biggest mistake people make in bathrooms like this?
Overcrowding the sink zone. Bathrooms read best when the countertop and lower shelf feel intentional, not accidental. Choose one anchor textile (bath mat), one warm-reflecting surface (mirror), and one storage texture (wicker). Everything else should support, not compete.
More in Bathroom

How to refresh a bathroom for under $700 with 7 quick swaps
A bathroom vanity nook can feel brand-new without a gut: swap in a terracotta bath mat, keep the brass faucet and mirror, and refresh the w…
7 renter-safe bathroom swaps for a $400 vanity corner
A bathroom vanity corner can look intentional without drilling or permanent changes. For a $400 refresh, these 7 renter-friendly swaps—rug,…
What $300 buys: a bathroom nook refresh with 7 swaps
A move-friendly bathroom nook refresh built from 7 swaps focused on a distressed bath rug, a brown towel, a candle on the counter, and warm…