- Season
- Spring through early fall (warm nights)
- Weatherproof
- Choose outdoor-rated bulbs + keep cords protected from rain exposure
- Cost
- Under $700 ($700 total)
- Difficulty
- Easy-to-moderate (about 3–5 hours for the full refresh)
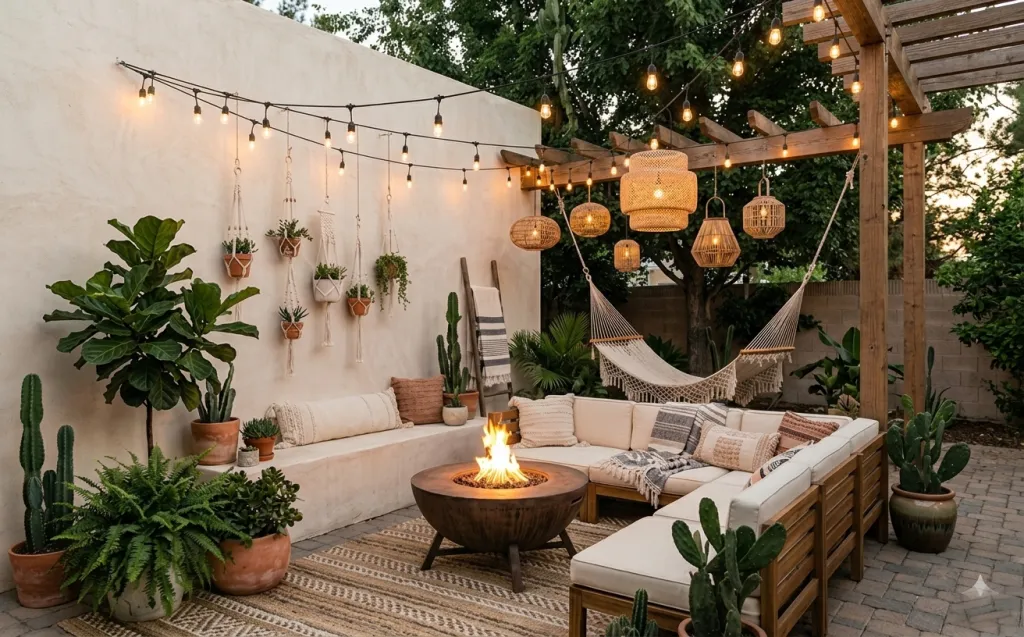
Why warm bulbs and desert greens are the outdoor patio of 2026
Outdoor spaces are getting the same “designed” treatment we used to reserve for living rooms, and this patio is a perfect example. The vibe comes from a tight palette—stucco off-white, clay terracotta, warm tan, and deep green—then repeating texture on purpose: woven rope, a flatwoven rug, and macramé cord. That repetition is exactly what you see in 2026 spreads from design-led brands—one anchor, then layered materials that play well together in natural light. A plug-in string-light set like this is also surprisingly practical: most LED sets use very little power, so you’re mostly paying for vibes, not electricity. For renters, this is achievable because the “architecture” is already there (wall + pergola), and the refresh uses removable styling and portable furniture.
When I tried a version of this look in my own rental, my first mistake was treating it like “outdoor shopping”—I bought random plants and called it done. The patio still looked fine, but it didn’t feel finished until I added the overhead warm bulbs and centered everything around a single fire-pit moment. I also learned to keep plant heights varied (tall cactus in back, broad-leaf greenery in front) instead of buying only the same size. The result is calmer and more intentional in photos, and—honestly—more relaxing to sit in. If you’re moving soon, I’d rather spend on portable anchors (rug, seating cushions, hanging décor) than on anything that would require permission.
Layer 1 — Plug-in outdoor string lights ($45) Warm-glass bulbs on one hanging line
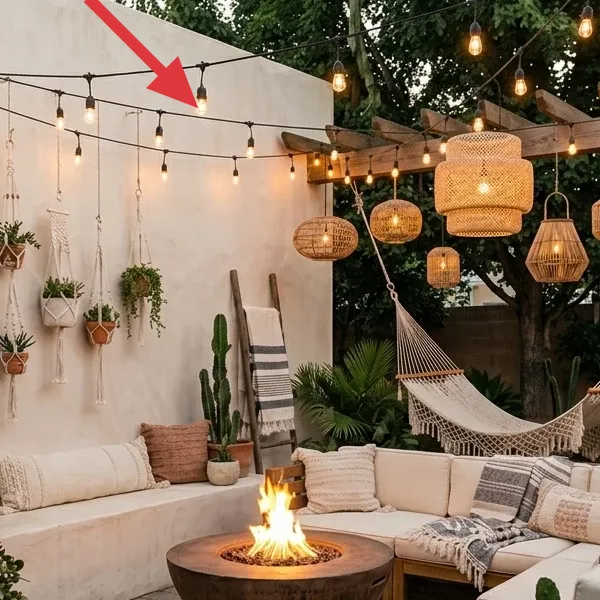
These plug-in string lights stretch across the upper patio area with small warm-glass bulbs and a tidy black cord framework. You can see multiple bulb sizes and shades, which gives the glow a little movement instead of a flat, uniform line. The lights also echo the patio’s natural wood tones under the pergola. Everything reads as “cozy overhead,” even before you add furniture.
String lights are the cheat code here because they turn the ceiling/pergola area into a visual anchor without touching the wall. The trade-off is scale: if you hang them too low, the bulbs compete with plants and cushions; too high, and they feel decorative instead of immersive. In this setup, they land in the “pergola zone,” so they frame the seating and fire pit together. If you’re aiming for renter-safe styling, plug-in lights beat hardwired fixtures every time.
Do place the busiest bulbs above the fire pit zone
That way your eye lands on the center of the conversation, not on whichever bulb happens to be closest to the camera.
Layer 2 — Outdoor sectional cushions ($260) Thrifted wood-frame seating with weather-ready pads
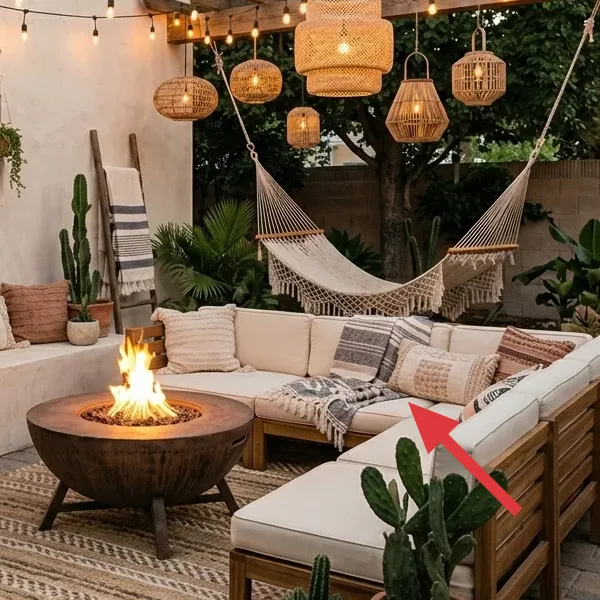
The main seating is a low outdoor sectional with a light beige cushion set and a wooden structure underneath. It sits along the patio wall, creating a built-in-feeling perimeter without needing you to install anything. The cushions look thick and supportive, and the seat depth invites lounging rather than quick visits. There are also coordinating throw pillows that add pattern and softness.
This works because the patio already has a strong neutral background, so the seating brings the warm “living room” comfort. I’d skip a tall, delicate outdoor bench here: the patterned rug and hanging décor need a grounded, substantial base. The compromise is cost and storage—cushions are bulky—but choosing a modular sectional lets you pack pieces away neatly instead of hunting for a single perfect matching set every time.
Why this cushion color stays timeless outdoors
That creamy tone plays well with terracotta pots and green plants, so you can swap pillows or macramé later without changing the whole palette.
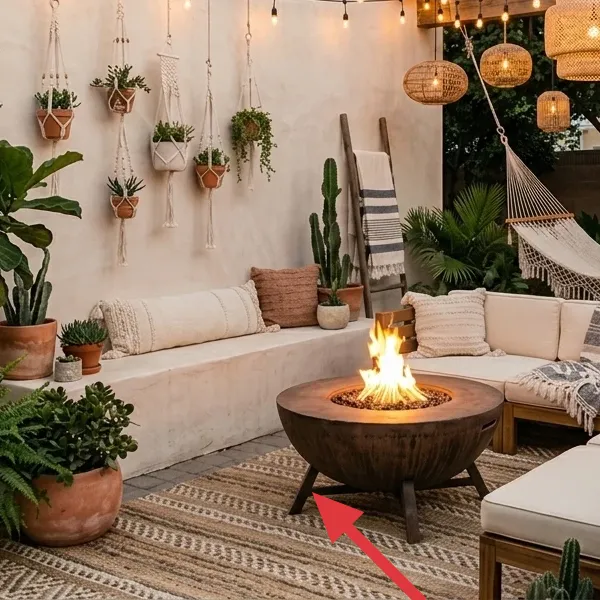
Layer 3 — Fire pit bowl ($95) Bowl-style flame center with lava rocks

The fire pit is a round, bowl-like metal feature with visible flames and a dark base. It sits on the patio floor between the seating sections, acting like a small hearth that visually “finishes” the lounge. Even with the rest of the styling going on, the fire pit reads as a single focal point thanks to its shape and the bright orange movement inside.
Around-fire moments are more design-effective than they sound: the flame adds a warm color accent that your plants and rug can borrow from. I’d choose a bowl-style pit over a long burner because the circular silhouette matches the rug’s woven rhythm and doesn’t fight the linear look of the string lights. Safety-wise, keep it on a stable surface away from loose rugs or overhanging cords. You’re buying ambience, but the right footprint matters.
Center your fire pit so it “stitches” rug and seating
If it sits off to one side, the room feels unbalanced—even when everything else matches.
Layer 4 — Rope hammock ($65) Hanging fabric seat with relaxed drape
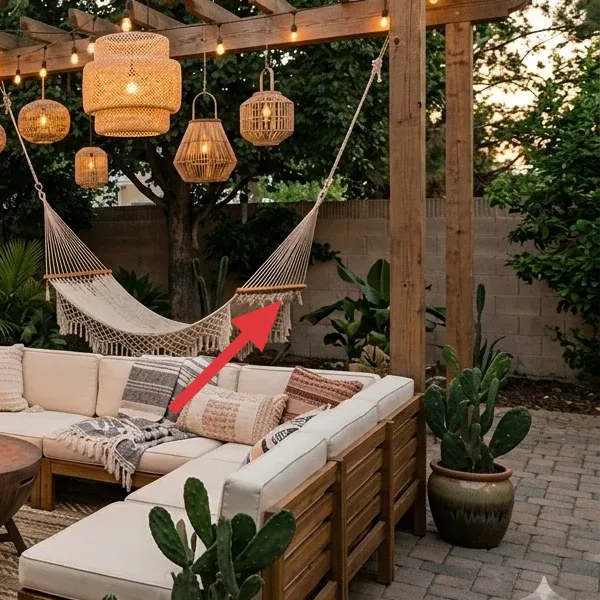
This hammock is a rope-and-fabric style with a scalloped, slightly textured drape and hanging ends secured to overhead structure. It adds vertical interest on the right side and softens the patio’s straight lines—especially the pergola beams. The hammock’s neutral tone blends with the cushions and rug, while the weave texture brings that tactile, boho energy the rest of the styling uses.
I like hammocks here more than an extra lounge chair because they add “swinging” dimension without adding more floor clutter. The trade-off is that hammocks need proper clearance so people can move their legs and feet safely. If you’re renting and can’t drill, look for a hammock that suspends from existing beams or a freestanding setup—anything that can be removed without leaving hardware behind.
Match hammock hardware to what’s already overhead
In this photo, the hammock hangs from the patio structure, so keep it similarly anchored for a clean look.
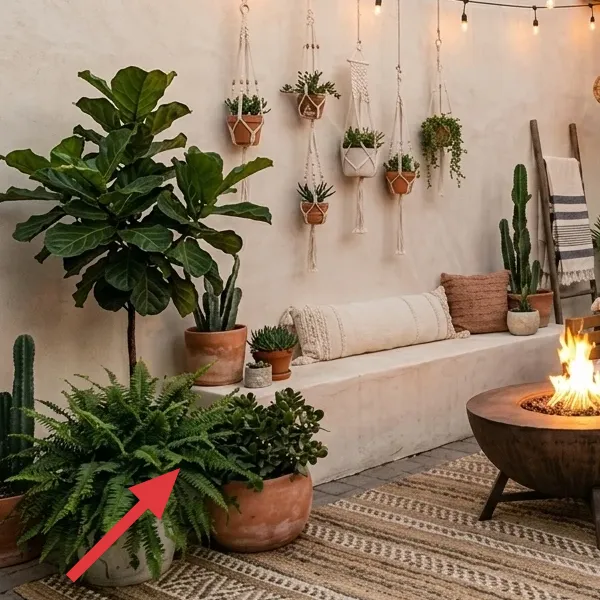
Layer 5 — Potted plants ($120) Mix of cactus + broad-leaf greenery
The plants do a lot of heavy lifting here: you’ve got big broad-leaf greenery in terracotta planters, plus tall cactus silhouettes for vertical contrast. The grouping is intentionally uneven—different heights, different leaf textures, and different pot shapes—so the patio looks layered instead of “one plant repeated.” The greens also counterbalance the warm beige cushions and tan rug underfoot.
I’d rather mix plant types than buy only matching planters, because the variety creates a natural desert-meets-garden rhythm. The trade-off is care: cacti need drier soil than broad-leaf plants, so you may need to water strategically or keep separate soil mixes. Still, this is one of the easiest renter wins—plants are portable, and you can swap the whole set later without redoing the rest of the decor.
Use terracotta as the “common denominator”
When your pots share a material, the garden looks curated even when the plants are different.
Layer 6 — Area rug ($95) Rug-and-pad combo for cozy footing
The rug is a flatwoven, patterned outdoor style that anchors the seating zone. It sits beneath the seating and extends toward the fire pit area, so it visually “collects” everything in the lounge. The pattern is warm and neutral—think tan stripes and earthy motifs—so it doesn’t compete with the string lights or the macramé wall décor. Even in a busy photo, the rug reads as the steady base.
This works better than a solid outdoor mat because the pattern echoes the texture trend throughout the patio. I’d skip super-thin rugs here: they look great in store lighting but slide under foot and feel less finished once the hammock and cushion movement start. Pairing with a non-slip rug pad is the hidden upgrade that keeps the rug in place without any drilling or permanent fixes.
Don’t rely on the rug alone to prevent slipping
On a patio floor, woven rugs can shift fast—use a rug pad so you’re not constantly readjusting it.
Layer 7 — Macramé plant hanger ($20) Cord-and-dowel mini garden for the stucco wall
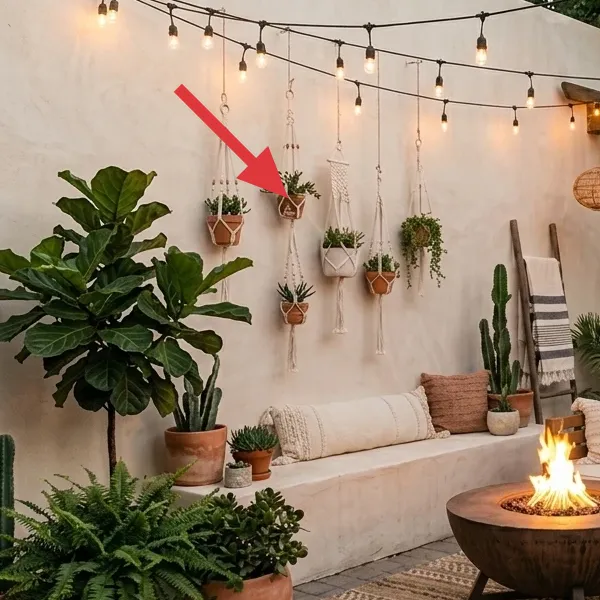
You can see multiple small macramé hangers attached to the stucco wall, each holding a tiny terracotta pot. The cords create vertical lines that break up the large, smooth wall surface, and the plant-filled centers add small bursts of green. The overall effect is “curated plant wall” without needing built-in shelving.
This earns its place because it adds texture in a vertical direction, which string lights and plants already do—but in different ways. Instead of another horizontal décor element, macramé gives you layered height that makes the patio feel deeper. The downside is weight and placement: Command-style mounting only works if you keep the hangers light and attach where the wall surface holds well. Still, a single DIY hanger is doable for renters and looks intentional even if you start with one.
Make it instead of buying it
DIY one small macramé hanger (cord + dowel + lightweight hook) and add a tiny terracotta pot so it matches the wall décor in the photo.
Materials
- Macramé cotton cord — 3 mm, 60 ft roll — Walmart — $6
- Wooden dowel — 1/2 in x 10 in — Home Depot — $2
- Command hook pack — pack of 2 — Amazon — $8
- Small terracotta pot — 4 in — Walmart — $4
Steps
- Cut 8 equal cord lengths (for example, 10–12 in each for a compact hanger) and line them up on a flat surface.
- Wrap the cord lengths over the dowel and tie a tight gathering knot so the top edge looks even.
- Space the cords into 4 pairs and knot a simple spiral/alternating knot pattern down each pair (keep tension consistent).
- Stop the knotting about 2–3 in above where you want the pot to sit, then fan the cords back together.
- Use the cord ends to create a small loop for hanging, then press and attach the Command hook to the stucco wall according to the package directions.
- Hang the dowel, lower the pot into position, and tie any loose ends so the pot sits centered.
Total DIY cost: $20 — saves about $15 compared with a ready-made macramé planter hanger.
The cost, layer by layer
| Layer | Item | Cost |
|---|---|---|
| 1 | Plug-in outdoor string lights (set) | $45 |
| 2 | Thrifted outdoor sectional with cushions | $260 |
| 3a | Fire pit bowl | $80 |
| 3b | Lava rocks + small poker set | $15 |
| 4 | Rope hammock with hanging straps | $65 |
| 5a | Assorted potted succulents and cacti | $90 |
| 5b | Cactus soil + slow-release fertilizer | $30 |
| 6a | Outdoor rug 5x7 | $80 |
| 6b | Non-slip rug pad | $15 |
| 7a | Macramé cotton cord (60 ft) | $6 |
| 7b | Wooden dowel (1/2 in x 10 in) | $2 |
| 7c | Command hook pack (2) | $8 |
| 7d | Small terracotta pot (4 in) | $4 |
| Total | $700 | |
If you want a cheaper version, keep the string lights and rug, but swap the hammock for a single outdoor day cushion (thrifted) and start with fewer plants—two statement planters instead of six to eight small ones. The look still works because the “frame” (overhead glow + woven base) is intact; the plants just scale down. You can also buy fewer cushions and add one extra throw pillow set after your first grocery-store plant run.
What worked, what didn't (across the whole room)
Overall, this patio hits the sweet spot: warm overhead light, layered texture, and a clear center-of-attention. The biggest gains come from repeating materials (cord, terracotta, woven fibers) and keeping the furniture low so the eye can travel upward through the string lights and macramé.
What worked
- The plug-in string lights create a “ceiling glow” effect without changing anything structural, which is ideal for renters who move often.
- The fire pit bowl anchors the whole grouping, making the seating zone feel intentional instead of randomly placed patio furniture.
- Macramé planters solve the blank-stucco problem by adding vertical texture where shelves would be too permanent for a lease.
- The flatwoven outdoor rug keeps footing cozy and adds pattern so the patio looks styled in photos.
- Layering cactus silhouettes with broad-leaf greenery makes the planting feel curated, not accidental.
- The hammock adds softness and height variation, which balances the straight lines of the pergola beams.
What didn't
- Starting with too many similar plant sizes makes the wall and seating look flat; the photo’s height mix is the real fix.
- If your rug pad is missing, the rug shifts and disrupts the whole “collected” look around the fire pit.
- Hanging anything heavy from removable wall hardware can be risky—keep plant hangers lightweight or use the hammock/overhead points instead.
- Too many different colors in the cushions will fight the warm bulbs, so the cream/tan base is doing a lot of work.
- If you choose a hammock in a cooler gray/blue, it can feel disconnected from the terracotta and string-light warmth.
What we'd skip if we did it again
Skip a “copy-paste” approach to plants. It’s tempting to buy a whole matching set of potted greenery, but this photo works because heights and leaf textures differ on purpose. If you do it again, buy fewer plants first, then add one tall cactus silhouette and one broad-leaf planter to create contrast. That’s the easiest way to make the patio feel styled on day one, even before everything fills in.
Skip a hammock with rigid, bulky hardware. In a renter setup, you want the hammock to look light visually and be easy to remove. A heavy, complicated mounting system can also force you into permanent installation decisions. If you’re choosing your hammock again, prioritize rope or fabric looks with simple hanging straps that work with existing overhead structure.
Skip patterned rugs that compete with the wall décor. The macramé hangers and hanging lights already add visual motion upward, so the rug’s job is to ground the patio. A woven tan-and-cream rug keeps the palette cohesive and lets plants provide the color. If you want to experiment, do it with the pillows or one plant grouping—not with the rug pattern itself.
Frequently asked
How long does this patio refresh usually take?
Most of the time is in sourcing the big pieces: the rug, seating cushions, and the hammock. If you’re thrifting the seating and buying one rug + plant grouping, plan for roughly 1–2 shopping sessions and 2–3 hours of setup total. The DIY macramé hanger itself takes about an hour once you’re cutting cord and knotting, plus a little extra time to line up the cord lengths evenly. If you’re adding multiple macramé hangers, do one first, judge the spacing, then repeat—your second one usually goes faster.
I’m renting—what if I can’t drill into the patio or wall?
This look is built around renter-friendly choices: plug-in string lights, freestanding furniture (rug + seating), and removable hanging décor. For anything that goes on the stucco wall, keep it light and use removable hardware like Command-style hooks that are designed for temporary placement. For the hammock, use existing overhead structure if the patio already has beams, or choose a freestanding hammock stand that doesn’t require wall or beam drilling. The key is to avoid anything that leaves permanent holes, and to make sure the removable hardware can actually handle the weight.
How do I make it work in a smaller patio or balcony?
Scale the “frame” first. Keep the string lights (they create vertical wow even in a small area) and choose a rug that’s appropriately sized for your seating cluster—often a 4x6 or smaller 5x7 depending on layout. Instead of a full sectional, use one low outdoor loveseat or even a bench with cushions. For plants, pick two to three planters max and focus on height contrast: one tall cactus, one broad-leaf planter, and one small accent. Macramé can still work—use fewer hangers so the wall doesn’t feel overcrowded.
Where should I shop differently in 2026 to keep the budget realistic?
In 2026, the easiest way to stay on budget is to split sourcing: buy the lighting and rug new if you can (because you want consistent quality and safer outdoor materials), then thrift the furniture and sometimes the cushions. For string lights, look for LED outdoor sets that are plug-in and include clips. For seating, prioritize solid frame pieces and swap in fresh cushion covers if you need them. For plants, mix one store-bought “anchor” planter with a few thrift or clearance small succulents. That mix lets you build the layered look without paying full price for every pot.
What’s the single biggest mistake people make on outdoor patio styling like this?
They underestimate how important the center focal point is. Without a central moment—fire pit bowl or similar focal grouping—the patio feels like separate items instead of one lounge. Start by placing the rug and centering the fire pit relative to the seating. Then hang the string lights so the glow visually wraps the same area. Only after that should you fill in hammock placement and plants. When you build in that order, the patio reads “designed” even from far away.
Can I keep the macramé look without damaging the wall at move-out?
Yes—just treat macramé like temporary styling. Use a removable hook system and keep the hanger light, so you’re not tempted to over-tighten or add extra support hardware. When it’s time to move, remove the hook carefully and clean the spot according to the hardware instructions. If you’re nervous, test the hook on a less visible area first. Also, consider doing one macramé hanger as your “signature” and leaving the rest for the next place—this look photographs beautifully even with just one or two hangers.
