
- Best for
- Move-friendly outdoor styling
- Cost
- Under $300
- Difficulty
- Easy
- Time
- 1–2 afternoons
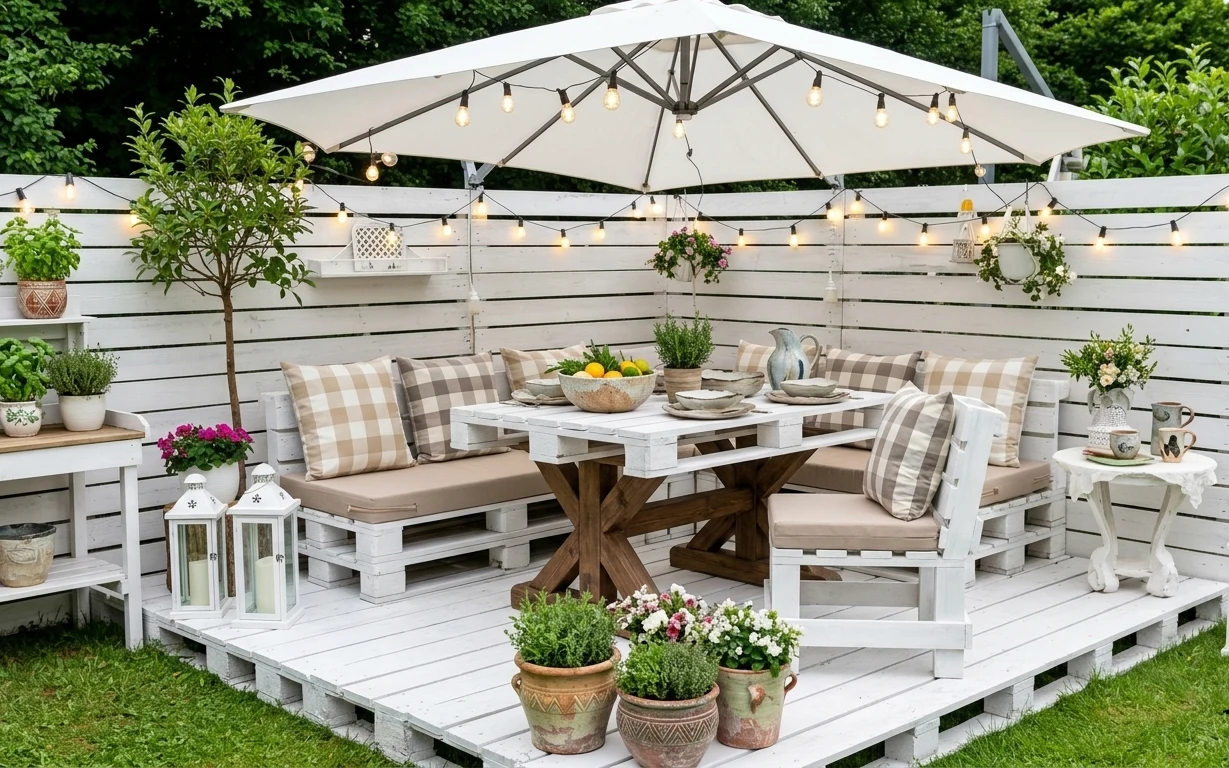
Why olive-and-cream textiles are the pallet patio nook of 2026
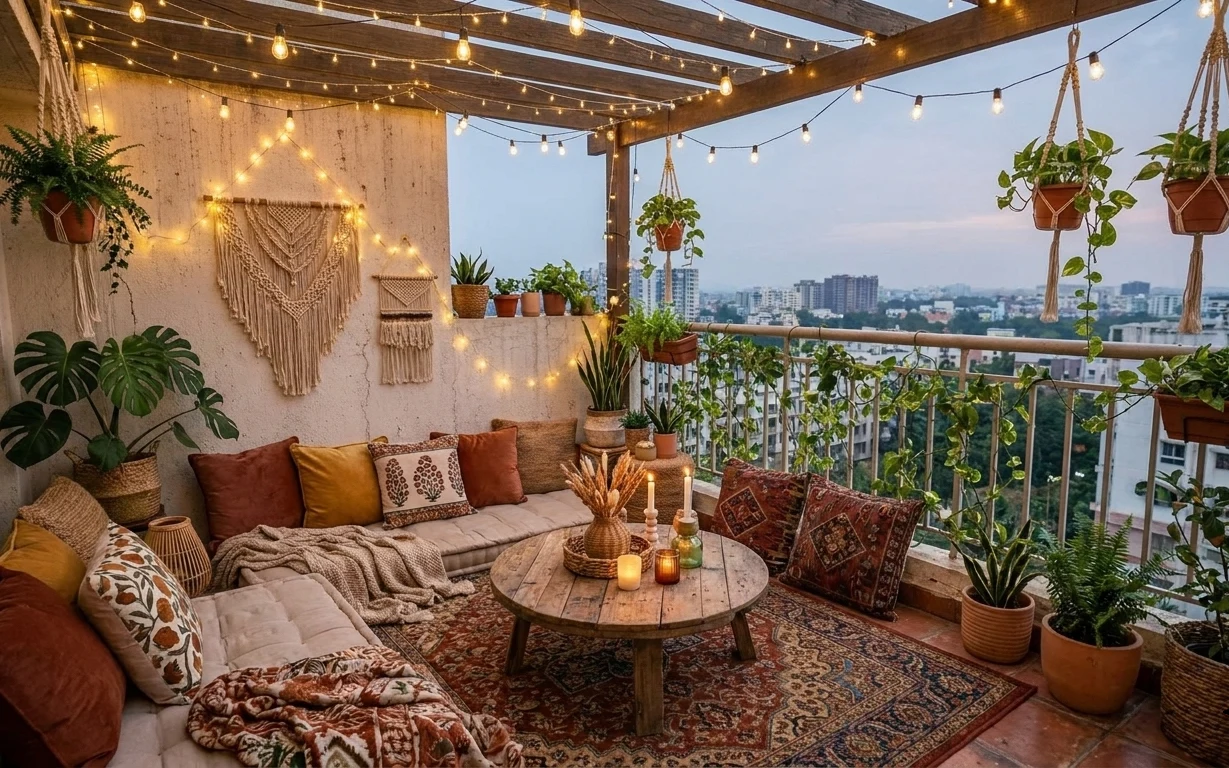
The fastest way to make a pallet patio feel intentional is to repeat two things: warm pattern on the cushions and warm light overhead. In the photo, beige seat cushions and plaid throw pillows sit against white-painted pallet wood slats, so everything reads crisp even in bright weather. The string lights add a second temperature without taking floor space, and the terracotta planters bring that earthy contrast the white backdrop asks for. For shared housing, this kind of refresh works because textiles, ceramics, and lighting all pack flat—or dismantle quickly.
I used to overdo “outdoor decor” with lots of small ornaments, and then I’d regret it on move day. This time, I tried a simpler rule: one repeatable pattern (the plaid), one warm-light line (string lights), and one plant grouping that looks styled from a few feet away. That’s why the mix here feels collected instead of cluttered, even though the pieces are totally removable.
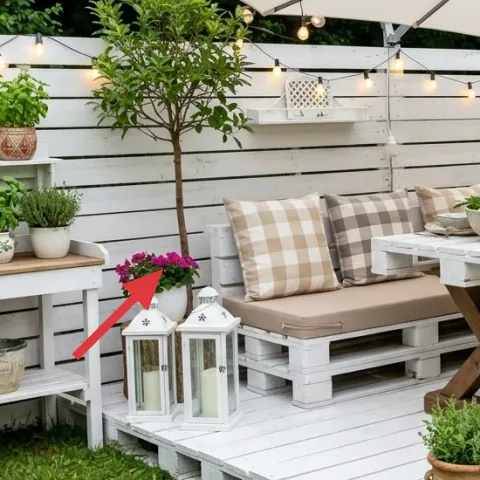
Layer 1 — string lights along railing ($20) warm line lighting over green grass
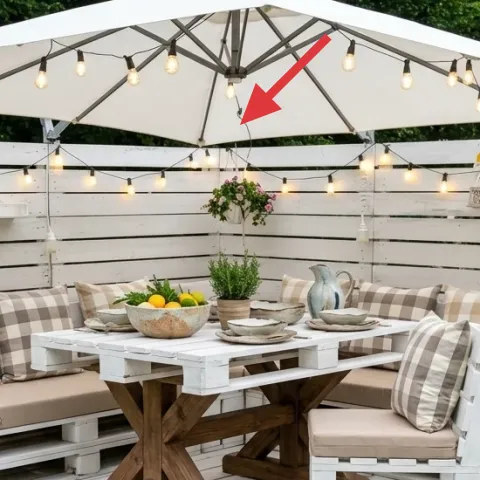
String lights run along the railing line in the upper half of the scene, which matters more than the bulb style. That placement keeps the patio feeling festive after dark, but it doesn’t steal attention from the seating cushions during the day. Choose an outdoor string light set and plan for warm-white bulbs so they don’t clash with the creamy pillows. The trade-off is that the lights need an outdoor-safe power setup, but the upside is total mobility: lights pack back into a small box and can be re-hung anywhere with the right clip approach for the rail.
Layer for height
Keep the lighting high enough that it frames the cushions; a low light line tends to make the patio feel heavier.
Layer 2 — plaid throw pillow covers (pair) ($30) add removable pattern to the bench seating
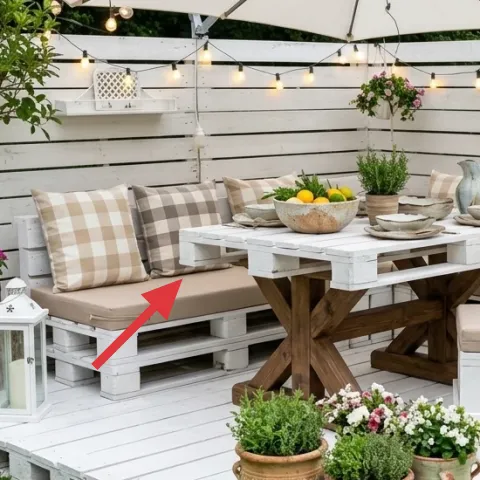
These plaid pillows do the heavy lifting for the whole look. The check pattern shows up clearly against the white-painted pallet slats, while the beige tones echo the seat cushion color so the patio doesn’t feel too busy. Buying covers (instead of new cushions) is also the move-friendly choice: covers slip off, and the fabric is easy to wash, store, and bring to the next outdoor spot. The only real compromise is that strong pattern means you should keep other accessories quieter—like ceramics and planters in earthy neutrals.
Make it instead of buying it
DIY dyed pillow covers so the plaid reads warmer and more cohesive without buying a full new set.
Materials
- Fabric dye (1 bottle) — enough for 2 covers — craft store — $10
- Salt (for dye bath) — 1 bag — grocery store — $6
- Gloves — 1 pair — drugstore — $5
- Plastic drop cloth — 1 sheet — hardware store — $2
Steps
- Pre-wash the pillow covers to remove finishes that block dye.
- Dissolve the dye in hot water in a separate container until fully blended.
- Prepare a dye bath in a tub and add salt to help the color set.
- Submerge the covers and stir periodically to avoid blotchy spots.
- Let the covers soak for the time listed on the dye package.
- Rinse until the water runs clearer, then air-dry completely.
- Heat-set the dye using the method on the dye instructions.
- Insert or place the covers back onto the pillow forms and check for even saturation.
Total DIY cost: $23 — saves about $7 over buying.
Layer 3 — ceramic fruit bowl with oranges ($15) a sunny center piece that doesn’t need walls
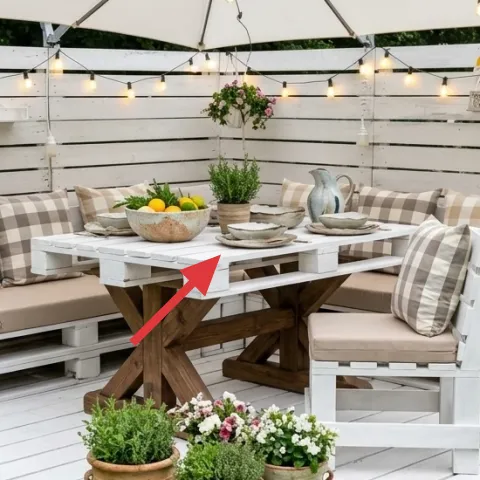
The ceramic bowl on the table gives you that “right in the middle” styling that makes outdoor seating look lived-in. It’s also a smart choice for shared housing because a bowl is small, stable, and easy to pack between moves. The fruit inside adds color that works with both the tan cushions and the terracotta planters, so you don’t need extra wall decor to carry the palette. The trade-off is practical: if weather turns, cover or store it quickly so you’re not cleaning sticky residue later. Overall, it’s a centerpiece that disappears and reappears without drama.
Keep it weather-tolerant
Use a sealed ceramic glaze and wipe the rim before packing to prevent citrus smell from lingering.
Layer 4 — wood dining table with X base ($120) anchors the seating with a sturdy center
The wood table is the hub that connects every separate piece: the cushions, the plant grouping, and the ceramics all have a place to “rest.” Choosing a table with an X base feels farmhouse without looking heavy, and the light wood tone works especially well with white-painted pallet slats. The best part for impermanence is that a tabletop centerpiece can be swapped, but the visual proportion of a proper table still keeps the patio from looking like a collection of parts. The trade-off is footprint: a larger table takes up more ground space, so it has to match the seating layout and not crowd the edges.
Size to your seating depth
Leave a clear path around the table so the bench doesn’t feel like it’s floating over clutter.
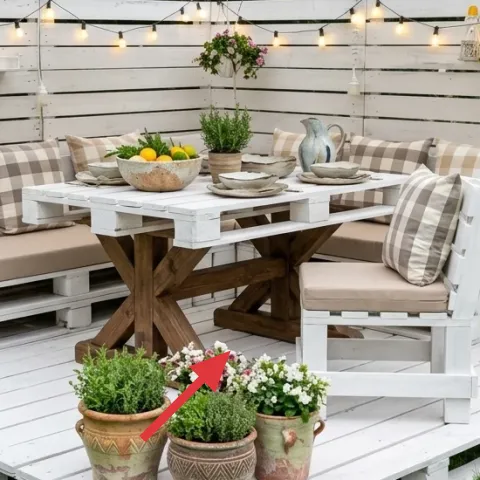
Layer 5 — terracotta planter pot group with greenery ($40) warm earth tones for the pallet backdrop
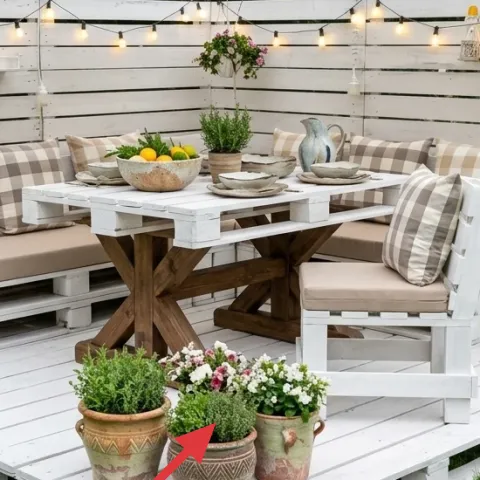
The terracotta pot group creates depth right where the eye lands—near the bottom third of the patio. This is a key move-friendly detail because planters can be rearranged between seasons and packed without tools. Terracotta also “bridges” white wood and beige cushions: it reads warm enough against the bright slats but grounded enough not to clash with plaid. The trade-off is upkeep: greenery needs watering and trimming, and you may want to swap in lower-maintenance plants if the next place has different sun exposure. Still, the visual payoff is consistent from daytime to evening.
Mind drainage
If the pots don’t have drainage holes, store them in a tray and avoid standing water to prevent plant issues.
Layer 6 — potted shrubs in white pots (table ledge) ($30) a clean, layered green edge
White pots on the ledge keep the patio feeling light, so the plants read as “accents” instead of another heavy block of color. This layer works because it frames the seating from the side—your eyes catch the green before landing on the plaid cushions and ceramics. Choose small potted shrubs or compact greenery so the height stays consistent with the railing line. The trade-off is that smaller plants dry out faster than large planters, but they’re easy to swap and they pack neatly for a move. For shared housing, this is one of those details that feels styled while staying low-commitment.
Repeat the pot color
Keeping some white planters in the mix helps the whole palette stay cohesive without matching every pot.
Layer 7 — decorative mugs/ceramic pieces on side table ($45) small ceramics that read from across the patio
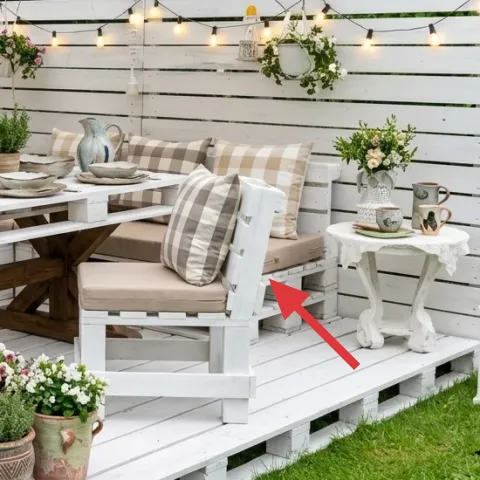
Small ceramic mugs and pieces on the side table add the “daily use” signal that makes an outdoor nook feel real, not staged. The side table also gives the patio a secondary surface, so the main table doesn’t need to hold everything. Stick with simple shapes and muted colors so the ceramics don’t fight the plaid pillows or terracotta planters. The trade-off is that small objects can look cluttered if there are too many, so two or three pieces are usually enough to create a visual triangle with the bowl and the planters. It’s also easy to pack: ceramics nest inside a box with paper wrap.
Use a tight cluster
Group ceramics together so the side table reads intentional even when the fruit bowl isn’t there.
The cost, layer by layer
| Layer | Item | Cost |
|---|---|---|
| 1 | String lights along railing (outdoor set) | $20 |
| 2 | Plaid throw pillow covers (pair) (DIY equivalent) | $30 |
| 3 | Ceramic fruit bowl with oranges | $15 |
| 4 | Wood dining table with X base | $120 |
| 5 | Terracotta planter pot group with greenery | $40 |
| 6 | Potted shrubs in white pots (ledges) | $30 |
| 7 | Decorative mugs/ceramic pieces on side table | $45 |
| Total | $300 | |
If you want a cheaper variant, prioritize the string lights and the plaid cushion covers, then swap the wood table and mugs for secondhand options. Keep one planter group and use only small white pots for greenery so you can stay cohesive while spending less on larger pieces.
What worked, what didn't (across the whole room)
The strongest win here is how the styling repeats color temperature: warm textiles, warm light, and terracotta next to white slats. The second win is that the accessories sit at multiple heights (rail line, table surface, ledge plants), so the patio reads complete even from one angle. The only downside is that too many small objects on the side table would tip into clutter fast outdoors.
What worked
- String lights create a warm line that makes the patio feel considered after sunset.
- Plaid pillow covers add structure to the look without changing the underlying pallet seating.
- Ceramic fruit styling gives a focal point so the table doesn’t look empty.
- Terracotta planters add warmth that keeps the white slats from looking too crisp.
- White pots at the ledge keep the greenery feeling airy instead of bulky.
- Grouping ceramics on the side table makes the whole vignette read from across the grass.
What didn't
- Low, uneven lighting placement would have made the seating feel flat in photos.
- Overstuffing the side table with extra mugs and knickknacks would tip into clutter.
- If the plants dry out quickly, the palette loses its “styled” look within a week.
- Choosing cool-toned pillow covers would fight the warm terracotta and look less cohesive.
What we'd skip if we did it again
Skip adding more freestanding furniture just to “match” the seating. Extra pieces look charming in stores, but on a small shared patio they create logistics problems and eat the visual space that cushions and plants need.
Skip fragile decor that can’t handle damp weather or packing. Outdoor ceramics are fine, but anything that chips easily or needs delicate assembly becomes a move-day burden.
Skip mixing too many plant pot colors. One warm terracotta group plus a set of white pots keeps the look cohesive while still giving natural variation.
Frequently asked
How long does this outdoor refresh take?
Plan for 1–2 afternoons. The string lights and cushion-cover swap are quick, while the plant part is about settling everything into the best height and spacing. If dyeing pillow covers, add a few hours plus drying time. The whole goal is a look that’s finished enough for a weekend hang, but still easy to pack away when a lease changes.
Is this renter-friendly for shared housing, not a permanent install?
Yes—nothing here depends on drilling or permanent wall changes. The focus is removable: lights, covers, ceramics, and potted plants. Even the centerpiece bowl is just styling on the table surface. For shared spaces, keep the “inventory” small and portable so you’re not fighting storage across semesters.
What if my patio is smaller than the photo?
Use the same system but downsize the planter count and keep the ceramics minimal. Stick to one planter group at the front edge plus one ledge set, rather than multiple clusters. For lighting, run the string line along the highest stable railing so it still frames the seating without visually shrinking the area.
What if my patio is bigger than the photo?
Lean into scale with a slightly larger planter grouping and a second surface item like an extra mug or ceramic tray on the side table. Keep the repeat pattern rule: plaid on the cushions and warm light overhead. When scale increases, the answer isn’t more random decor—it’s more of the same cohesive elements.
Where can these items be shopped differently to save money?
String lights are often cheapest during seasonal sales or at big-box outdoor sections. Pillow covers are easier to find in multipacks at home goods stores, and the DIY dye option is the budget lever. For planters and ceramics, look at garden centers for live plants and thrift stores for bowls and mugs—then stick to your palette to avoid mismatched clutter.
Biggest mistake for this pallet patio look?
Adding too many small items without a clear center. The photo works because the table bowl, cushion plaid, and plant grouping act like a trio of focal points. If the side table becomes a dumping ground, the room loses that calm farmhouse rhythm. Keep clusters tight and let the greenery and textiles do most of the styling.
More in Outdoor & Patio
Under $300: move-ready pallet patio nook refresh with 7 layers
A pallet patio nook already has the structure—so this $300 refresh focuses on move-friendly textiles, light, and plant styling. Seven layer…
Under $600: boho balcony lounge refresh with 7 move-ready swaps
A boho balcony lounge refresh under $600, built from 7 move-ready swaps that pack into boxes. The look leans on warm string lights, a patte…