
- Best for
- plants + textiles layering
- Cost
- under $600
- Difficulty
- easy (mostly swap-and-style)
- Time
- 1–2 weekends
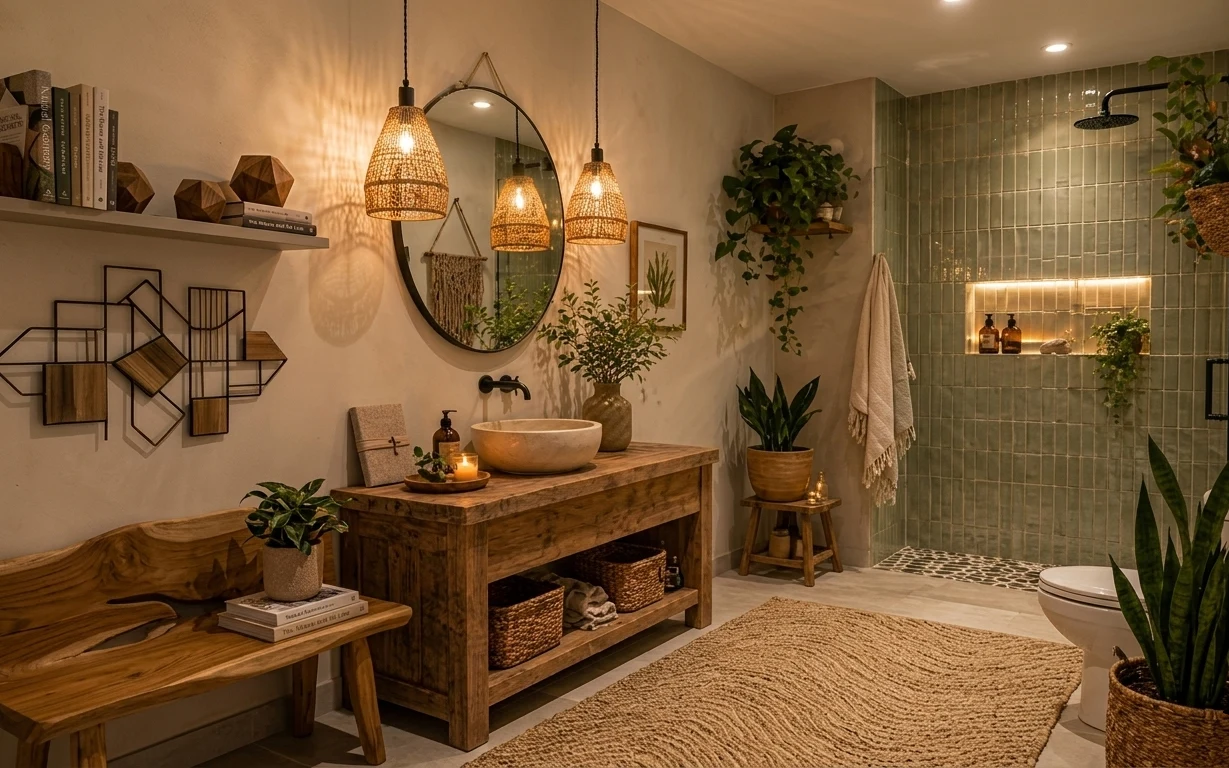
Why warm wood-and-plant bathroom is the spa bathroom corner of 2026
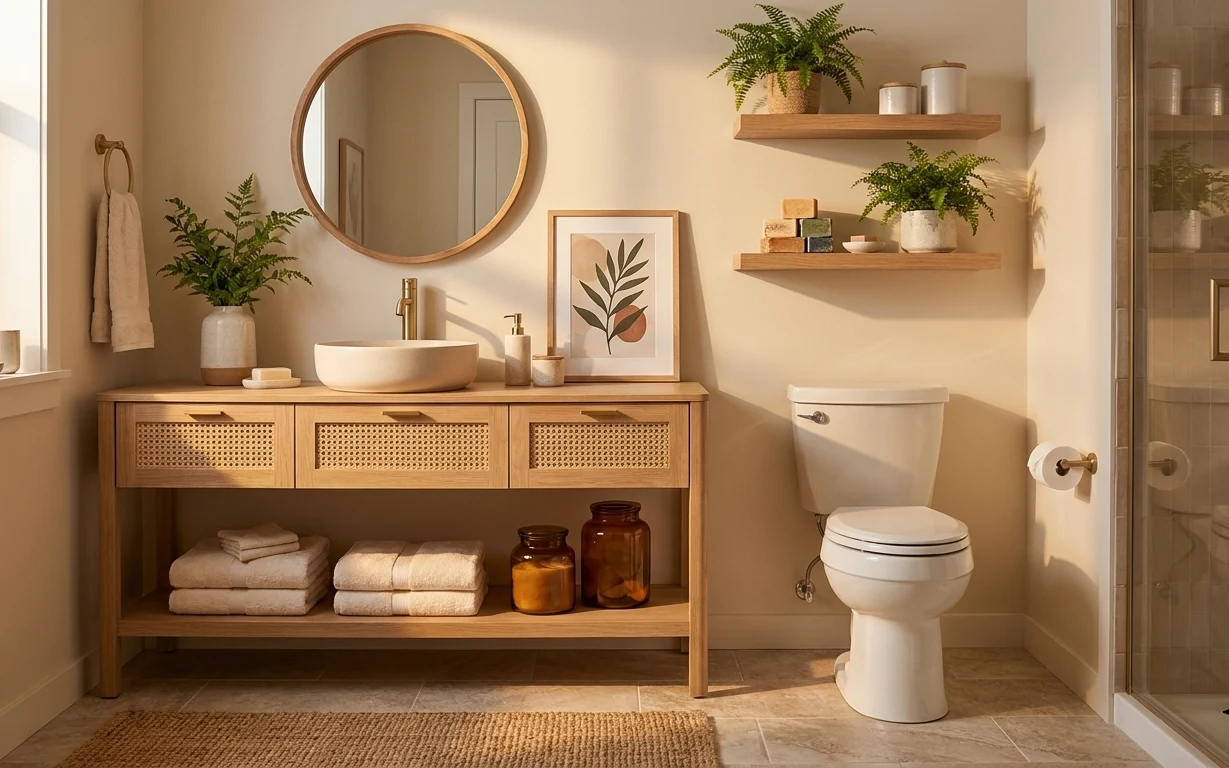
Start with what the room already does well: warm honey-toned wood surfaces and that cool green tiled shower wall. Then add textures at the “touch points”—underfoot with a bath rug, at eye level with a round mirror, and at counter height with a simple tray and candle. The plants matter too: a tall leafy planter brings movement without taking up floor space. For renters, this works because it relies on removable decor and textiles, not changes to landlord fixtures or walls.
The first time I tried this vibe in my own place, I over-bought matching “set” pieces and ended up with a bathroom that felt staged, not lived-in. What changed was going texture-first: one rug with enough pile to soften the tile, then one statement plant, then tiny styling objects. Once the big textures were right, the smaller details (like labeled bottles and a candle) stopped looking fussy and started looking intentional.
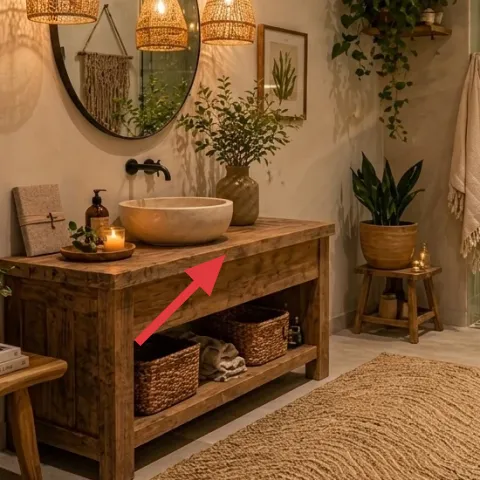
Layer 1 — decorative tray on vanity ($25) Ground the counter with one styled surface
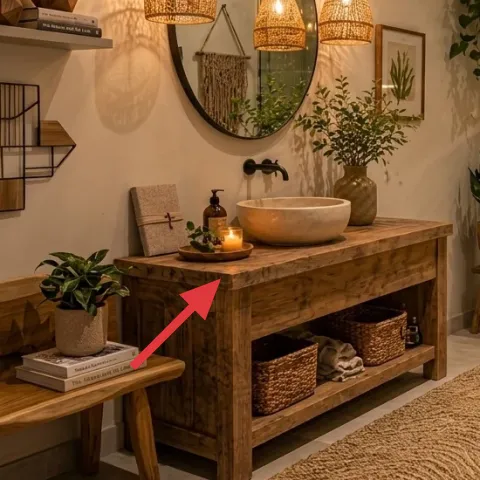
A decorative tray on the vanity creates a boundary for all the small bathroom stuff, which is how you keep a tiled, busy-looking room from feeling cluttered. In the photo, the tray sits on the wood console top and lets the candle and bottles look “curated” instead of randomly placed. The trade-off is that you’ll need to edit your countertop more often—no one wants five different containers competing. The benefit: you can move the tray to a different spot (or pack it away) without changing anything about the bathroom itself.
Layer on top, not around
Use the tray as the staging area, then keep everything else either on the rug or in a basket so your eye has a clear landing zone.
Layer 2 — glass candle on vanity ($20) Add warm light that doesn’t require a fixture swap
This glass candle is doing more than “smell good” duty—it’s the warm glow that makes green tile feel less cold. Since the bathroom lighting setup is already fixed by the landlord, a candle is one of the few renter-friendly ways to add atmosphere without touching wiring. Place it on the tray so it feels intentional with the bottles instead of taking over the counter. The trade-off: you’ll need to actually light it (or choose a flameless option) and keep a quick eye on safety near towels and plants.
Match the mood, not the label
A simple, neutral candle jar works best here because the teal tile already brings plenty of color.
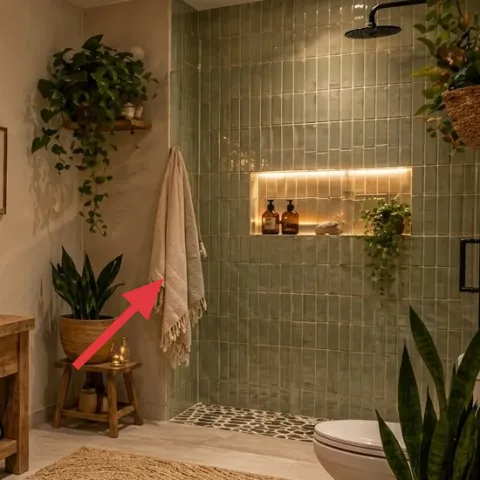
Layer 3 — bath rug 5×7 ($200) Soften the tile with one plush anchor
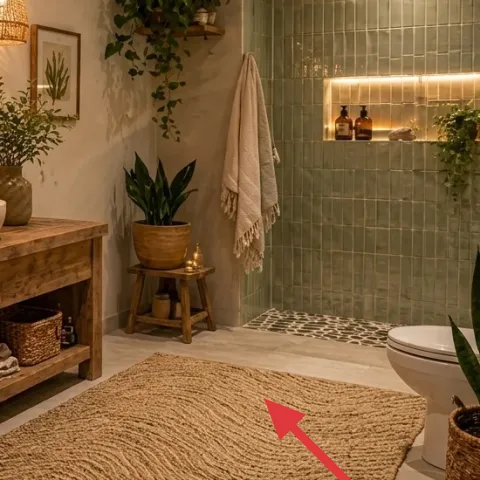
A bath rug with enough pile is the easiest way to make tile feel spa-like. In the photo, the rug sits in front of the shower area and visually “holds” the space—plus it keeps your feet from landing on cold grout every morning. Choose a 5×7 so you get coverage where you actually stand, not just a small doormat that disappears into the corners. The trade-off is drying time: thicker rugs need a little more care. If your bathroom runs humid, shake it out and let it fully dry between uses.
Don’t size it too small
A rug that’s only the width of the threshold looks accidental against grid tile; go bigger so it reads as a floor layer.
Layer 4 — apothecary-style jar labels for soap bottles (DIY) ($45) Make the bottles look designed without buying more
Make it instead of buying it
This DIY replaces the look of your existing soap bottles with apothecary-style labels—so the counter reads intentional while staying completely renter-safe.
Materials
- Printable label paper sheets — 1 pack — Staples — $6
- Black acrylic paint marker — 1 — Michaels — $8
- Clear label tape (matte) — 1 roll — Office supply — $5
- Small paintbrush (fine tip) — 1 — craft store — $3
- Scissors — 1 — desk drawer — $3
Steps
- Print simple label layouts (name + small notes) on the printable label paper.
- Cut the labels to size, then test placement on one bottle.
- Use the fine-tip paint marker to darken any small text so it stays legible at a glance.
- Seal each label with a thin layer of clear matte tape to resist moisture splashes.
- Apply labels to clean, dry bottle surfaces, smoothing from center outward.
- Add a second label line only if it helps the bottle read “apothecary” from across the room.
Total DIY cost: $25 — saves about $20 over buying.
Layer 5 — shower curtain panel ($80) Soften the shower line and add pattern-light movement
A white shower curtain panel gives the tile a break, which is how this space stays calm instead of visually loud. In the photo, the curtain drapes near the shower edge and makes the green grid feel more spa and less “bathroom showroom.” The renter-friendly part is that a curtain is fully removable, and you can switch it without touching any fixtures. The trade-off is cleaning: curtains collect water spots, so a fabric that can handle gentle laundering (or regular wiping) makes the whole look feel higher-maintenance than it should be.
Choose a curtain that moves
Lightweight fabric reads softer with tile—heavy, plastic curtains can look stark against grid patterns.
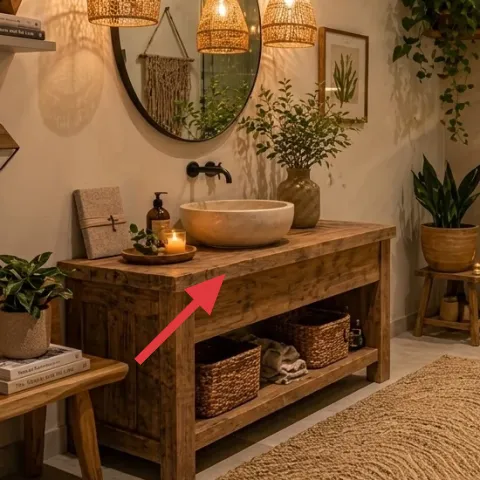
Layer 6 — wicker planter pot with tall leafy plant ($60) Add life without adding clutter
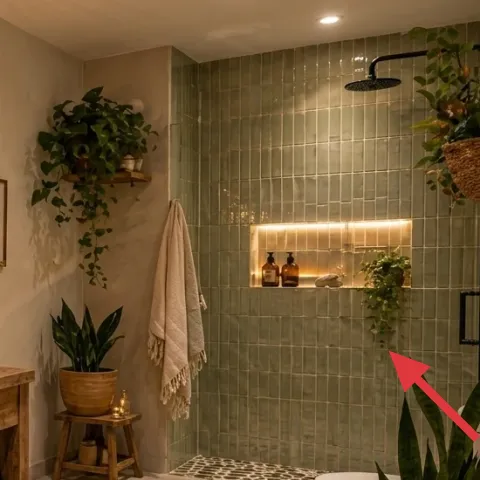
A tall leafy plant in a wicker pot is doing two jobs: it adds vertical shape and it warms up the hard lines of tile and fixtures. In the photo, the plant sits near the shower area and reaches above eye level, so it feels like part of the “architecture” instead of just decor on a surface. The wicker texture also echoes the woven baskets and makes the earthy-neutrals palette feel intentional. The trade-off is plant care—these need consistent light and a simple watering routine. If that’s not your thing, pick a plant with similar leaf shape that fits your window situation.
Keep the pot texture in the same family
Wicker and woven storage keep the room cohesive even when the tile pattern is strong.
Layer 7 — round mirror above vanity ($120) Give the whole corner a centered focal point
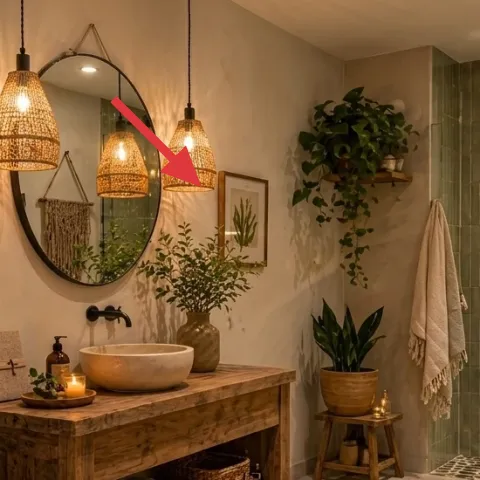
A round mirror creates a friendly focal point above the vanity and balances all those right angles from the tiled shower wall. The photo’s mirror sits centrally and visually “rounds” the space, which is especially helpful in bathrooms where grout lines can otherwise feel rigid. If you swap to a renter-friendly alternative, look for a mirror that hangs safely (using the appropriate renter-approved method for your setup) and stays level. The trade-off is weight and mounting logistics—mirrors are heavier than a rug or curtain, so this layer is best when you’re confident in hanging it without drilling.
Size it to the vanity, not the whole wall
When the mirror width matches your counter width, the styling looks designed instead of random.
The cost, layer by layer
| Layer | Item | Cost |
|---|---|---|
| 1 | Decorative tray | $25 |
| 2 | Glass candle | $20 |
| 3 | Area rug 5×7 | $200 |
| 4 | Apothecary-style jar labels | $45 |
| 5 | Curtain panel pair (shower) | $80 |
| 6 | Indoor plant (4–6 ft) | $60 |
| 7 | Mirror (24–36") | $120 |
| Total | $550 | |
If the full rug budget feels high, try a smaller runner-shaped rug for your main standing zone and rely on the curtain + plant to carry the “spa” look. The room still reads softer even with less coverage—just keep the rug in front of the shower area.
What worked, what didn't (across the whole room)
The biggest win is how the rug, curtain, and plants create softness in a bathroom with strong tile lines. The tray-and-candle setup also makes the counter look intentional without adding more clutter. The only area that can go wrong is sizing—if any one layer is too small, the whole corner starts to look piecemeal.
What worked
- The bath rug makes the grid tile feel warmer when you’re standing right in front of the shower.
- One tray keeps bottles and candles grouped, so the wood console doesn’t look busy.
- The round mirror visually rounds the room and softens all the straight edges.
- The shower curtain adds a quiet “buffer” between the tiled wall and the rest of the bathroom.
- The tall leafy plant brings height and life without blocking the floor.
- DIY labels make everyday bottles look styled, even when you don’t want to buy new ones.
What didn't
- A rug that’s too small reads like a doormat instead of an anchor layer.
- If the curtain fabric is too stiff, it can look stark against the tile grid.
- Skipping the tray makes countertop items look scattered no matter how nice they are.
- Plant placement that’s too close to the shower stream can lead to browning or constant trimming.
- If candle placement is near towel edges, it can feel cluttered rather than calm.
What we'd skip if we did it again
Skip buying a full “matching bathroom set.” The tile pattern already brings visual structure, and matching hardware + matching towels can make the look feel uniform in the wrong way.
Skip a tiny rug or a flat weave that doesn’t cover the standing zone. Against tiled floors, you want enough pile and coverage to change how the space feels underfoot.
Skip a curtain that’s heavy or glossy. With green grid tile, the best curtains read soft and breathable, so the room feels more spa and less sharp.
Frequently asked
How long does a refresh like this usually take?
For most renters, plan on 1–2 weekends. The rug and curtain decisions take the longest because sizing and fabric weight matter. Once those are in place, the styling step (tray, candle, labeled bottles, and the plant) is fast—usually a few hours total. If you’re doing the label DIY, add about an extra evening for printing, cutting, and applying.
Will this work if I’m not allowed to change anything in the bathroom?
Yes—everything in this plan is renter-safe and removable. Rugs, shower curtains, candles, trays, and plants don’t require landlord approval. For the mirror layer, choose an approach that fits your existing setup without drilling; if you can’t hang one, the rest of the layers still create the spa vibe.
What if my bathroom is smaller or has different tile color?
If your bathroom is smaller, use the same strategy but scale coverage down: keep a rug that reaches your standing zone and go for a curtain that spans most of the shower opening. With a different tile color, rely on the same “warm + soft” mix—wood-toned accessories, a plant with similar leaf texture, and neutral textiles to keep the palette cohesive.
Where can I shop differently to stay on budget?
For the big texture items, shop thoughtfully: rugs and curtain panels can be found at big-box retailers and discount home stores. For labels, DIY is the budget lever—print at home and seal with clear tape. Plants are often cheaper at local nurseries, especially if you’re open to a slightly smaller pot size and let it grow into the space.
What’s the biggest mistake people make in spa-style bathrooms?
They buy too many small decor pieces before adding the real soft layers. Spa style usually comes from texture first: one rug, one curtain, one meaningful plant, and then a few objects grouped intentionally on a tray. If the rug is too small or the curtain is too heavy, the whole corner won’t feel calm even if the accessories are pretty.
More in Bathroom
Under $600: spa bathroom corner refresh with renter swaps
A renter-friendly bathroom refresh built around a spa bathroom corner—warm wood, green tile, and plants—using move-safe swaps. This plan ke…
Under $300: bathroom vanity swaps for move-friendly calm
A small bathroom vanity refresh for shared housing: swap in 7 move-ready upgrades for under $300. The look focuses on a rug, tidy textiles,…