
- Best for
- Plant-wall balcony refresh
- Cost
- $566 total spend
- Difficulty
- Moderate DIY
- Time
- One weekend (about 6–10 hours)
Why warm wood-and-green plant corner is the balcony nook of 2026
In daylight, this balcony nook already has the right ingredients: warm wood flooring, pebble gravel, and a bench that anchors everything for lounging. What’s missing isn’t comfort—it’s refinement. The cream cushions read cohesive, but the white sheer curtain and the framed botanical prints need crisp placement to look styled, not leftover. The leafy tree and small plant cluster do a lot of the visual work, so the trick is making the containers and surfaces look deliberate. For a homeowner refresh, these swaps are achievable because you’re updating what you can reach in a weekend: textiles, wall art, and finishes.
I used to overthink balcony decor until I noticed a pattern in my own places: when the planters and hardscape don’t match the same “brightness level,” the whole corner looks accidental. The fix for this look is surprisingly practical—choose one light color (cream/white) to repeat in soft goods, then keep the plant vessels in a consistent tone. Once I started repeating cream cushions and a clean white curtain, the greenery finally looked like it belonged to the space instead of trying to compete with it.
Layer 1 — white sheer curtain panel pair ($80) filters daylight without blocking plants
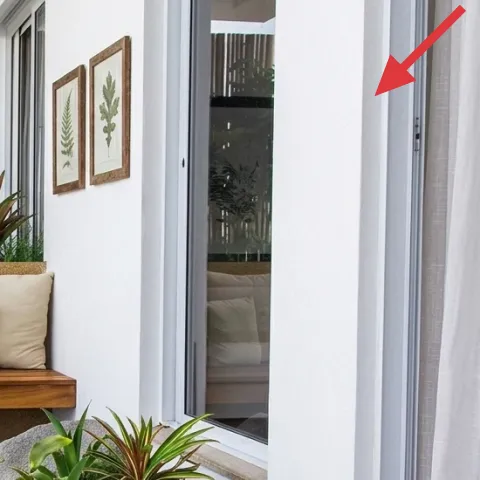
The white sheer curtain on the right side is the quickest way to soften the balcony’s vertical lines while keeping the space bright. Because it’s sheer, it won’t fight the daylight or cover the windows; instead, it adds a gentle veil that makes the plant wall feel more intentional. Buying a matched panel pair also helps the drape read even—single panels tend to pull attention to the gap. The trade-off is that sheers won’t give privacy like heavier curtains, but that’s exactly why this works on a sunny balcony nook: it’s light management, not window dressing.
Let the curtain skim
Hang the sheer so it just clears the floor and doesn’t pool—high airflow keeps it looking crisp.
Layer 2 — framed botanical prints ($2) keeps the walls from looking too blank
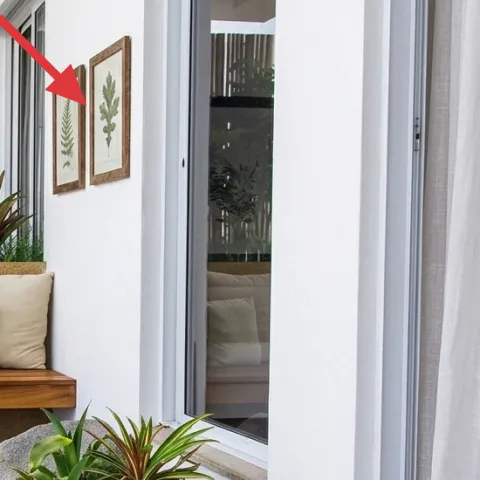
Two framed botanical prints on the wall are the visual bridge between the leafy plants and the wood/cream bench setup. In a corner like this, wall art needs to repeat the same “nature” language as the greenery—straight line frames plus botanical illustrations do that without adding clutter. The easy alternative is a larger single print, but it can feel heavy against a balcony where you already have a lot going on below. The trade-off here is scale: you want frames that sit clearly above the bench level so the plants don’t visually swallow the art.
Pick frames that share a finish
When the frame finish is consistent across both prints, the pair looks curated even if you change the plants.
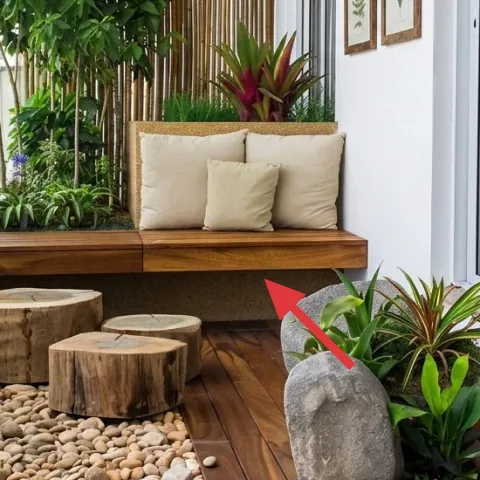
Layer 3 — large potted leafy tree (4–6 ft) adds the height the eye needs
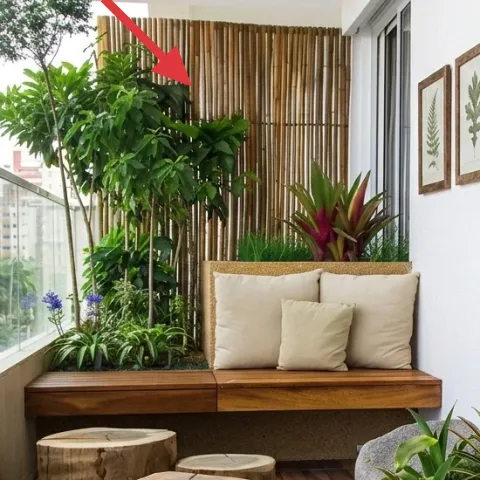
The large potted leafy tree is what gives this balcony nook its “room” feeling. Height matters because you’re building a backdrop against the window and the bench; without a taller focal plant, the corner reads flat and you end up compensating with more small pots. Buying a 4–6 ft plant gives you instant vertical structure and saves the weeks it can take to grow into the space. The trade-off is maintenance: larger foliage needs a consistent watering rhythm, but that’s also why it looks fuller and more established in photos and in everyday use.
Group by leaf brightness
Mix a darker-leaf plant with a slightly brighter one so the cluster doesn’t turn uniform green.
Layer 4 — decorative gray stone planter ($40) grounds the greens with a cool neutral
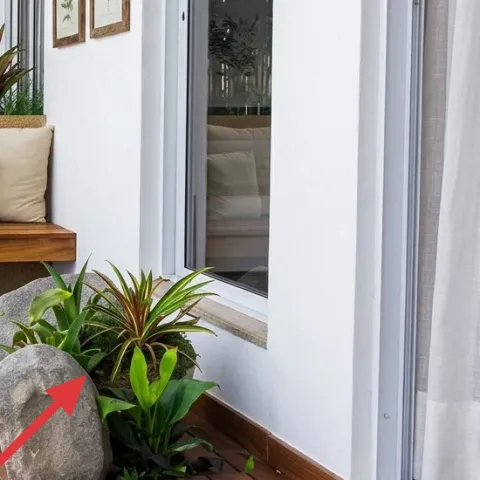
This decorative gray stone planter sits in front of the bench area and adds a grounding material note—stone reads cool next to warm wood and cream cushions. It also gives the plant styling a “designed object” feel rather than just another pot on the floor. The obvious alternative is using another standard plastic planter, but that’s usually where the look starts to feel temporary. A stone-toned planter has weight visually and helps the pebbles and wood flooring feel intentional. If the planter looks a little tired, a refresh is still easier than replacing the whole set.
Make it instead of buying it
Spray-paint the gray stone planter so it matches the cool neutral tone while hiding scuffs and dull patches.
Materials
- Painter’s tape — 1 roll — store aisle — $14
- Degreasing cleaner/degreaser wipes — 1 pack — hardware store — $6
- Outdoor-rated spray paint (stone/gray shade) — 1 can — home center — $12
- Clear matte sealer (outdoor-safe) — 1 can — hardware store — $2
Steps
- Clean the planter thoroughly with degreaser wipes and let it dry fully.
- Tape off any edges you don’t want painted and protect the floor with cardboard.
- Apply a light bonding coat of spray paint from 10–12 inches away.
- Let the coat dry completely according to the can directions.
- Apply 1–2 more light coats until the color evens out.
- Finish with a thin layer of outdoor-rated matte sealer, then let it cure.
- Remove tape and let the planter fully dry before bringing it back to the corner.
Total DIY cost: $34 — saves about $6 over buying.
Layer 5 — cream throw pillow covers ($2) makes the bench look styled, not temporary ($36)
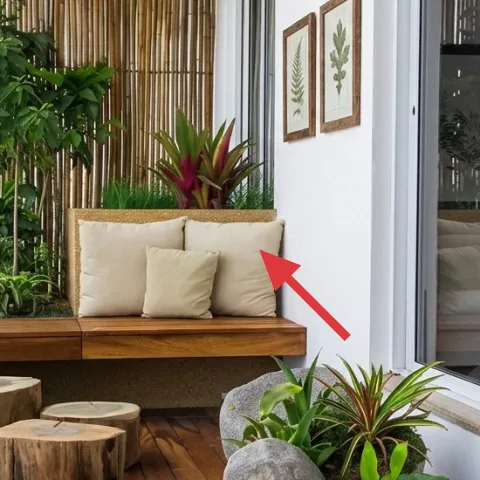
Adding or swapping cream throw pillow covers on the bench is a small change that reads instantly. The cushions in this corner are already in a warm cream tone, and two extra covers (or fresher ones) help the seating look intentional and symmetrical. It’s the easiest place to repeat your color palette: cream ties the white curtain and botanical wall art to the wood flooring. The trade-off with buying covers is that you may still need a proper insert if yours are thin, but the visual payoff is worth it because pillows carry shape and softness in photos and in everyday lounging.
Don’t match every texture
If all cushions are the exact same weave, they look flat—add a mix like smooth + subtle texture.
Layer 6 — wooden bench with storage base (fresh finish) ($200) ties the whole balcony to one material story
This wooden bench is the anchor of the nook, and a fresh finish makes the whole corner feel “designed” instead of borrowed. Since the flooring is wood and the bench is also wood, keeping the tone consistent is the move: too-dull bench wood can make the plant corner feel muddy, while a cleaner finish makes cream cushions and white sheers look brighter. The most tempting alternative is buying new furniture, but finishing what’s already there is faster and more budget-friendly for a weekend. The trade-off is time and drying—plan the finish so it cures before cushions go back on.
Test the finish in a hidden spot
Wood tone shifts by light, so try one small area before committing to the full surface.
Layer 7 — pebble gravel (decorative layer) ($50) adds texture and hides the “in-between” spots
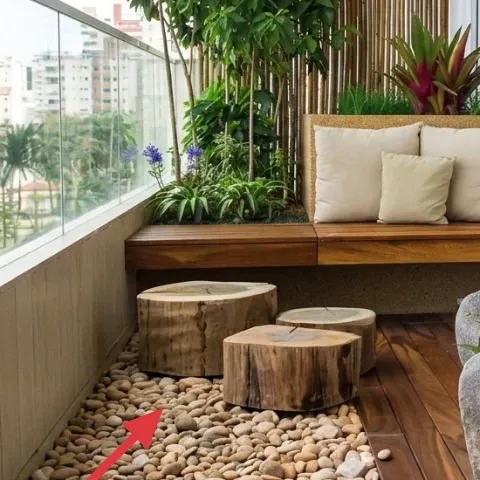
Pebble gravel under the plant cluster adds a tactile contrast to the smooth wood flooring and gives the corner an intentional landscape feel. It’s especially helpful in balcony nooks because you’re working in a small zone where the floor can look bare around planters. An alternative is a mat or rug, but in an outdoor setup, gravel reads more natural and doesn’t trap as much moisture around plant bases. The trade-off is that pebble gravel needs occasional top-offs and light leveling, yet it’s still one of the most visually impactful changes you can make fast.
Level before you place pots
Even a quick rake-and-level makes the planters sit straight instead of wobbling on high spots.
The cost, layer by layer
| Layer | Item | Cost |
|---|---|---|
| 1 | White sheer curtain panel pair | $80 |
| 2 | Framed botanical prints (2) | $80 |
| 3 | Large potted leafy tree (4–6 ft) | $80 |
| 4 | Decorative gray stone planter | $40 |
| 5 | Cream throw pillow covers (2) | $36 |
| 6 | Wooden bench fresh finish | $200 |
| 7 | Pebble gravel decorative layer | $50 |
| Total | $566 | |
If the budget is tighter, start with the curtain pair and pillow covers first. Swap in smaller framed prints and use one statement plant instead of a tall tree, then add the pebble gravel layer last for the texture payoff.
What worked, what didn't (across the whole room)
The best results came from repeating cream and white in soft goods while keeping the plant vessels in a cool neutral. That repetition made the bench feel cohesive and let the greenery stay the star.
What worked
- Sheer curtains softened the vertical window lines without dimming the daylight.
- Two botanical frames matched the leaf shapes so the wall didn’t feel like an afterthought.
- The tall leafy tree added height, which made the bench zone feel more like a “corner” than an alcove.
- The gray stone planter grounded warm wood and kept the plant cluster from looking random.
- Cream pillow covers repeated the bench color so the seating looked styled, not temporary.
- Pebble gravel brought natural texture and helped the planters sit more intentionally.
What didn't
- Using only one plant at mid-height made the corner feel flat against the window wall.
- Too-many different planter materials (plastic + stone + metal) reduced the “calm” effect.
- Letting the bench finish look patchy made the cream cushions look more beige than white.
- Overloading the pebbles with extra small pots created visual clutter near the doorway.
What we'd skip if we did it again
Skip replacing the bench first. A fresh finish keeps the same structure you already have, and it’s usually faster (and more forgiving) than sourcing a whole new seating base.
Skip “random” planters in a mix of cool and warm metals. One consistent neutral—like the gray stone look—makes the leafy plants feel curated instead of assembled.
Skip adding a rug outdoors to fix bare floor. In this setup, pebble gravel gives texture and drainage, while a rug can collect moisture or shift under plant pots.
Frequently asked
How long does this balcony nook refresh take on a weekend?
Most of the work is front-loaded: curtains (hanging), framed prints (leveling and spacing), and styling the plant cluster. The bench finish is the time wildcard because you need drying and a full cure before cushions go back on. If you stagger tasks—morning/afternoon—the whole look usually lands in one weekend.
If I rent, can I still do this exact vibe?
Yes, as long as you keep changes to non-structural updates. Curtains, framed prints with anchors, and pillow/cushion swaps are all renter-friendly. For planters, stick to freestanding pots on the floor. For the bench, use a gentle refresh only if your lease allows; otherwise, focus on textiles and artwork.
My balcony is smaller—what should I downsize first?
In a smaller balcony nook, reduce plant count before reducing the focal height. Keep one taller potted leafy tree for vertical structure, then scale down the number of small pots. Keep the curtain panel proportion (don’t overhang far), and choose two framed prints instead of more wall decor.
What if my balcony gets a lot of sun—will the sheers fade?
Sheers can fade faster in intense sun, which is why choosing a crisp white with solid fabric weight matters. If fading happens, swap the curtain pair before they look dingy; it’s a relatively low-cost update compared with replacing a full seating set. Rotating curtain sides can also help even out light exposure.
Where would you shop for the framed botanical prints and pillow covers?
For prints, look for sets that come with pre-sized frames in a consistent finish so you don’t end up with mismatched styles. For pillow covers, choose cream covers that hold shape—better seams and thicker fabric read more “finished” on a bench. Thrift and discount home stores can work well if the frame finish is uniform.
Biggest mistake on a plant-heavy balcony nook?
The biggest miss is mixing too many container materials and tones. When planters are random—warm metals here, cool stone there—the eye can’t settle, and the corner reads cluttered. Pick one neutral container tone and repeat it, then support it with the same cream/white palette in cushions and sheers.
More in Outdoor & Patio

7 balcony nook upgrades for a $700 weekend
A balcony nook refresh that looks like a high-touch resort, built from seven changes you can do on a weekend. With $700 total spend, you’ll…
Coastal patio seating area refresh, $800
A patio seating area with cream cushions, light wood furniture, and string lights looks pulled together fast with 7 specific swaps. This $8…

7 small, renter-friendly patio swaps for a $600 outdoor grill setup
A move-friendly outdoor grill patio refresh for shared housing on a $600 budget. Use no-drill string lights, easy planter color, and simple…