- Best for
- Layered textile bedroom refresh
- Time
- 1 weekend (plus dye dry time)
- Total cost
- About $500
- Renter-safe
- Yes—freestanding and no-drill
Why warm earthy boho bedroom is the layered comfort of 2026
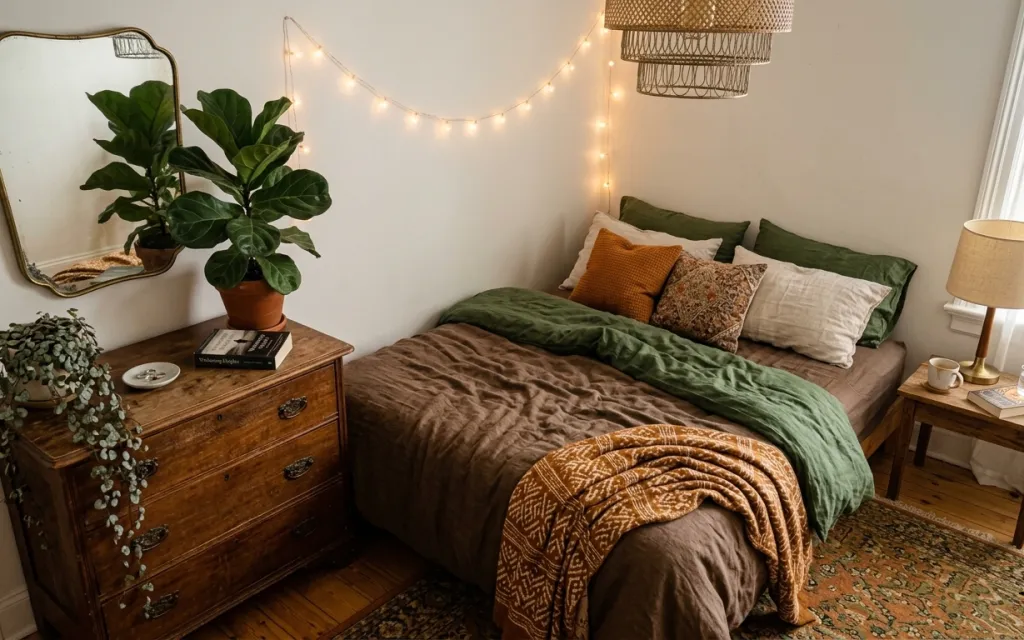
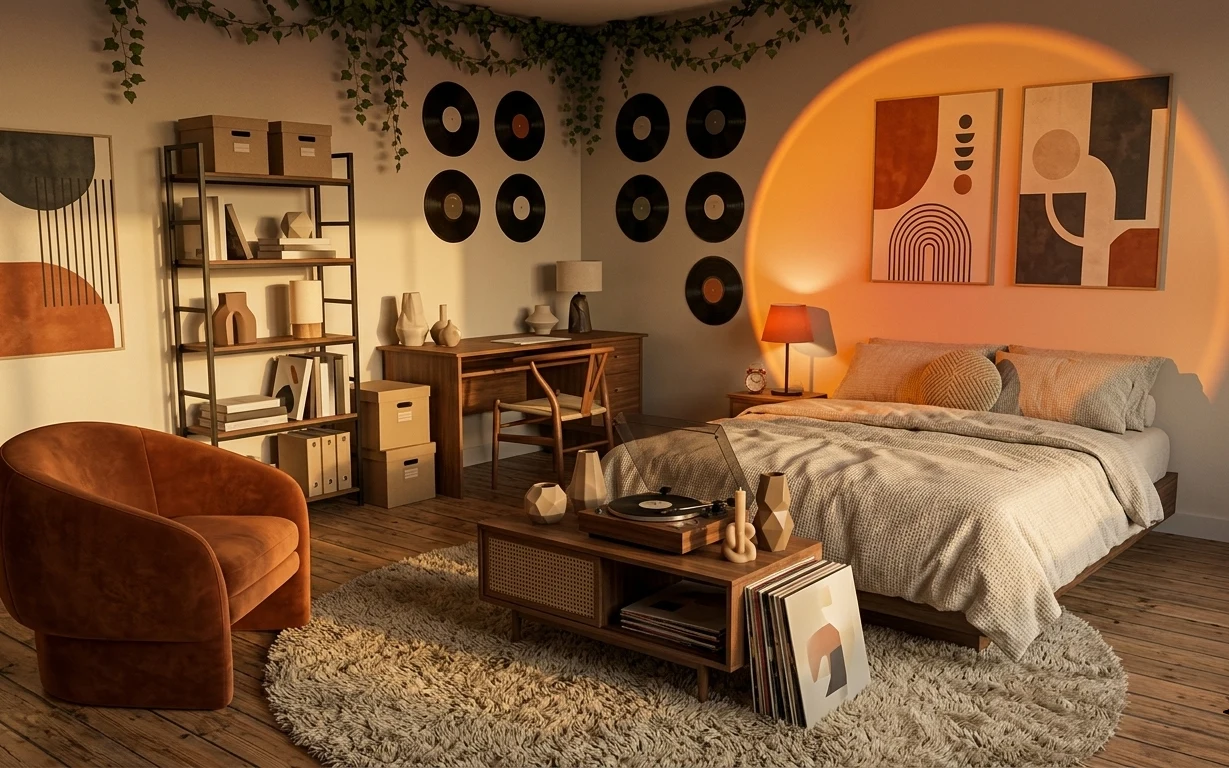
The first thing this setup gets right is texture: a patterned rug anchors the hardwood floor, while a green throw blanket and a rust-and-cream blanket add “caught-in-the-wind” movement right on the bed. The warm wood pieces—the dresser and the bedside table—keep the palette grounded, and the plug-in lamp with its beige drum shade makes the whole corner feel softer than any overhead light ever could. If you’re used to decorating with only one rug or one lamp, this is the extra layer mindset that makes it work for renters.
I used to overthink this part and buy matching sets, then wonder why the room felt a little flat. What clicked for me was choosing one strong accent color (here, green) and then repeating it in small quantities: blanket, pillow, and the way the lamp light bounces off cream fabrics. It’s a lot easier than it sounds—especially when every item can pack away when the lease ends.
Layer 1 — patterned area rug (5×7) ($200) Tames busy hardwood and grounds the bed
This patterned area rug sits under the bed and extends into the foot-and-sidebar zone, so it visually links the whole sleep corner instead of leaving the floor bare. Its warm medley plays nicely with the wood dresser and bedside table, and the pattern gives you permission to be a little bolder with throws and pillows. The trade-off is maintenance: a high-contrast pattern hides everyday fuzz and footprints better than a flat solid rug, but you’ll still want regular vacuuming around the edges. Compared with a simple neutral rug, this one adds personality without needing wall changes.
Go one size bigger than you think
If the bed front can sit on the rug, the room reads intentional, even in a smaller footprint.
Layer 2 — wood bedside table ($80) Adds height and a place for lamp glow
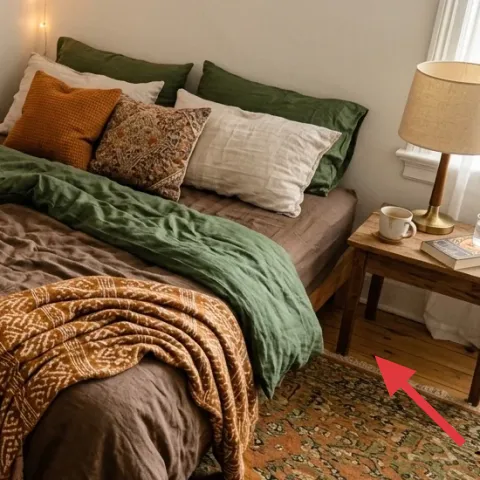
The wood bedside table on the right side does two jobs at once: it creates a landing spot for the plug-in lamp, and it balances the dresser on the left. I love this style choice because the warm grain repeats what your bed frame is already doing, so you’re not fighting the room’s existing materials. If you went with a small acrylic or metal side table, it would feel visually “lighter,” but it would also disconnect from the cozy warmth you see here. This is a renter-friendly win because it’s freestanding and you can move it to another room—or sell it—when you move.
Match the wood warmth, not the exact finish
Similar undertones (not identical stain color) make the whole set feel cohesive without looking cloned.
Layer 3 — plug-in table lamp with beige drum shade ($60) Keeps light soft and forgiving
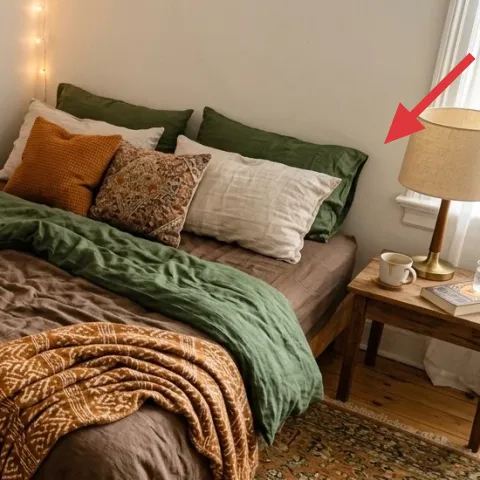
The plug-in lamp with the beige drum shade is doing the heavy lifting for the “late evening” feeling. The shade color is key: it warms the light, so green and rust textiles look richer instead of flat or gray. Choosing a table lamp over a ceiling-focused approach is also practical for renters—no rewiring, no landlord approvals, just a nearby outlet and a cord you can route along the baseboard. The trade-off is scale: a too-tiny lamp shade can look lost beside a bed, so picking one with a substantial silhouette is what keeps it visually grounded on the bedside table.
Warm the whole palette with a neutral shade
Beige or cream shades are the easiest way to keep earthy colors looking intentional.
Layer 4 — string lights along the wall ($15) Adds gentle ambience without wall work
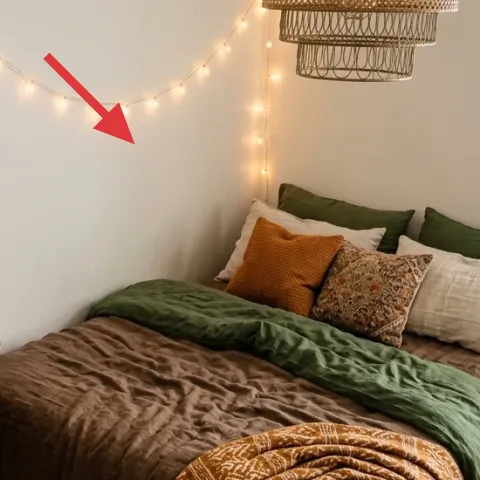
The string lights arc across the wall behind the bed, which makes the head-of-room feel “framed” even though you’re not hanging anything permanent. I like that they sit higher than the lamp shade, so you get layered light sources at different heights: lamp at table level, string lights at wall level, and the rug anchoring everything below. The trade-off is that string lights can look messy if they’re stretched too tight or too far apart, so spacing the bulbs consistently matters. Instead of installing fixtures, this is an inexpensive, removable way to add depth and mood right where your eyes land when you enter the bedroom.
Don’t plug in extra features you won’t use
If the set has multiple modes you never touch, skip it—simple warm-only strings usually look best in bedrooms.
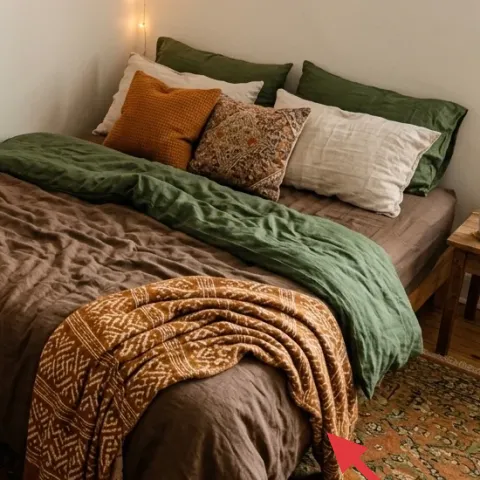
Layer 5 — green throw blanket folded on the bed ($60) Brings the dominant color into the “everyday” zone
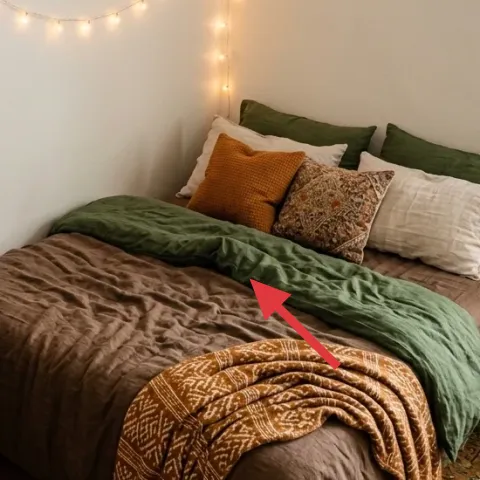
This green throw blanket is folded across the bed in a way that reads casual, not styled-to-the-inch. The depth of the green echoes the other green accents in the pillows, so the whole palette feels deliberate instead of random. I’d rather start with a single bold color on a large textile like this than rely on small decor objects; it’s the easiest way to make the room feel finished fast. The trade-off is weight and drape: choose a throw that lays smoothly without stiffness, because lumpy folds look messy instead of cozy. When you get the fold right, it also covers less-perfect bedding moments at a glance.
Fold, then tug once
A quick pull at the edge creates soft volume, which photographs and feels better than a flat blanket.
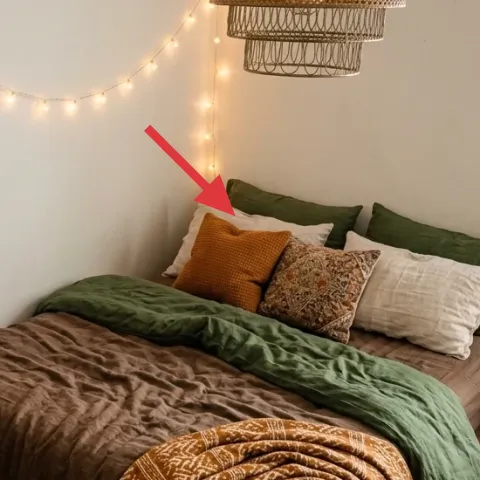
Layer 6 — dyed pillow covers ($30) Adds rust warmth without buying matching sets
Make it instead of buying it
Dyed pillow covers let you create a rust-and-terracotta tone that matches the room’s green-and-cream palette, for less than buying a new cover.
Materials
- Cotton pillow cover (12×20 or similar) — 1 — thrift or sale — $10
- Fabric dye (rust/terracotta shade) — 1 kit — craft store — $8
- Table salt — ~1 cup — grocery — $3
- Plastic gloves — 1 pair — hardware store — $2
- Drop cloth or plastic bag liner — 1 — dollar store — $1
Steps
- Pre-wet the cotton cover so the dye spreads evenly.
- Protect surfaces with a drop cloth or plastic liner.
- Mix the dye according to the kit, then add salt as directed.
- Submerge or brush-dye the cover, then stir carefully so there are no dry pockets.
- Let the cover dye for the time listed in the kit (no shortcuts).
- Rinse in cool water until the water runs less cloudy.
- Wash once separately, then air-dry fully.
- Load the fresh cover onto the pillow insert, then fluff and place it between the cream and green cushions.
- Let the dyed cover fully dry before styling with throws so you don’t transfer any moisture.
Total DIY cost: $24 — saves about $6 over buying.
This rust-toned cover sits near the top row of pillows, so it reads as a “color note” every time you look at the bed. Dyeing lets you choose a shade that lives between terracotta and warm orange, which is exactly what keeps the room feeling earthy instead of overly bright. Buying a pre-dyed cover in the same shade is convenient, but it’s often either too saturated or too plain; DIY gives you control over how intense the rust looks. The main trade-off is timing—dye takes multiple rinses and a full dry—so it’s best to do it a day or two before you style the bed.
Pick a kit that dyes cotton well
For the closest match, the cover material matters more than the brand name.
Layer 7 — cream decorative pillow cover ($30) Softens the green and keeps the palette airy

The cream pillow cover is the breather in the arrangement: it gives your eye a light landing between the green throw and the rust accents. Visually, that contrast makes the green look deeper and the wood look richer, without needing extra patterns. I like choosing a cream tone over another warm color because it also pairs with the beige lamp shade, so the lighting and textiles support each other. The trade-off is that cream shows lint more than darker covers, but the pattern and texture in the throws hide a lot, and a quick lint roller fixes the rest. This is the small swap that prevents the bed from looking too “busy.”
Blend in texture, not just color
A slightly woven or textured cream cover reads richer than a flat, shiny fabric.
The cost, layer by layer
| Layer | Item | Cost |
|---|---|---|
| 1 | Patterned area rug (5×7) | $200 |
| 2 | Wood bedside table | $80 |
| 3 | Plug-in table lamp with beige drum shade | $60 |
| 4 | Warm string lights set | $15 |
| 5 | Green throw blanket | $60 |
| 6 | Dyed pillow cover (retail equivalent) | $30 |
| 7 | Cream decorative pillow cover | $30 |
| Total | $475 | |
A cheaper variant keeps the same layout: swap in a smaller patterned rug if the room is tight, choose a basic beige shade lamp, and use two pillow covers instead of three. The overall goal is still the same—layered color and texture without changing anything permanent.
What worked, what didn't (across the whole room)
The strongest win here is layered textiles: the rug anchors the floor, and the throws/pillows give the bed depth that feels styled without wall changes. Warm lighting also does a lot—string lights plus a beige-shaded lamp keep the palette from reading flat. The only downside is that this look rewards frequent minor upkeep, especially with light-colored pillows.
What worked
- The patterned rug hides everyday foot traffic while making the bed zone feel intentional.
- The beige drum lamp shade warms the green and rust textiles so they read richer.
- String lights create a “frame” behind the bed without using nails or wall anchors.
- The green throw introduces the dominant color at a large scale, not just through small decor.
- Rust-and-cream pillows add color contrast without turning the bed into a full matching set.
- Keeping cream in the mix prevents the palette from becoming too heavy or muddy.
What didn't
- Cream pillow covers show lint faster, so they need quick maintenance after moving around.
- If the string lights are spaced unevenly, they can look accidental instead of curated.
- Too many competing patterns (rug plus multiple busy throws) can blur together in photos.
- Using only neutrals for throws makes the bed feel unfinished once the lamp is off.
What we'd skip if we did it again
Skip a matching “set” approach where every pillow, throw, and lamp shade come from the same collection. This room works because the textures and tones repeat, but the objects don’t look identical.
Skip cool-white light sources. In a green-and-wood palette, bright cool bulbs can make the room feel clinical and flatten the colors; a warm lamp shade and warm string lights keep everything softer.
Skip going too symmetrical with blanket folds. A slightly off-center drape looks more lived-in and hides small bedding imperfections better than perfectly centered styling.
Frequently asked
How long does this bedroom update take?
Plan for about a day to place the rug, set the bedside table, and style the bed. Styling usually takes 30–60 minutes because it’s mostly fold-and-fluff work. The only timing “variable” is dyed pillow covers: allow a full day for dye rinsing and drying, then style once everything is completely dry.
What if my bedroom is smaller than the photo?
Keep the bed textiles, but adjust scale: choose a smaller rug size that still sits under the front edge of the bed. For lighting, the plug-in lamp should stay—string lights can be kept shorter and closer to the bed wall so they don’t visually crowd the room. Also consider fewer pillow covers (two tones instead of three) to avoid pattern overload.
What if my bedroom is bigger and the bed feels lost?
Go up one rug size if you can, and add a little more “height” with light sources—string lights help here. You can also extend the green throw so it spreads farther across the bed, keeping the dominant color present at a larger scale. A taller lamp or slightly wider bedside table can help too, as long as the lamp still fits the bedside proportions.
Where should I shop differently to get this look for less?
For the lamp and rug, browse big-box home sections for budget-friendly basics, then focus on texture and shade color rather than brand. Thrift stores are great for wood side tables and frames, and craft stores handle string lights easily. For pillow covers, look for cotton covers on sale if you plan to dye one.
What’s the biggest mistake people make with this style?
Overloading the room with matching patterns. The look here works because the rug has pattern, while the bedding keeps one dominant color (green) plus two complementary tones (rust and cream). If everything is patterned, your eye doesn’t know where to rest.
Will this still work if I don’t dye anything?
Yes. You can buy rust or terracotta pillow covers, then keep the same layering order: cream pillow for contrast, rust for warmth near the top, and green as the largest textile color. The key is repeating the green at least once on the bed surface so the lamp light and textiles feel like one palette.
More in Bedroom

7 no-drill bedroom swaps for a $500 renter-friendly reset
A warm, earthy boho bedroom refresh built from move-friendly swaps: patterned rug, plug-in lamp, string lights, and layered throws. Total D…
Under $500: boho bed-by-the-window refresh with 7 renter swaps
A boho “bed by the window” look built for renters: warm curtains, layered textiles, and wall texture—without drilling. This refresh uses 7 …
Under $800: warm terracotta bedroom lounge refresh with 7 layers
A warm terracotta bedroom lounge refresh for homeowners, built from 7 specific upgrades totaling $770. Focus: a shag rug underfoot, a tan v…