
- Square footage
- works well on ~60–120 sq ft patio seating zones
- Cost
- $317 total, under a $400 ceiling
- Difficulty
- Easy (textiles + styling)
- Renter-safe
- Yes—no drilling, everything packs up
Why warm wood-and-blue styling is the patio seating of 2026
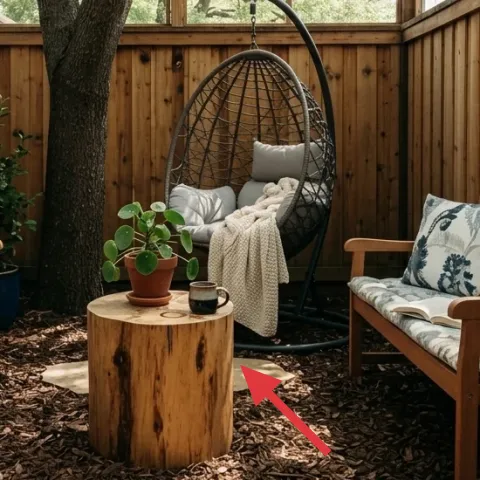
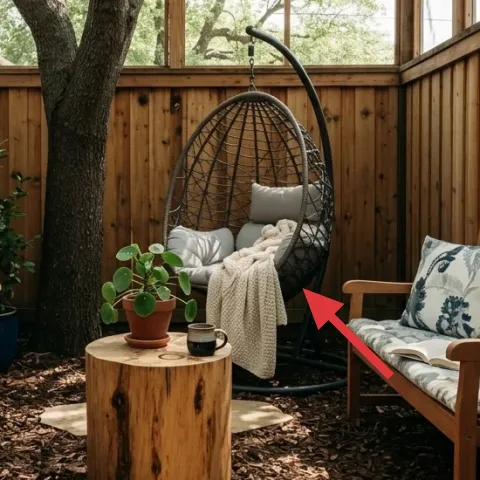
What I love here is the way soft textiles calm down the chunky wood fence—an outdoor rug anchors everything on the dirt ground, and patterned throw pillows keep the chairs from looking too stiff. The cream throw blanket on the hanging egg chair adds contrast with cozy, light-on-texture softness. Then the string lights bring the whole setup into that after-work, golden-hour mood without changing a single fixed surface. For shared housing, this works because the “main” visual elements are all things you can box and move.
I caught myself wanting to “fix” the patio by swapping hardware and planning a bigger structural upgrade. Then I remembered how often shared houses ask you to move on a timeline you didn’t choose. Every time I’ve done that, I ended up leaving good furniture behind—or worse, trying to reuse pieces that didn’t travel well. This look is the opposite: it leans on removable rug + textiles + small planters, so it survives both living-room feelings and move-day reality.
Layer 1 — outdoor rug ($200) Defines the seating zone on dirt
An outdoor rug is the foundation here, especially because this patio is on dirt ground instead of built-in flooring. Choose one that sits wide enough to go under the chair fronts and the wooden stump side table, so the space feels “designed” instead of staged. The trade-off is that outdoor rugs need a little more shake-off and spot-cleaning, but they’re still completely moveable. Compared with buying new seating, the rug gives you the biggest visual change per box count. In photos like this, it’s also what keeps blue-and-green accessories from looking random.
Buy for chair coverage
When a rug reaches under the front legs, it reads as one zone, not separate furniture islands.
Pattern helps you hide wear
Leafy or speckled patterns make the “outdoor life” mess less noticeable between deep cleans.
Layer 2 — cream throw blanket ($25) Adds softness against rustic wood
The cream throw blanket on the hanging egg chair is doing two jobs: texture contrast and visual warmth. Cream reads brighter than the darker wood fence, so it keeps the whole setup from feeling heavy, especially near the middle where the chair sits. The best version for shared housing is lightweight enough to fold small and still look intentional when draped. Compared with adding another pillow layer, a throw blanket creates “depth” without adding more objects to pack. The trade-off is that throws can slip off smooth chair backs, so folding the edge over once helps it stay put.
Drape, don’t stack
A diagonal drape looks curated and packs flatter than a thick folded stack.
Avoid delicate fringe
Fringe tangles outdoors fast, and it’s a pain when you’re tossing everything into boxes.
Layer 3 — dyed pillow covers ($30) Lets you match the blue without buying new pillows
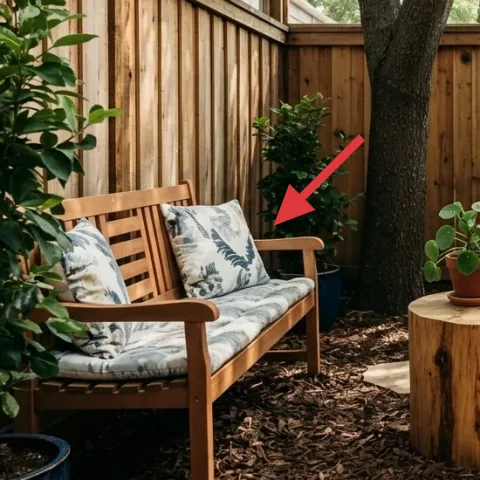
These patterned throw pillows bring the blue color thread into the seating. Dyeing covers is the move for shared renters because you can refresh the look (lighter, deeper, more “sage-friendly”) without buying matching pillow hardware or worrying about style fatigue later. The trade-off is that color control takes attention—fabric type and initial color matter. Still, it’s way cheaper than replacing every cushion, and it’s easy to pack as flat fabric squares. This also keeps the styling flexible: a future shade shift is just a new dye batch away.
Make it instead of buying it
DIY dyed pillow covers so the blue stays cohesive with the rug and plants—without needing new pillows that won’t move well.
Materials
- Fabric dye (blue shade) — 1 kit — store: craft store — $10
- Salt (for dye set) — 1 box — grocery store — $3
- Disposable gloves — 1 pair — hardware or drugstore — $2
- Plastic tarp/garbage bags — 1 roll — convenience store — $3
Steps
- Spot-check the fabric: confirm the pillow cover is dye-friendly (cotton or blend works best).
- Protect surfaces with a tarp and lay out the cover flat.
- Dissolve dye and salt according to the kit directions, then fully submerge the cover.
- Stir and soak for the recommended time, keeping the fabric moving so color doesn’t pool.
- Rinse in cool water until it runs clearer, then gently squeeze (don’t wring).
- Air-dry flat away from direct sun.
Total DIY cost: $18 — saves about $12 over buying.
Layer 4 — string lights ($15) Brings warm evening glow without hard installs
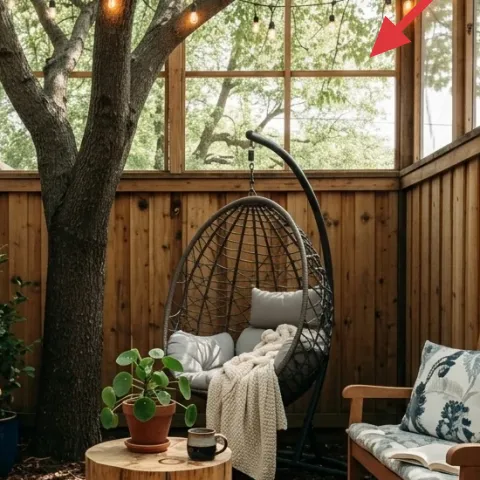
The string lights across the top of the patio are what makes this setup feel lived-in, not just “daytime furniture.” A warm bulb temperature (think amber-white) plays really nicely with the warm wood fence and the sage-green leaves from the plants. For shared housing, the win is that these lights are removable and packable, so you’re not locked into one layout. The trade-off is that you’ll want a plan for where the cord can rest safely so it doesn’t become a trip hazard. Compared with overhead lighting, string lights are also the easiest way to get that glow after the sun goes down.
Match the warmth
Warm bulbs keep the blue pillows from looking washed-out.
Keep cords off walking paths
Routing along beams creates a cleaner look and prevents snagging while moving chairs.
Layer 5 — terracotta planter pot ($20) Adds sun-baked color in the center
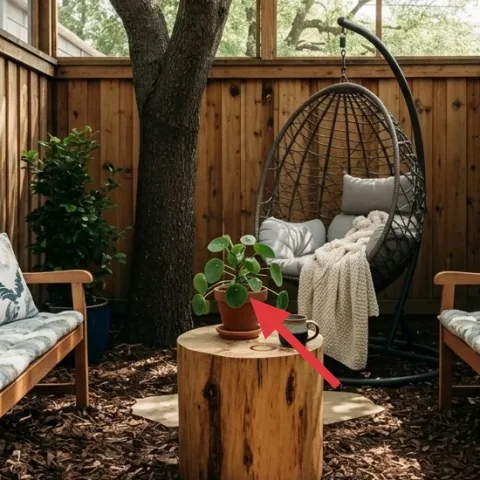
A terracotta planter pot is a small object, but it makes the whole palette feel intentional. In this photo, the terracotta color softens the cool greens and makes the outdoor setup feel warmer, especially around the hanging egg chair area. Choosing a medium, lightweight pot helps for shared housing because you can move it in a single tote instead of finding room for a big planter later. The trade-off is that terracotta can be heavier and can dry out faster, so outdoor watering habits matter. Still, it’s an easy swap compared with changing the furniture layout.
Use a consistent pot shape
Even if plants change, repeating one pot silhouette keeps the look cohesive.
Layer 6 — ceramic coffee mug ($12) Small table styling that reads like a real day
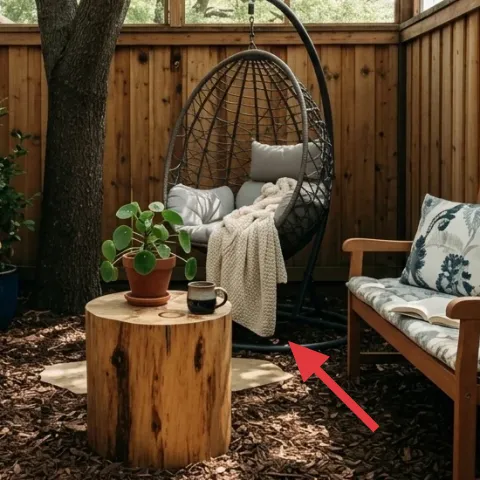
The ceramic coffee mug on the stump side table makes the patio feel like it’s actually being used. It also anchors the eye at the center of the scene, which helps when the rest of the area is busy—pillows, plants, and the egg chair. For a move-friendly refresh, this is the kind of styling that doesn’t take up space and doesn’t require hardware. The trade-off is that it’s easy to over-style a small surface, so one functional object (mug) beats five decorative ones. Compared with adding a second lamp or side table, the mug creates mood instantly with almost no bulk.
One object, not a set
If the table is small, keep it to one “moment” so the rug still carries the room.
Layer 7 — gray planter pot ($15) Adds contrast beside the rug edge
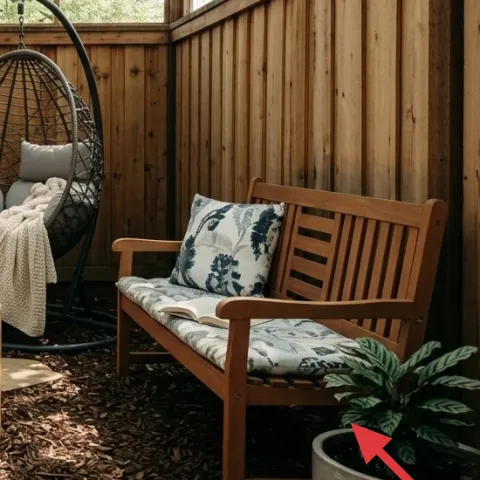
The gray planter pot on the right side balances the terracotta and keeps the plant cluster from looking one-note. Gray is especially useful here because it’s neutral against both the warm wood fence and the blue textiles, so it doesn’t compete with the pillows. Picking a medium gray pot that’s easy to carry helps with the shared-housing constraint—no one wants to discover planter weight on move day. The trade-off is that gray can look flat if the plant selection is too sparse, so aim for fuller foliage. This is a subtle choice, but it’s one of the reasons the setup reads as “styled,” not accidental.
Don’t go too matchy
Keeping two pot colors (terracotta + gray) is the trick—one color can feel repetitive fast.
The cost, layer by layer
| Layer | Item | Cost |
|---|---|---|
| 1 | Outdoor rug for the seating zone | $200 |
| 2 | Cream throw blanket | $25 |
| 3 | Dyed pillow covers (DIY layer) | $30 |
| 4 | String lights (warm bulb set) | $15 |
| 5 | Terracotta planter pot | $20 |
| 6 | Ceramic coffee mug | $12 |
| 7 | Gray planter pot | $15 |
| Total | $317 | |
If you need a cheaper version, swap the outdoor rug for a smaller patterned runner and choose one throw pillow color direction. That keeps the blue thread and soft texture while lowering the biggest-ticket item in the layout.
What worked, what didn't (across the whole room)
The overall look works because it repeats a few elements—warm wood, soft textiles, and plant greens—without adding permanent changes. The biggest wins are the rug anchoring the dirt patio and the string lights turning it into an evening hangout.
What worked
- The outdoor rug creates a clear seating zone even when the floor is dirt.
- Cream throws soften the heavy wood fence tones and keep the hanging chair visually light.
- Blue patterned pillow covers add color that matches plants without needing new furniture.
- Warm string lights bring atmosphere quickly, without any drilling or hard-wired fixtures.
- Terracotta and gray planters give contrast so the green doesn’t blend into the wood.
- A single ceramic mug on the side table makes the scene feel lived-in, not staged.
What didn't
- Too many decorative small items on the stump table would crowd the center.
- Overly delicate fabric trim on throws would tangle faster outdoors.
- Matching every planter in one color can make the palette feel flat and repetitive.
- Cool-white lighting would fight the warm wood and make the blue look less flattering.
- Skipping the rug can make the seating feel like disconnected pieces instead of one plan.
What we'd skip if we did it again
Skip “permanent-feeling” upgrades like repainting fence panels or adding fixed hardware. On a shared timeline, those changes don’t pack, and they usually add stress when you move.
Skip oversized, heavy outdoor furniture refreshes. The look here is driven by washable textiles, removable lighting, and small plant objects—so focus your budget on pieces that fit in boxes.
Skip piling on small decor. One mug moment on the stump table and two planter colors are enough—when everything is a focal point, nothing reads as intentional.
Frequently asked
How long does this patio seating refresh take?
Plan for about 2–4 hours for the full swap: rug setup, draping the cream throw, arranging pillows, and placing planters and the mug. If you DIY the pillow covers, add 3–5 hours depending on dye soak and dry time. Most of the time is passive—rinsing and drying—so the “active” work stays pretty manageable.
What if I’m renting and can’t add anything to the fence?
That’s fine. Choose freestanding placement for everything you’re adding: the rug goes down on the ground, throws and pillows are portable, and planters sit anywhere you can safely water. For the string lights, use routes that run along existing beams or overhead structures that don’t require hardware changes.
Can I make this work with a smaller patio?
Yes—downsizing the rug is the easiest adjustment. If the space is tight, choose a smaller rug size that still lands under the chair fronts, then lean on fewer objects: one throw, one planter color, and a single “moment” on the stump table. Keep the string lights, because vertical height makes a small patio feel taller.
What if my patio is larger and needs more coverage?
Go broader with the rug first, so it reaches the seating area edges. Then add plant group volume: a second planter in the same gray or terracotta silhouette. Leave the wall and furniture styling mostly unchanged—too many competing patterns will make it feel busy instead of cohesive.
Where should I shop for the easiest move-friendly pieces?
Start with textiles and lighting: rug and throw blankets from home goods retailers or outdoor-focused sellers, plus string lights from general home or seasonal sections. For planters, look for lightweight medium sizes that won’t weigh you down during moves. For pillow covers, search “outdoor throw pillow cover” if you want quick swaps, or dye a pair if you want a color match.
What’s the biggest mistake people make on outdoor shared rentals?
They spend money on big items that don’t travel well, like heavy stands or permanent-looking hardware. The better approach is to build the look with removable textiles, lighting, and plant objects—things you can carry in totes and fold into boxes. If the main pieces are move-ready, your next place won’t require a full redesign.
More in Outdoor & Patio

7 renter-friendly ways to soften a patio seating area
A patio seating refresh for shared renters: $400 worth of move-friendly swaps (rug, throws, lights, and planters) keeps the look intentiona…
How to refresh a patio lounge corner for under $700
A lush patio lounge corner starts with the big visual moves: a cream-and-gray rug, a painted coffee table, and warm string lights. This wee…

How to build an outdoor seating nook for under $1,500
A cream-sofa outdoor seating nook gets grounded with a black-and-cream striped rug, warm lighting, and layered natural textures. This weeke…