
- Best for
- Colorful patio refreshes with portable pieces
- Season
- Spring through early fall
- Weatherproof
- Choose washable covers and sheltered styling
- Cost
- $500 total
Why this green-and-pink outdoor seating nook is the easy move-friendly corner of 2026
The hero look leans boho-tropical: crisp botanical art on the stone wall, a green daybed-backed sofa, and warm rust-and-blue pillows that read from across the patio. Texture does the heavy lifting with woven placemats, a patterned cushion, and the glossy leaves of a large potted plant. The trick is that every element here is “grab-and-go” instead of permanent—nothing depends on landlord changes. For shared housing, this is the exact direction I’d copy because you can transport the textiles and big accents as boxes with handles.
I almost overthought the shelf styling the first time I tried this kind of vibe—then I realized I was trying to match every bottle. In the photo, it’s the grouping that matters more than perfect sameness: a few glass bottles, a pair of green ceramics, and one bold botanical frame. Once I stopped chasing symmetry, the whole corner looked intentional even when it was slightly imperfect.
Layer 1 — framed botanical print ($60) Green-wall anchor with a real print
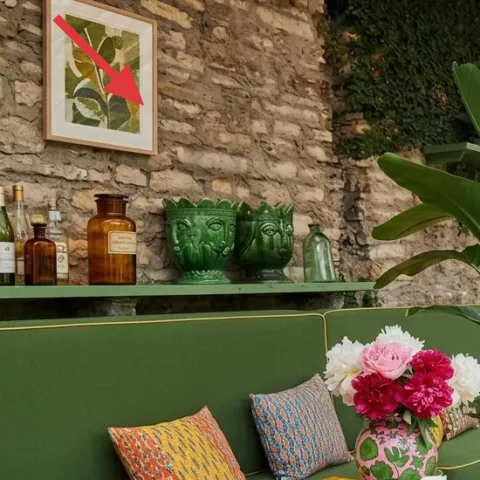
This framed botanical print sits high on the stone wall and gives the corner a “designed” focal point without committing to a permanent install. A framed piece is also roommate-friendly: it’s easy to carry, easy to pack flat, and it doesn’t require drilling into plaster or tile. The trade-off is that you have to live with whatever wall space you’re given, so the frame size matters—this one works because it’s large enough to read from the daybed. If you go smaller, the patio will feel more cluttered than styled.
Pick a frame you can survive moving with
Use bubble wrap and keep the back protected—prints are fragile, but they’re far easier than furniture swaps.
Layer 2 — patterned throw pillow in rust orange ($30) A DIY color hit on the daybed
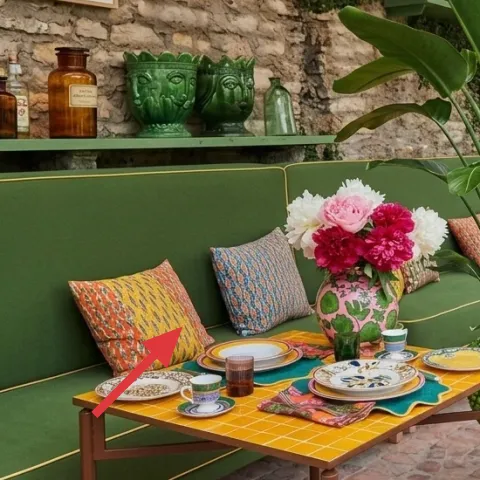
The rust-orange pillow provides the warmth that keeps all that green from turning flat. It’s one of the easiest high-impact layers because it reads as a color accent from across the stone floor, and it stacks well with the blue-patterned cushion beside it. I’d rather refresh one pillow this way than buy a whole new set, since shared housing means you’ll likely move again before you’re bored. The trade-off: dyed fabric will look slightly different from screen photos, so aim for “close-to-the-reference,” not exact.
Make it instead of buying it
DIY dyed pillow covers so the rust tone matches the patio’s warm accents without buying an all-new set.
Materials
- Fabric dye (rust or terracotta shade) — 1 kit — Target/Amazon — $10
- Table salt — 1 small box — grocery store — $5
- Plastic gloves — 1 pair — hardware store — $3
- Drop cloth or plastic tarp — 1 roll/sheet — hardware store — $2
- Large bucket or dye tub liner — 1 liner or repurposed tub — household — $5
Steps
- Wash the pillow cover (or a used cotton cover) to remove sizing so dye takes evenly.
- Mix the dye according to the kit directions in a bucket with water.
- Submerge the cover and stir constantly for the first few minutes to prevent blotches.
- Add salt as directed, then keep the cover moving while dyeing.
- Rinse in cool water until it runs clear, then wash once alone.
- Air-dry away from direct sun, then slide the cover over the insert.
Total DIY cost: $25 — saves about $5 over buying.
Don’t dye an already-polyester cover
If the cover is synthetic, it may not take dye—check the fabric tag first so you don’t end up with patchy color.
Layer 3 — wood-and-metal coffee table ($120) A styling stage for “summer objects”
This coffee table is the reason the whole nook feels collected instead of random: it’s the level where placemats, the flower vase, and small ceramics can sit together. The mix of warm wood tones and metal structure creates contrast with the green daybed sofa and keeps the palette from feeling too matchy. For shared housing, a coffee table is a sweet spot—big enough to anchor the seating area, but still manageable to move in a van if you’re careful with the legs. The trade-off is patience: you’ll want to take it apart before a move so it doesn’t become one more thing you dread.
Style it in “food-table layers”
Start with placemats, then add one flower moment, then one small object group—avoid scattering everything at once.
Layer 4 — flower-print cushion on front wicker chair ($25) Pattern you can swap without drama
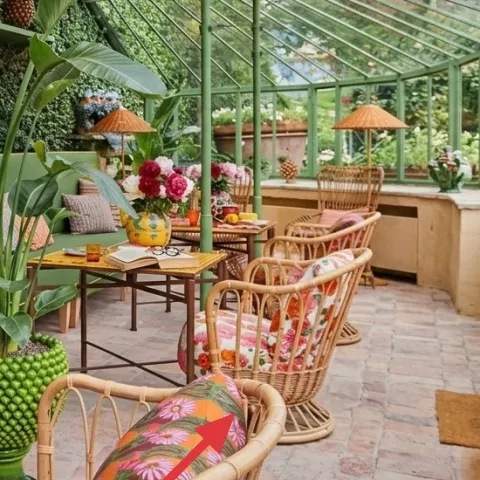
The flower-print cushion brings a playful pop that matches the pink blooms on the table, so the patio reads as one story instead of separate zones. Because it’s textile, it’s the easiest piece to pack in a flat bundle, and it’s also the most forgiving part of the look—if your next lease has different light, fabric pattern still carries the vibe. I like this over changing the whole chair, because the chair shape is already doing the heavy lifting and you only need a color bridge. The trade-off is that cushions can get dirty faster outside, so prioritize washable covers when possible.
Keep the pattern, shift the color
If you can’t find the same print, use a similar scale—small florals tend to look calmer with boho plants.
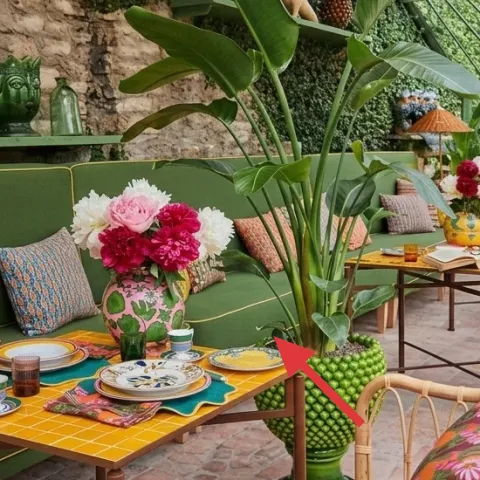
Layer 5 — large potted green plant in the foreground ($80) Instant height without a permanent change
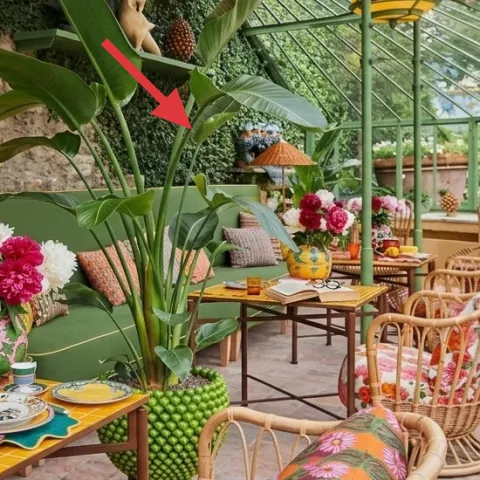
A large potted plant gives you vertical presence, which is everything on a patio where you can’t rely on built-in shelves at eye level. In the hero photo, the plant’s big leaves create a soft “frame” around the seating, and it also balances the busy stone wall behind. The best part for shared housing: you can transport it in a pot with a handle (or box it with packing paper) without changing anything fixed. The trade-off is logistics—plan your watering and check the light before the move so the plant doesn’t arrive to the new place already stressed.
Choose a pot you can carry
Look for wide handles or a lightweight nursery pot inside a decorative outer container.
Layer 6 — glass bottles and olive-brown bottles on the wall shelf ($140) A no-drill bar moment
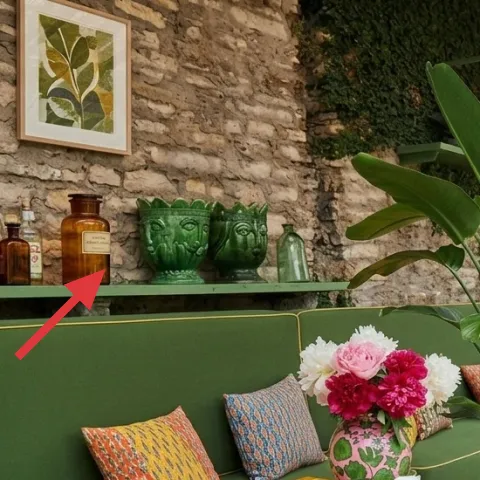
The bottle cluster on the wall shelf is a visual “palette builder”: it adds shine, varied heights, and warm amber tones that echo the rust pillow and the table objects. Even though the shelf itself is fixed in the photo, the styling is what you can recreate—swap in similar bottles, keep the grouping, and you’ll get the same curated feel. This is the exact kind of detail that makes shared spaces feel intentional without remodeling. The trade-off is cleaning: bottle surfaces collect dust, so plan a quick wipe-down during your weekly reset.
Group by height, not by brand
A tall bottle plus a few shorter ones reads more designed than an even lineup.
Layer 7 — decorative green ceramic planters on the wall shelf ($35) One color family, repeated

The green ceramic planters tie the whole palette together because they echo the wall’s green paint and the plant’s leaves at the same time. They also add texture that bottles can’t—glossy ceramic makes the shelf feel layered instead of flat. This is a cheaper way to get the “collectors shelf” look without filling the area with too many heavy objects. The trade-off: ceramic pieces chip if they’re packed carelessly, so wrap each planter individually and keep them in a box with cushioning. In a move, these are still easier than furniture.
Skip anything too heavy for one person
If you can’t lift it confidently with one hand, rethink it—your future-move self will thank you.
The cost, layer by layer
| Layer | Item | Cost |
|---|---|---|
| 1 | Framed botanical print | $60 |
| 2 | Patterned rust pillow cover (DIY option) | $30 |
| 3 | Wood-and-metal coffee table | $120 |
| 4 | Flower-print cushion cover | $25 |
| 5 | Large potted green plant (4–6 ft) | $80 |
| 6 | Glass bottle set for shelf styling | $140 |
| 7 | Decorative green ceramic planters | $35 |
| Total | $490 | |
If you want a cheaper variant, swap the coffee table for a thrifted side table (keep the same placemat-and-flower layering) and pick fewer bottles—three pieces instead of a larger cluster. You’ll still get the palette, height, and “styled table” effect without spending the full amount.
What worked, what didn't (across the whole room)
The overall win here is repeat color: green shows up in the wall, ceramics, and plant, while rust and pink keep the patio from feeling too monochrome. The other big success is height—plants and shelf items pull your eye up so the seating area doesn’t read flat.
What worked
- The framed botanical print gives the corner a focal point without any wall changes.
- Rust-and-blue pillows add contrast that reads well from across the patio.
- The coffee table styling keeps the center busy in a controlled, layered way.
- The large foreground plant adds vertical softness against the stone wall texture.
- The bottle cluster plus ceramic planters builds a curated shelf look.
- Textiles and décor move easily, which matters when leases change.
What didn't
- If the bottle group is too large, it turns into visual noise instead of a palette.
- Matching every fabric print too closely can make the look feel costume-like.
- Skipping a “tall” element (plant or shelf height) makes the nook feel compressed.
- Overloading the table with objects reduces breathing room around the flowers.
- Using a heavy planter that’s hard to carry makes move day harder than it should be.
What we'd skip if we did it again
Skip buying a full matching outdoor cushion set. In this kind of boho-tropical palette, one strong pillow (rust) plus one supporting print (blue or floral) gives you the color bridge without locking you into a specific pattern you may not love later.
Skip overfilling the wall shelf with “every pretty thing.” Keep to a small grouping—three bottle heights plus a pair of green ceramics—so the shelf looks curated instead of crowded.
Skip a plant in a decorative pot that’s too heavy to move. If the pot is awkward, you’ll postpone repotting or relocation, and the plant will look stressed long after you’ve done everything else.
Frequently asked
How long does it take to recreate this outdoor seating nook?
Plan about 2 to 4 hours for the core changes: swap in the framed botanical print, replace one cushion, reposition the plant, and style the coffee table and shelf. If you DIY-dye a pillow cover, add another 3 to 6 hours for setup, dye time, and rinsing (most of that is hands-off). A final 20-minute wipe-down and fluff is what makes it look finished.
Is this renter-friendly if I can’t change the wall shelf or railing?
Yes. This look works because most of what reads as “styled” is portable: textiles, a framed print, table objects, and plants. The photo’s shelf is fixed, but you can recreate the effect by swapping the bottle and ceramic styling you place on top. Avoid anything that needs permanent mounting.
What if my outdoor space is smaller than the photo?
In a smaller nook, keep the same structure—focal art, one statement pillow, one table styling moment, and one tall plant—but reduce the “number of bottles.” Try three items on the shelf instead of a larger cluster, and keep the coffee table to placemats plus one vase. The goal is repetition without crowding.
What if my space is larger and feels empty?
Add one extra height cue instead of more small objects. For example, keep your shelf cluster the same but choose a taller plant or add another framed botanical print on a nearby wall section you’re allowed to use. On the table, increase only the size of the runner/cloth so the surface doesn’t look like a random tray.
Where should I shop for the look if I want it move-friendly?
For the framed botanical print and textiles, prioritize thrift stores, home goods aisles, and online secondhand for the quickest match. For the plant and planters, search local nurseries and garden centers for pots you can carry. Bottles and ceramics are often easiest on marketplace and at vintage shops because you can choose similar heights without buying a set.
Biggest mistake to avoid on an outdoor shared-housing nook?
Over-styling the shelf and table at the same time. When both surfaces are busy, the eye doesn’t know where to rest, and the look becomes chaotic. Pick one “busy” surface (usually the shelf) and keep the other surface calmer by using fewer objects and letting the flowers or plant do the visual work.
More in Outdoor & Patio

7 renter-safe swaps for an outdoor seating nook, $500
Outdoor seating nook refresh for shared housing, built around move-friendly swaps totaling $500. Get a greener, more lived-in look using a …

Rust-and-green patio garden seating refresh, $800
A patio garden seating setup with rust-brown warmth and deep-green plants—now you can recreate the look for about $800. This weekend-friend…
Under $500: move-ready patio seating area refresh with 7 no-drill swaps
A warm, backyard patio seating area refresh on a $500 shared-housing budget—using seven move-friendly upgrades (pillows, string lights, a l…