- Best for
- warm vanity vibes
- Cost
- under $400
- Time
- 2–4 hours
- Renter-safe
- yes—no-drill swaps
Why this olive-and-terracotta candle-and-ceramic styling is the vanity corner of 2026
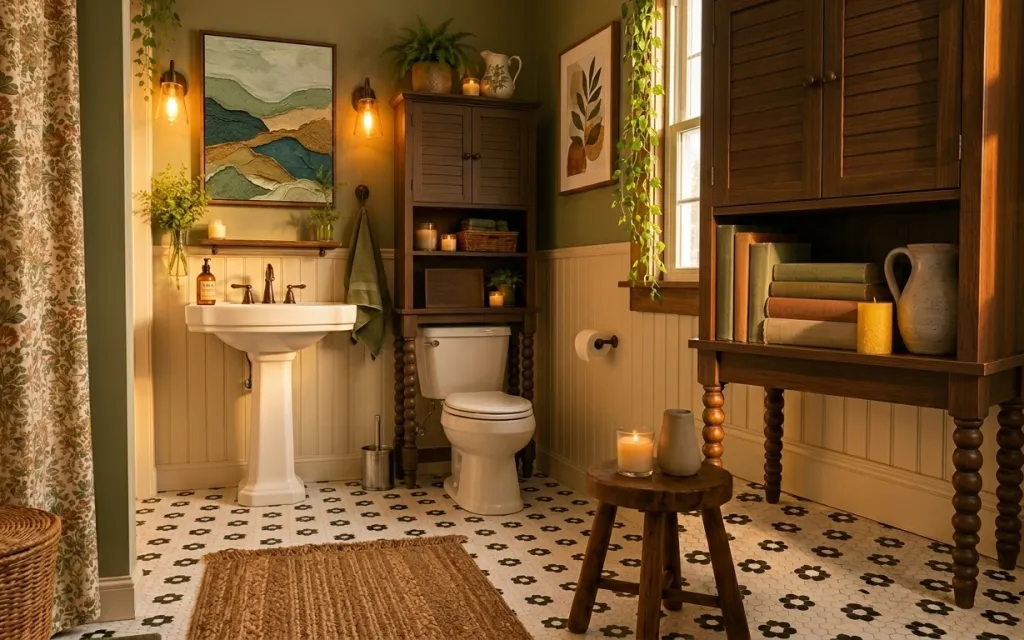
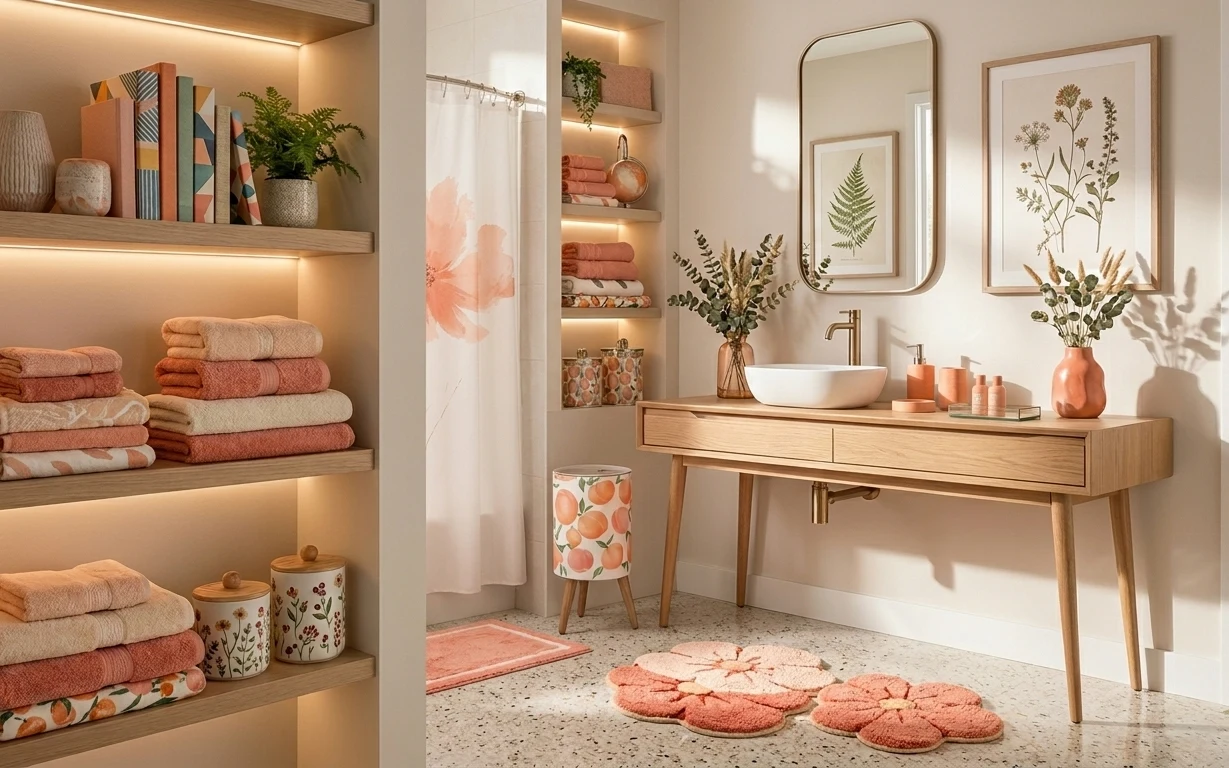
Start with what the room already does well: warm wood tones, soft wall lighting, and that calm green backdrop. Then borrow the look’s texture mix—patterned rug on the floor, a ceramic jug on the open shelf, and a pillar candle sitting low on a stool. The framed landscape prints bring movement without feeling busy, and the trailing greenery adds a “kept, not curated” feel. For renters, the best part is that everything here can go up with Command-style hanging or stays freestanding, with no lease-level changes.
I used to overthink bathroom styling and end up with either “pretty but slippery” (too-slick surfaces) or “practical but flat.” This is the version where I keep one anchor piece in pattern (the rug) and repeat the palette twice—olive green and warm neutrals—so it reads intentional even in imperfect lighting. The candle placement also matters; I learned that a candle too high can feel decorative instead of soothing.
Layer 1 — pillar candle ($25) DIY: pour your own warm glow
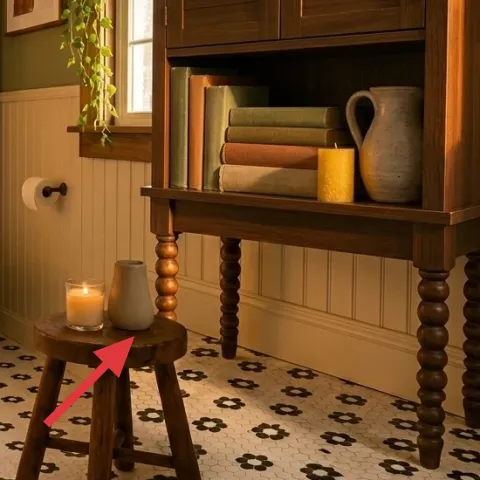
This pillar candle lands on the small wood stool in the right side of the corner, keeping the light source at a countertop-to-floor “just right” height. The trick is scale: a candle that’s tall enough to read, but not so huge that it crowds the cabinet shelves, so the room stays airy. If you’d rather skip store-bought, this layer is a perfect DIY because you can control the size and keep the color family in the same warm-beige range as the rug. The trade-off is that DIY candle consistency takes a couple tries, but the payoff is a custom candle that matches the space.
Make it instead of buying it
This candle pour recreates the same warm pillar look by choosing a simple jar, a steady wick, and a wax blend that holds shape.
Materials
- Wax (enough for 1 pillar-style candle) — store craft aisle — $10
- Candle wick (pre-tabbed) — craft store — $3
- Jar or mold for pouring — thrift store or craft store — $6
Steps
- Set up a double-boiler: pour water into a pot and melt wax in a heat-safe container.
- Attach the wick to your center point (jar lid or wick holder) so it stays straight.
- Pour wax slowly into the jar/mold to avoid bubbles.
- Let the candle cool undisturbed until fully set.
- Trim the wick to about 1/4 inch.
- Test-burn briefly, then style the candle on the stool.
Total DIY cost: $19 — saves about $6 over buying.
keep candle color warm, not smoky
Go for off-white, honey, or amber tones so the glow echoes the rug’s beige instead of fighting the olive walls.
Layer 2 — potted plant on cabinet shelf ($30) trailing greenery brings “alive” without clutter
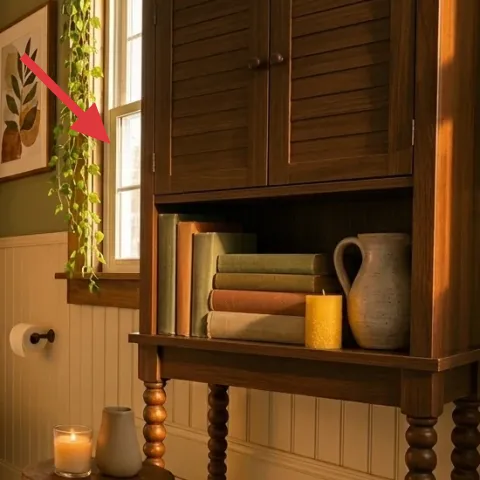
One potted plant on the cabinet shelf (near the top of the cabinet) gives you the same lived-in rhythm as the trailing vines, but in a more controlled, tidy form. The leaf shape matters here: you want something that reads leafy and organic from across the room, not a plant that looks too tiny at a shelf height. This works especially well next to framed landscape prints because both bring “nature” cues without changing the room’s color temperature. I like this over adding more small decor objects because plants add volume and depth while still feeling purposeful in a rental.
match leaf color to the wall’s undertone
In this palette, choose a medium to dark green so it harmonizes with the olive accents rather than turning gray.
Layer 3 — ceramic jug on cabinet shelf ($30) adds soft curves and a usable styling surface
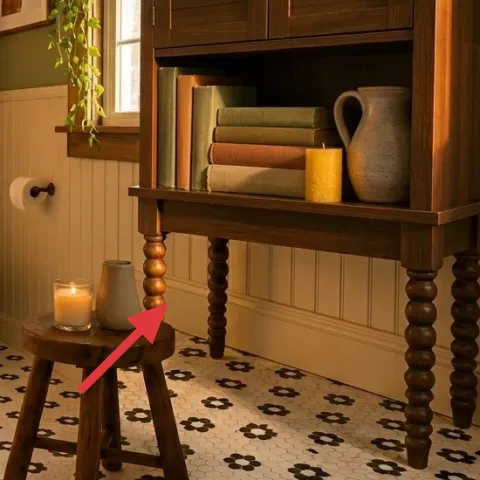
The ceramic jug anchors the shelf styling because it’s both decorative and functional: you can treat it like a vase, or keep it empty for texture. Visually, the matte ceramic finish plays nicely with the warm wood cabinet and the candle’s glow, so the shelf doesn’t look like a single flat color block. I chose this layer over another candle-adjacent accessory because ceramic texture shows up even when the flame is off, and it doesn’t require extra lighting. The trade-off is that ceramics can look a little “precious,” so handling carefully is worth it when setting it near a frequently used sink.
place it where you naturally pause
If the shelf is in your line of sight while brushing your teeth, keep the jug angled so the spout and handle catch light.
Layer 4 — framed landscape print ($45) repeat the green palette with wall-scale art
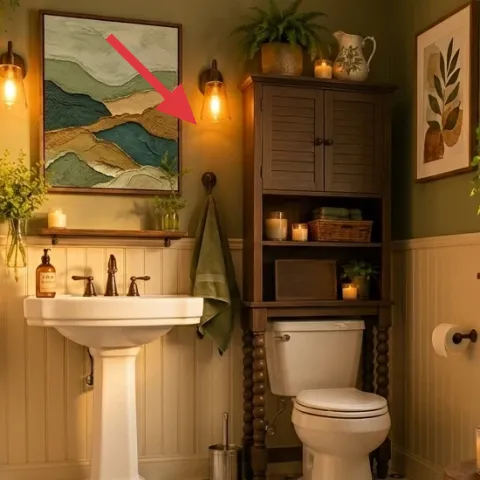
The framed landscape print helps the whole corner feel collected, not just “decorated.” In the photo, the print sits above the sink area, so it works like a focal point for the entire routine. Choose a landscape with greens (and at least one sandy or warm neutral tone) so it echoes the olive walls and the rug. This is a renter-friendly layer when hung with Command hooks (or a picture-rail hook if your rental already has a rail). I’d skip adding more small frames nearby—the prints already do the heavy lifting, and too many frames can make the bathroom feel crowded.
avoid hanging art too high above a working sink
Keep the bottom edge comfortably above the toothbrush zone so it never feels like it’s leaning into your daily use.
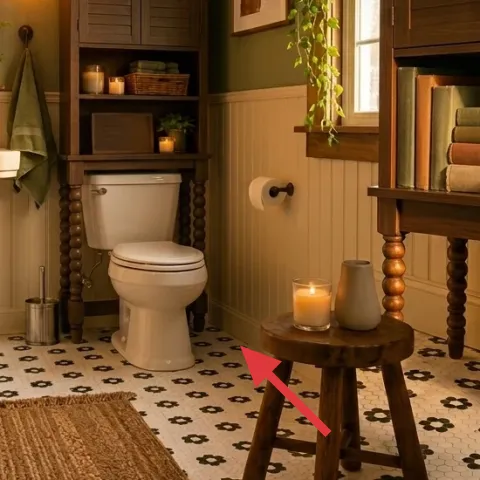
Layer 5 — wood stool table ($60) creates a low styling “stage” for candles
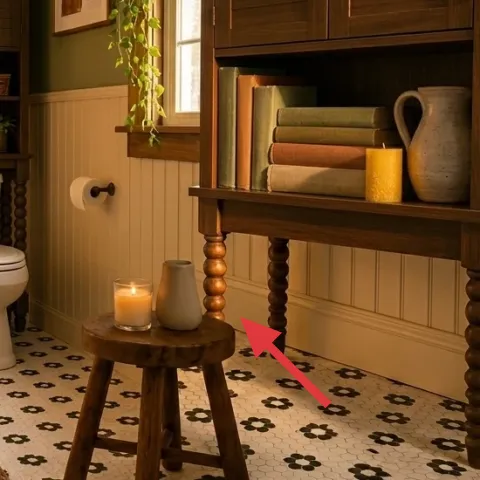
A small wood stool table is what makes the corner feel layered at different heights. Because it sits low, the candle reads as part of the floor-to-shelf composition, instead of competing with the framed art above. The dark wood tones also repeat the cabinet’s finish, which visually ties the styling together even when you change smaller items like candles. Compared with using a tray on the cabinet, this gives you a clearer silhouette and better separation, especially in a compact bathroom. The trade-off is that stools can feel wobbly if the legs are uneven—level placement matters.
keep the top uncluttered
One candle plus one small object is enough; a cluttered stool pulls attention away from the sink.
Layer 6 — green floral curtain panels ($60) softens the window area without drilling
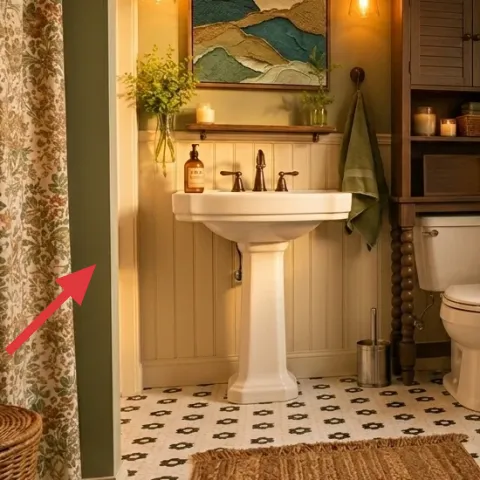
Green floral curtain panels bring softness and pattern to the far left side of the corner, balancing all the straight lines from the cabinet doors and the sink pedestal. This layer works because textiles absorb sound and light, making the space feel calmer at night when the wall lights are on. For renters, curtains are an easier win than switching hardwired fixtures: use a tension rod or standard curtain hardware your landlord already allows, and make sure the fabric reaches far enough to cover the window’s harsh edges. The trade-off is that busy patterns show dust more than plain sheers, so regular shake-outs are part of keeping it fresh.
steam or hang-dry to get crisp vertical folds
Even cheap panels look more “designed” when the folds align from top to bottom.
Layer 7 — patterned area rug ($80) grounds the corner and hides real-life water
The patterned area rug does the most for the overall look because it creates a stable base under everything else—stool, candle, sink, and cabinet. In this photo, the rug’s repeating shapes help camouflage small splashes and footprints that happen even with careful bathroom habits. I’d rather do this than rely on multiple small mats because a single rug ties the palette together and makes the floor feel intentional. Choose a pattern that includes both warm beige and olive/green tones, so your accessories don’t have to match perfectly to “blend in.” The trade-off is sizing: too small looks cramped, so pick a rug that reaches far enough into the open floor.
place the rug so the pattern centers on the vanity zone
A centered rug makes the whole corner look balanced even if the room layout is slightly off.
The cost, layer by layer
| Layer | Item | Cost |
|---|---|---|
| 1 | DIY candle pour pillar candle (retail equivalent) | $25 |
| 2 | Potted plant on cabinet shelf | $30 |
| 3 | Ceramic jug on cabinet shelf | $30 |
| 4 | Framed landscape print (16×20) | $45 |
| 5 | Wood stool table | $60 |
| 6 | Green floral curtain panels | $60 |
| 7 | Patterned area rug 5×7 | $80 |
| Total | $330 | |
For a cheaper variant, swap the framed landscape print for a single larger print at a discount, choose solid-color curtain panels in the same olive family, and pick a simpler rug pattern with the same beige/green palette.
What worked, what didn't (across the whole room)
The corner reads cohesive because the palette repeats (olive, warm neutrals, dark wood) and the textures land in three zones: floor (rug), midline (stool/candle), and wall (framed art). The candle placement also makes the room feel softer after dark. The only thing that needs restraint is how many small objects you add to the shelf.
What worked
- The patterned rug hides everyday splashes while still looking intentional under the pedestal sink.
- The candle on a low stool changes the “temperature” of the corner without adding clutter.
- The framed landscape print gives a clear focal point that matches the room’s green undertones.
- The ceramic jug adds texture even when the candle is unlit.
- The plant on the cabinet shelf keeps greenery present without filling every surface.
- The green floral curtain panels soften straight lines and make window light feel gentler.
What didn't
- Too many small shelf accessories near the jug can compete with the framed prints.
- A rug that’s too small makes the vanity zone feel floating instead of anchored.
- Candle colors that run cool or gray can fight the warm wood tones in this corner.
- Curtains that are too short look “unfinished” and won’t balance the wall cabinet height.
What we'd skip if we did it again
Skip a second decorative candle. With wall-mounted lights already in place, two candles can turn the corner from calm into busy, especially in a compact bathroom. Keep one candle on the stool and put the rest of the styling weight on the rug and framed print.
Skip a matchy-match tray system on the cabinet shelf. The ceramic jug already handles texture and shape, and repeating too many similar items makes the shelf feel staged. If extra styling is needed, add only one plant or one small ceramic moment—nothing more.
Skip curtain panels in a fabric that’s too thin. Sheers can look washed out next to warm wall lighting and may read like a temporary fix. Choose a panel with enough body for vertical folds, so the window area looks composed from the doorway.
Frequently asked
How long does this bathroom vanity corner refresh take?
Plan for about 2–4 hours total. Hang the framed landscape print first (or use Command hooks/picture-rail hooks), then place the rug, stool, and candle for positioning. Finish with the plant and ceramic jug styling. The only time sink is getting curtain folds to look straight—steam or hang-dry if needed.
Will this work in a small bathroom where the rug has to be thinner?
Yes—choose a smaller rug size only if it still reaches into the open floor zone around the stool area. The goal is anchoring the corner, not covering every square inch. A lower-pile rug also helps with quick cleanups around the sink. Keep the candle and stool placement the same relative height for the layered look.
What if I rent and can’t drill or replace anything hardwired?
This styling avoids changes to fixed fixtures. The framed print can be hung with Command-style removable hooks, and everything else stays freestanding: rug, stool, plant pot, ceramic jug, and candle. Curtains are also renter-friendly when installed with tension hardware your landlord already allows.
Where should I shop for pieces that match this olive-and-ceramic palette?
For the rug and curtain panels, look for patterns that repeat beige plus olive/green. For the plant and ceramic jug, thrift stores are great because ceramics and clay tones vary in a way that still feels cohesive. For the framed landscape print, search for a 16×20 size so it looks proportional above the sink.
What’s the biggest mistake people make with bathroom corner styling?
Overloading the shelf. When you add too many small objects, the framed art and cabinet architecture start competing visually. The better approach is one textured ceramic moment, one plant for volume, and a single candle at a low height—then let the rug pattern do the grounding.
More in Bathroom

Under $400: renter-friendly vanity corner refresh with warm candles
A warm, olive-and-wood vanity corner makeover that you can do as a renter for under $400. This look uses a patterned bath rug, layered fram…
Under $400: make a renter-friendly vanity counter nook
A soft boho vanity counter nook for renters—built from bath mats, a shower curtain, framed botanical art, and countertop styling. This look…
Under $300: earthy bathroom refresh with 7 move-ready swaps
A terracotta-and-cream bathroom refresh built for shared housing, with 7 move-ready swaps under $300. The look hinges on a patterned rug, a…