- Best for
- Warm nighttime seating
- Cost
- Under $600
- Difficulty
- Easy
- Time
- 2–4 hours + drying/cure
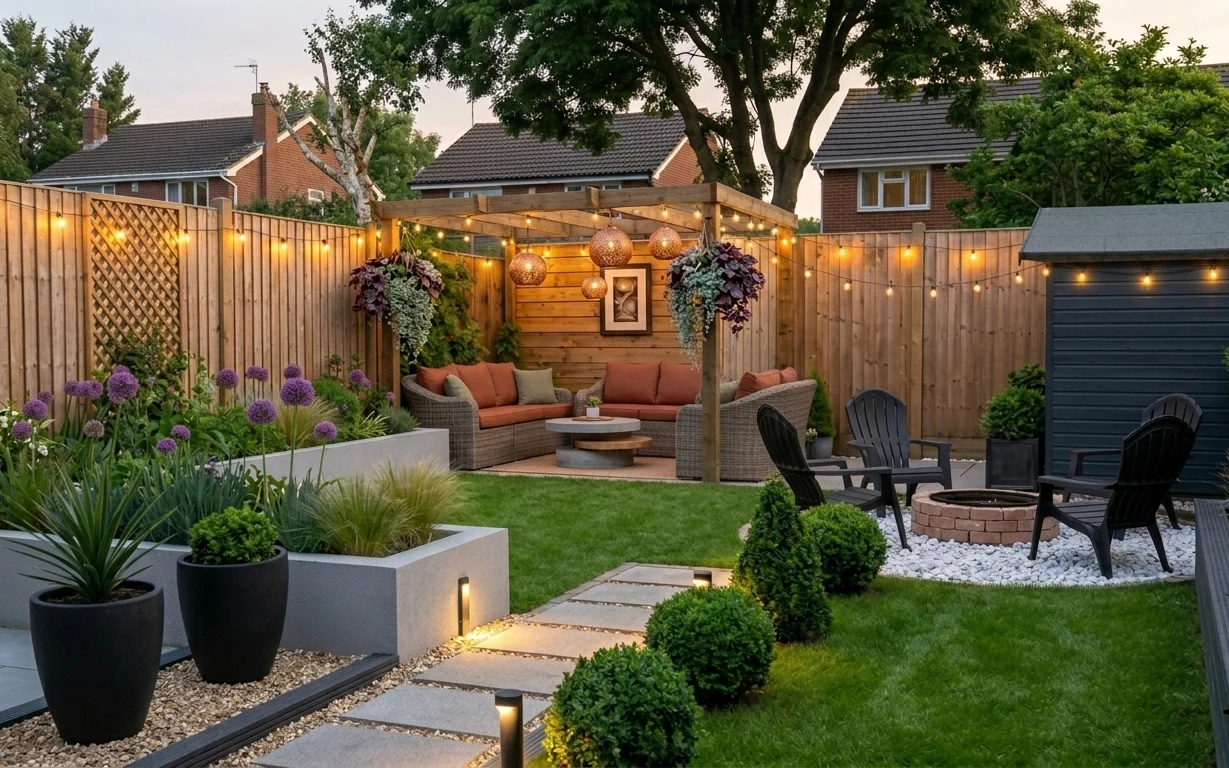
Why sage-and-rust deck styling is the patio seating area of 2026
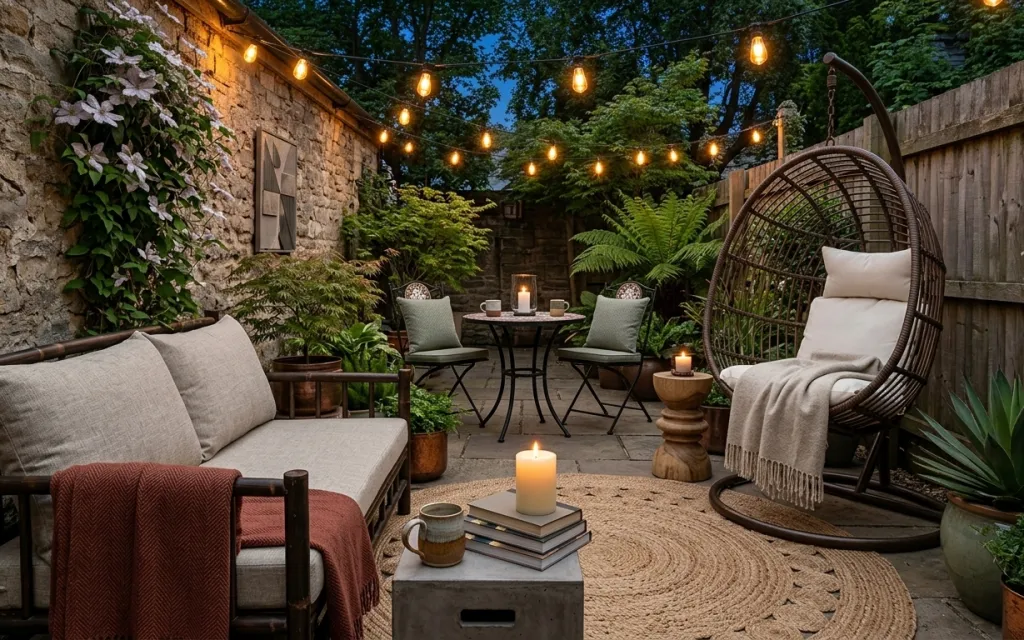
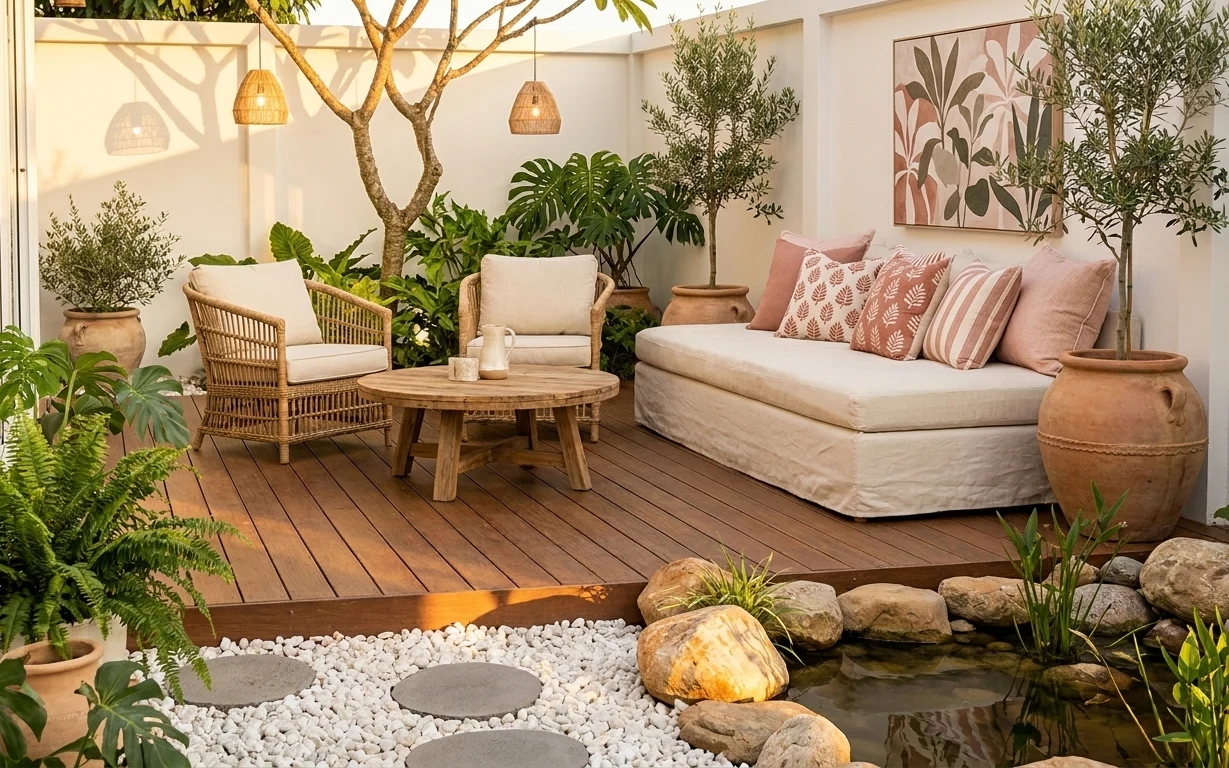
The photo’s look is built on texture: a woven or textured outdoor rug anchors the seating, while light beige throw layers keep the metal and wood feeling softer. The warm golden glow from string lights makes everything read cohesive after dark, even with lots of different materials. Stone patio floor and a wood fence add the backdrop, so the styling can stay simple: neutrals on the textiles, a couple of greenery moments in planters, and one framed rectangular wall art piece to give the stone wall a “done” feeling. For shared housing, these are all removable, van-friendly moves.
I used to chase matching sets outdoors, and it never looked right once people sat down. One time I added too many “coordinating” items at once, and the space felt busy instead of calm. This version works because it repeats only what matters—beige textiles, sage green accents, and warm light—while letting the shapes vary (chairs, table, rug). A few intentional pieces do more than a whole new outdoor kit.
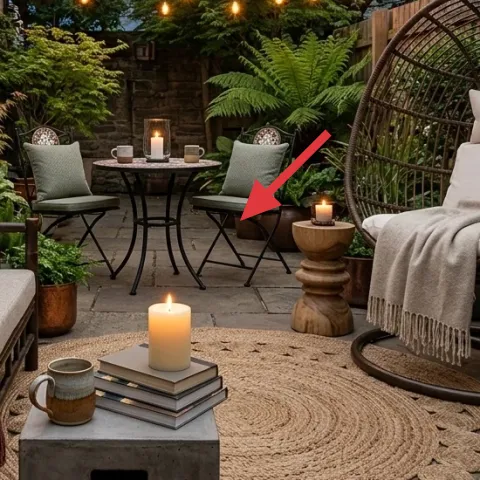
Layer 1 — woven or textured outdoor rug ($200) Rope-and-weave texture underfoot
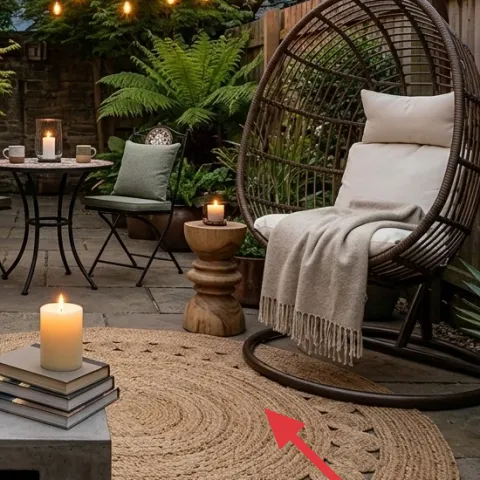
A woven or textured outdoor rug brings in that ropey, pattern-forward texture the scene relies on, and it visually “holds” the whole patio seating area together. In the hero, it sits under the central table zone and wraps the walking paths so the floor doesn’t feel blank. The obvious alternative is skipping a rug and leaning on planters alone, but that makes the seating read disconnected from the patio. The trade-off: an outdoor rug takes a little storage planning, so choose one that rolls and stacks easily for moves.
Go for a low-profile weave
Flat, textured rugs dry faster and still look rich in low light.
Layer 2 — large leafy plant in pot ($30) Tall greenery that reads from the walkway
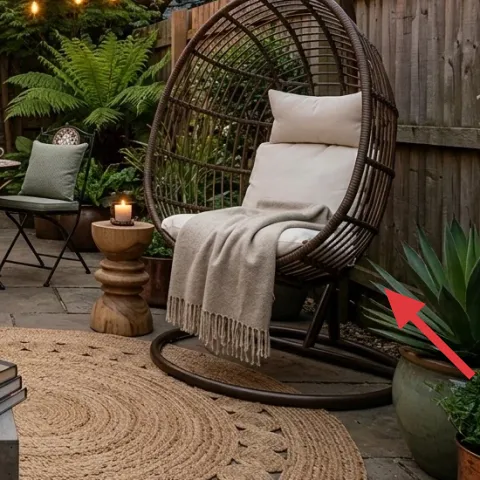
That large leafy plant in pot adds vertical movement, which matters because the stone wall and fence are visually heavy. In the photo, the plant lands near the right side and gives the seating a softer edge—especially against beige textiles and warm lighting. The alternative is small tabletop-only greenery, but then the palette can feel “too level,” like everything sits on one line. The trade-off is care: outdoor plants do better with consistent watering than with on-and-off roommate schedules, so set a simple routine before committing.
Use plants like punctuation
One taller pot can do what three small pots can’t.
Layer 3 — framed rectangular wall art ($60) One simple focal point for the stone wall
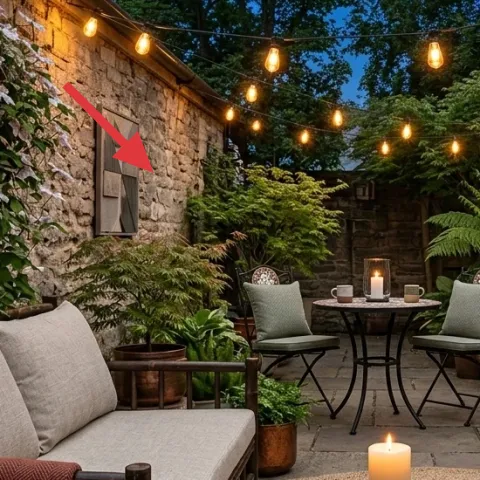
The framed rectangular wall art breaks up the stone wall without turning it into a full gallery wall. In the hero, it’s placed high enough to feel intentional, and its muted tones keep the outdoor palette natural instead of graphic. The obvious alternative is hanging more frames, but that’s harder to pack, easier to damage, and it can compete with the string lights at night. The trade-off: choose a frame that’s light and removable—then you’re not stuck leaving “wall memories” behind when a lease ends.
Skip anything that can’t pack flat
Large or heavy frames become a pain during moves—pick something that dismantles or stacks safely.
Layer 4 — string lights ($25) Warm glow that makes textiles look cohesive

String lights are the reason this outdoor arrangement reads warm instead of chilly. They drape across the space, and the small bulbs create that soft golden glow on the rug, the table, and the chair cushions. The alternative is a single outdoor lantern, but one light source makes the room feel spot-lit and makes shadows harsher on stone. The trade-off: manage cords so they don’t become tripping hazards—use clips or hooks that come off cleanly with the rest of your outdoor kit.
Route the wire above eye level
That keeps the light flattering and avoids tangles when people move through.
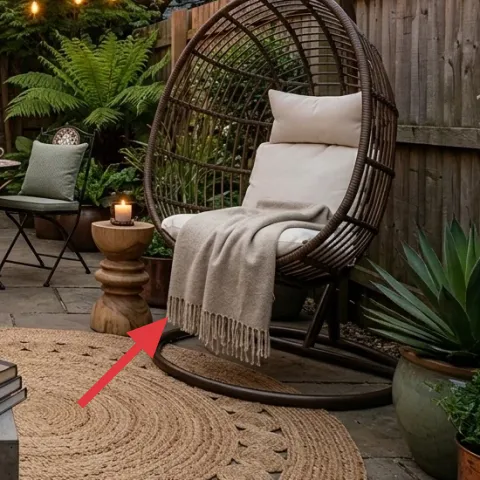
Layer 5 — light beige throw blanket on loveseat ($60) Add softness where the wood shows
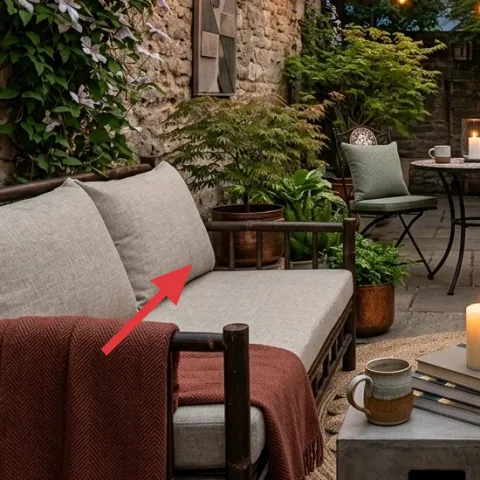
The light beige throw blanket on loveseat adds a “wearable” layer that softens the wooden frame and keeps the seating from feeling too stiff. In the hero, it’s visible on the left side, where it balances the greenery and gives the photo a calmer center tone. The obvious alternative is more pillows, but pillows multiply quickly and can look scattered when the weather changes. The trade-off here is that a throw is more exposed, so choose a fabric that doesn’t feel too delicate for patio life.
Match the throw to the rug undertone
When beige families match, the whole space reads intentional even with mixed chairs.
Layer 6 — candle ($35) Night-ready warmth that doesn’t require power
Make it instead of buying it
This candle pour recreates the same warm, pillar-style glow using a simple wax-and-wick setup that packs easily for the next move.
Materials
- Soy wax flakes — 1 lb — craft store — $12
- Wick set (tabs + wick) — 2–4 wicks — craft store — $6
- Candle scent oil — small bottle — craft store — $6
- Heat-safe pouring container — 1 reusable — kitchen supply — $2
- Wax dye (optional) — small vial — craft store — $1
Steps
- Measure the wax and wick length for the container size.
- Melt the wax slowly until fully liquified.
- Stir in scent oil (and dye if using) off heat.
- Secure the wick in the center of the container.
- Pour wax to your target height in one steady stream.
- Let it cool and cure until the surface firms up, then trim the wick.
Total DIY cost: $27 — saves about $8 over buying.
In the hero, the candle glow sits at table height and makes the whole patio feel “settled” without extra hardware. The trade-off vs. buying more decor: candles are temporary, but they’re also easy to swap—perfect for shared housing where the vibe needs to change with the season. Pouring your own keeps the look consistent and saves money, while still packing into a small box between leases.
Use a stable container for outdoor wind
Even a simple covered holder reduces the flame struggle.
Layer 7 — plant pots ($40) Bring texture at pot-level, not just leaf-level
Plant pots do double duty here: they add another texture layer and they frame the greenery so it looks styled, not accidental. In the photo, those earthy pot tones echo the rug and keep the palette grounded, especially near the right side where the hanging chair draws the eye. The alternative is using plain plastic nursery pots and swapping only plants, but then the “finish” level drops fast once you see the color mismatch. The trade-off is choosing pots you can lift one-handed and store compactly—look for medium sizes that stack.
Match pot color to your rug undertone
That small repeat is what stops the outdoor mix from feeling random.
The cost, layer by layer
| Layer | Item | Cost |
|---|---|---|
| 1 | Woven or textured outdoor rug (move-ready roll-up) | $200 |
| 2 | Large leafy plant in pot (4–6 ft) | $30 |
| 3 | Framed rectangular wall art | $60 |
| 4 | String lights (set) | $25 |
| 5 | Light beige throw blanket | $60 |
| 6 | Candle (pillar-style look) | $35 |
| 7 | Plant pots (medium, earthy tone) | $40 |
| Total | $450 | |
If you want a cheaper variant, downshift the rug size, choose a smaller framed rectangular piece, and swap one leafy plant pot for a shorter fern planter—those three changes keep the same warm, textured effect without pushing the budget.
What worked, what didn't (across the whole room)
The standout win is how the lighting and textiles work together: the string lights and beige throw layers make the patio feel cohesive even with mixed furniture shapes. Greenery and wall art add structure so the stone-and-wood backdrop doesn’t feel empty.
What worked
- The woven or textured outdoor rug anchors the seating and reduces visual clutter on the stone floor.
- String lights add warm golden glow that flatters metal frames and softens nighttime shadows.
- The light beige throw blanket makes the wooden loveseat feel less heavy and more inviting.
- The framed rectangular wall art gives the stone wall a focal point without needing multiple pieces.
- Large leafy plant placement adds vertical balance against the fence and wall lines.
- Plant pots repeat earthy tones, tying the greenery to the rug undertone.
What didn't
- Candles can look fussy if the container is unstable on breezy nights.
- Too many wall pieces at once can compete with the string lights after dark.
- Overloading with small plants can flatten the composition instead of adding height.
- Throws placed only on one seat can leave the opposite side feeling less balanced.
What we'd skip if we did it again
Skip replacing outdoor furniture finishes or buying matching sets. When shared housing changes, staying flexible matters more than perfect uniformity, and textiles + lighting provide most of the “designer” read without committing to anything permanent.
Skip relying on tabletop-only decor. Without a larger anchor like the woven or textured outdoor rug, the seating area can look like separate islands instead of one patio seating area.
Skip candles without wind-friendly placement. Even a beautiful candle flickers less when airflow keeps knocking the look off-center—prioritize stable holders and simple, repeatable positions.
Frequently asked
How long does this patio refresh take for shared housing?
Most layers are quick: laying down the woven or textured outdoor rug and styling throw blankets and plant pots takes about an hour. String lights usually take 30–45 minutes once cords are routed. The only slower part is DIY candle pouring, which needs cooling and curing time. Plan a single afternoon for styling, then set the candle aside until fully set.
Can these updates work if the patio is very small?
Yes—keep the woven outdoor rug size proportionate to the seating footprint, and prioritize one large leafy plant instead of multiple small ones. String lights can still work, but route them higher so they don’t crowd seating. For wall art, choose one framed rectangular piece over multiple smaller frames to avoid making the wall feel too busy.
What if the patio is larger than the photo?
Use the same color language—beige textiles, sage green accents, and warm lighting—but scale up the anchor pieces. That usually means a larger rug or adding a second plant pot cluster on the far side. Keep string lights consistent so they feel intentional across the wider area, and let candle styling happen at table height rather than on the floor.
Where should string lights be placed so they look intentional?
Aim for a line that runs above eye level and visually connects the seating zone to the wall backdrop. In this setup, the string lights create a soft golden glow over the rug and table, so keep them positioned to “wash” the seating area rather than just lighting the wall. Tuck cords so the bulbs read as a continuous strand.
What’s the biggest mistake to avoid for outdoor moves?
Overbuying hard-to-pack decor is the fastest way to regret a patio refresh. Rugs and planters are movable, but heavy, oddly shaped items aren’t. Choose layers that roll, stack, or pack into boxes: the woven or textured outdoor rug, framed rectangular wall art that can be wrapped, and textiles that fold flat.
Can the candle pour DIY survive outdoor use?
DIY candles are great for achieving the look, but outdoor conditions matter. Use stable placement in a wind-managed holder, and keep the flame away from dry leaves or hanging greenery. If the container setup is secure, the candle styling becomes easy to refresh during move-in weekends, then swap out later for the next season.
More in Outdoor & Patio

Under $600: move-friendly patio seating area refresh
A budget-friendly refresh for a patio seating area using warm string lights, a textured outdoor rug, and simple candle styling. Designed to…
Under $800: patio lounge area refresh with warm string lights
A patio lounge area gets more usable fast when you swap in an inviting outdoor sofa, add a warm string-light setup, and sharpen the seating…
Under $400: 7 renter-friendly patio swaps with terracotta color
A covered patio lounge can look styled (not rented) using 7 renter-friendly swaps like patterned and striped pillows, a warm wood coffee ta…