
- Best for
- Cozy evenings
- Cost
- Under $800
- Difficulty
- Easy-to-moderate
- Time
- One weekend
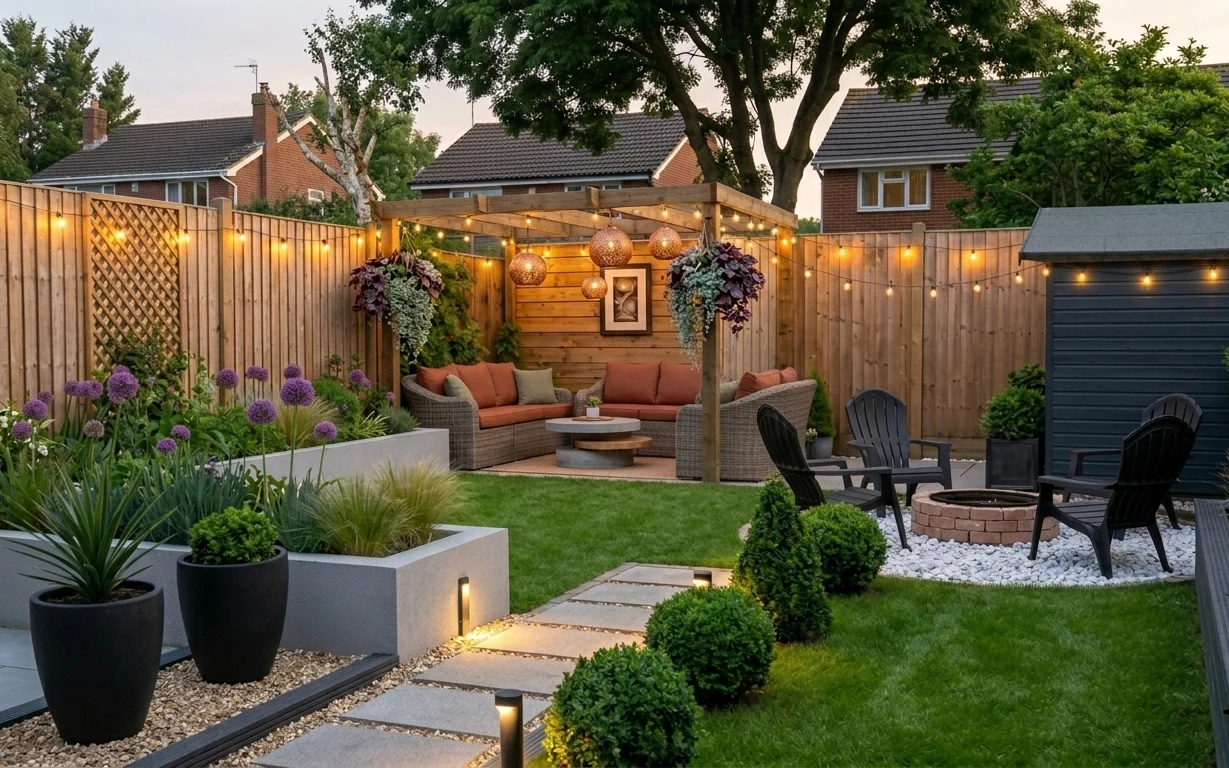
Why terracotta-and-olive patio lounge area is the patio lounge area of 2026
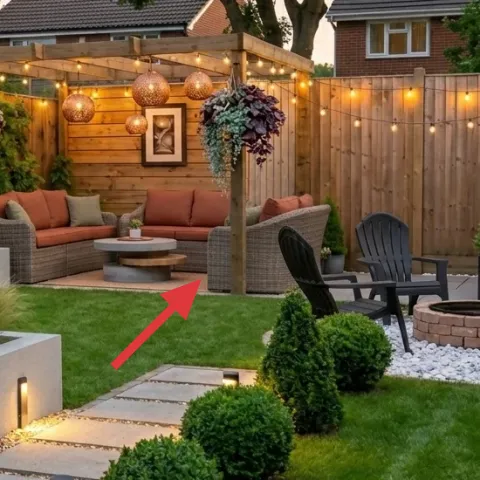
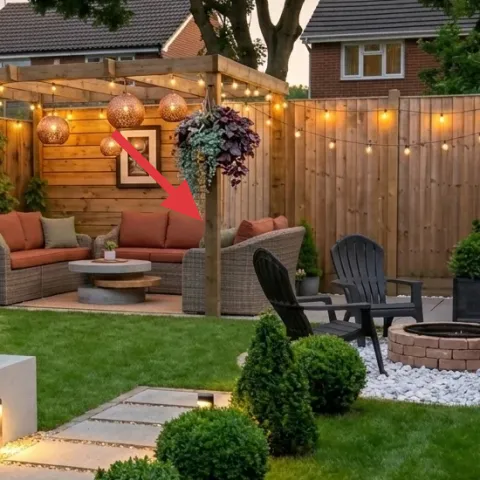
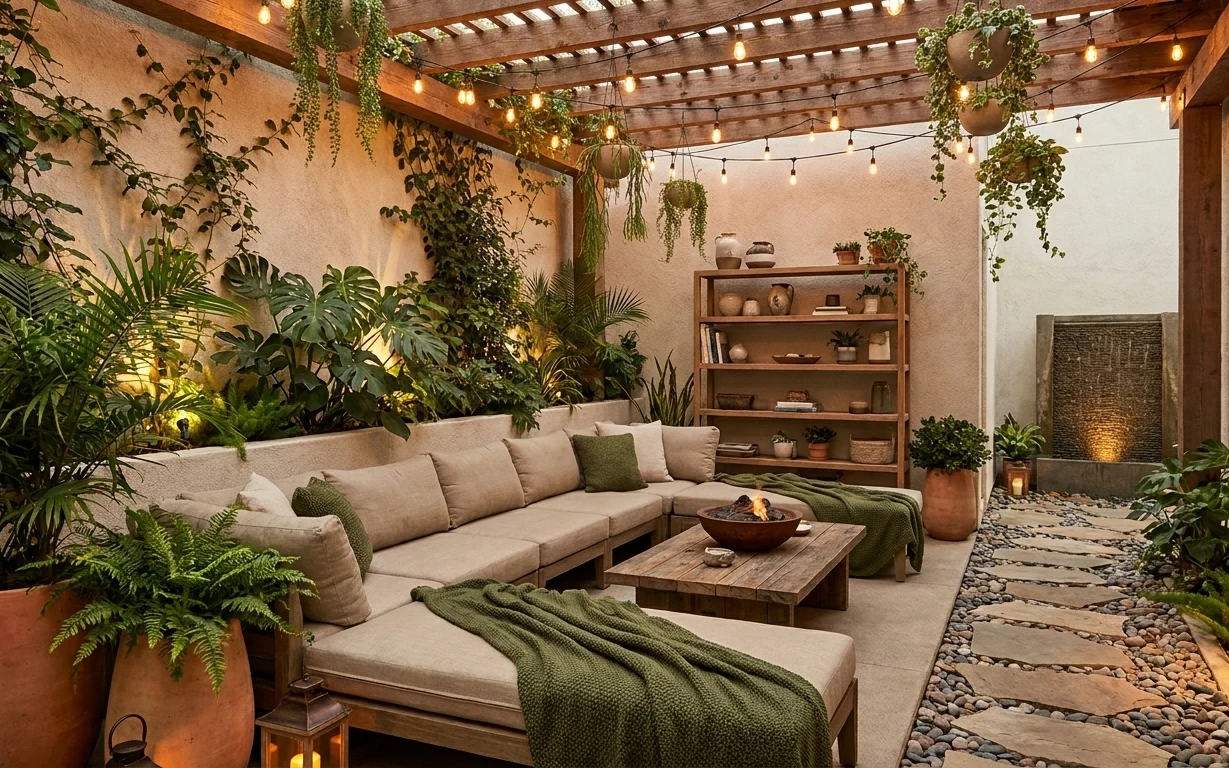
The quickest way to make an outdoor space feel “done” is to build around the sitting zone: an outdoor sofa with terracotta-toned cushions, a round coffee table for drinks, and chairs that pull the conversation forward. In this photo, the gray stepping stones, gravel bed texture, and bright green lawn act like a calm backdrop, so color can stay concentrated on pillows and plantings. Warm string lights along the fence also matter—when the sky goes dark, they turn the whole backyard into a place you actually want to linger.
I caught myself wanting to chase the most decorative pieces first (the pretty lanterns, the purple flowers). Then I noticed the real foundation: the seating grouping and the warm light line. If those two are solid, the rest becomes styling instead of scrambling. That’s why this refresh starts with the sofa and tabletop, not with “more stuff.”
Layer 1 — Outdoor sofa with cushions ($250) Anchors the seating zone in one easy move
An outdoor sofa is the largest anchor in this patio lounge area, and it’s doing more than looks. In the hero, the terracotta and olive cushions sit low enough to feel relaxed, while the seat height keeps the coffee table and chairs in the same conversation. The trade-off with going sofa-first is budget: it’s the one place you can’t really cheap out on structure. If you go thrifted, check that the seat cushions spring back and that the frame doesn’t flex when you press down—otherwise the room starts feeling tired even with great lighting.
Match cushion colors to your planting palette
Terracotta and olive read “natural” against green grass and purple blooms, so the sofa looks intentional instead of random.
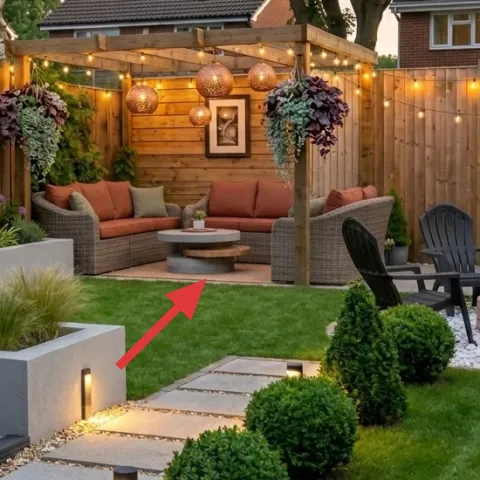
Layer 2 — Round outdoor coffee table ($180) Keeps drinks and small items centered
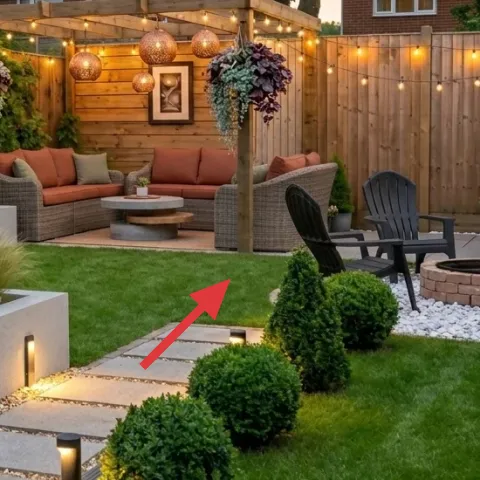
A round coffee table is one of those choices you feel every day, not just at a distance. In the photo, the round top makes it easier to reach from either side of the sofa, and it softens the hard edges created by stepping stones and fence lines. I like this over a square table here because the space already has plenty of angles—why add more? The trade-off is storage and surface area: if you entertain often, measure your “landing zone” for trays and coasters before you buy. Keep the finish weather-friendly so it doesn’t look dull after a few weeks outdoors.
Use it like a landing pad
A coffee table only looks tidy if you plan for a coaster/napkin landing spot.
Layer 3 — Black outdoor dining chairs ($120) Builds a second seating layer without adding bulk
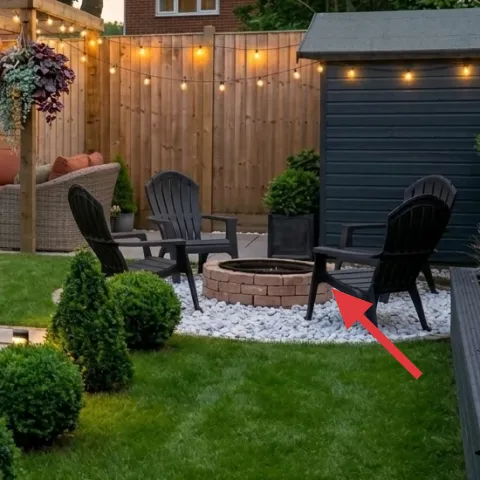
These black outdoor dining chairs do double duty: they extend the seating beyond the sofa and create a visual frame on the right side of the lounge. Black also helps the chairs fade into the background when the lights come on, so the warm bulbs stay the hero rather than the furniture. The trade-off is that black can show dust and scuffs more than lighter colors, so plan for quick wipe-downs. If you’re shopping, prioritize lightweight frames you can move to protect from heavy rain, since the chairs are positioned near the gravel and stepping stones.
Pull chairs slightly in toward the table
Even a small shift makes the room feel more like a “group” and less like separate pieces.
Layer 4 — String lights on fence ($80) Turns the whole patio into a warm evening zone
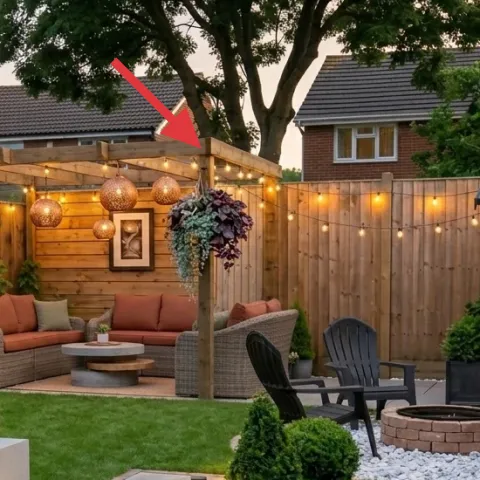
String lights are the most practical decoration in this photo because they change the mood without changing your layout. The fence run creates a clear horizontal line that guides the eye from the sofa to the planted beds, and it makes the space look welcoming even when the rest of the yard is quiet. I’d rather spend on lights than on one-off decor because they work every night. The trade-off is that you need a clean mounting plan so the cords don’t sag. Aim for even spacing, and keep the line roughly level so it reads intentional rather than accidental.
Avoid tight, high-tension hangs
When the line is pulled too tight, bulbs swing more and can wear spots into the fence boards.
Layer 5 — Framed art print on fence ($80) Adds a focal point at eye level
A framed art print on the fence gives the patio lounge area an “indoor” reference point—something your eyes can land on instead of scanning only plants and lighting. In the hero, it sits behind the seating group, balancing the vertical clutter of hanging florals and the horizontal sweep of the string lights. I like this over placing art on a side table because it keeps the tabletop surface useful for drinks. The trade-off is weather exposure: if you live where it rains sideways, choose an outdoor-safe frame or plan to swap it out during harsh seasons.
Choose art with colors already in your plants
This keeps the fence piece from looking pasted on top of the planting plan.
Layer 6 — Large black planter pot ($40) Makes the planting look more polished

Make it instead of buying it
DIY the planter look by painting the large black pot so it reads cleaner and more modern against the gravel and stepping stones.
Materials
- Exterior primer — 1 can — hardware store — $10
- Exterior spray paint (matte) — 1 can — hardware store — $15
- Clear outdoor topcoat — 1 can — hardware store — $10
Steps
- Clean the pot thoroughly, then let it dry completely.
- Lightly scuff the surface with fine sandpaper for paint grip.
- Wipe away dust with a dry cloth.
- Spray on a thin primer coat and let it dry per the can.
- Lightly sand any rough spots, then wipe clean again.
- Spray two light color coats, keeping the can moving to avoid drips.
- Let the paint cure fully before handling.
- Apply a clear outdoor topcoat to protect against scuffs.
- Let the topcoat cure fully, then re-seat the pot where it belongs.
Total DIY cost: $35 — saves about $5 over buying.
Layer 7 — Throw pillows on outdoor sofa ($48) Brings the color story to the front edge
In photos like this, pillows are the easiest way to make the sofa feel cared-for, not temporary. The hero uses throw pillows in terracotta and olive tones, which echo the planting and keep the seating from looking flat against the fence. I’m also a fan of how pillows soften the look of structural elements—gray stone, wood fence, and chair lines—so the patio feels more like a living room than a passageway. The trade-off is that outdoor cushions need weather-resistant fabric and a quick shake after wind or rain. If the covers are washable, plan to rotate them so they keep their shape.
Stick to two main colors plus one accent
That limits visual noise when you also have string lights and purple florals.
The cost, layer by layer
| Layer | Item | Cost |
|---|---|---|
| 1 | Outdoor sofa with cushions | $250 |
| 2 | Round outdoor coffee table | $180 |
| 3 | Black outdoor dining chairs (set of 4) | $120 |
| 4 | String lights on fence | $80 |
| 5 | Framed art print on fence | $80 |
| 6 | Large black planter pot | $40 |
| 7 | Throw pillows on outdoor sofa (set of 4) | $48 |
| Total | $798 | |
If you want a cheaper version, prioritize the sofa and string lights, then keep the rest simple: use existing chair frames, choose fewer pillow covers, and refresh just one planter pot instead of buying a new set.
What worked, what didn't (across the whole room)
The biggest win is the seating-first layout paired with warm fence lighting. It creates a real focal zone that feels comfortable in daylight and inviting after dark. The plant textures and framed fence art then make the whole scene feel intentional rather than “decorated at random.”
What worked
- The outdoor sofa and coffee table stay visually connected, so guests naturally gather in the middle.
- String lights create a warm horizontal line that balances the fence and planted beds.
- Black chairs add seating without competing with the terracotta and purple colors.
- Pillows add fast color control and soften the hard edges of stones and gravel.
- The framed art print gives the fence an eye-level stopping point.
- Matched planters make the planting look styled, not merely planted.
What didn't
- If you hang lights too loosely, bulbs sag unevenly and read messy at a glance.
- Skipping a focal point behind seating can make the patio feel like scattered decor.
- Too many accent colors in pillows fights the purple flowering plants and lanterns.
- Light-colored planter finishes can show dirt from gravel splash faster than black.
What we'd skip if we did it again
Skip swapping the entire chair set if the frames are still solid. Spend money where the eye rests first: sofa cushions, the coffee table surface, and lighting coverage along the fence.
Skip buying extra decorative plants to “fill space.” The planting already has shape and texture—add only one repeat (like another planter pot size) so the beds look organized.
Skip hanging lights at multiple heights. One steady line looks cleaner and makes evening use feel effortless, especially when the patio has stepping stones and gravel textures to visually balance.
Frequently asked
How long does this patio lounge area refresh take on a typical weekend?
Most of the time goes into seating placement, leveling simple items, and getting the light line even along the fence. If the sofa and chairs are already assembled, plan about 4–6 hours total for setup and styling. Painting a planter pot adds another chunk if you count cure time—day one is prep and paint, day two is final topcoat and re-staging.
Can this work if I rent and can’t change the patio structure?
Yes. Focus on items that don’t require demolition: pillows, a coffee table, slipcover-friendly outdoor seating, and string lights. For any framed piece, use removable hanging hardware that matches your landlord rules. The layout choices still matter—so even if you can’t mount anything new, the sofa-first placement and color grouping will carry the look.
What if my patio is smaller than the photo?
Use the same hierarchy—sofa first, then a single centered coffee table—but reduce chair count or rotate them so there’s one clear circulation path. You can also shorten the string-light span so it frames the seating without wrapping the entire fence line. On smaller patios, fewer planter pots with repeated shapes look more intentional than adding more containers.
What if my patio is larger—how do I avoid it looking empty?
Add one more seating-facing element, like an extra chair or a second small side surface, but keep the same color story: terracotta/olive cushions and warm bulbs. For planting, repeat one pot size so the beds read as a plan rather than scattered additions. If you expand the string lights, keep spacing consistent so it doesn’t look droopy.
Where should I shop for the sofa, lights, and pillows for this look?
For outdoor seating and coffee tables, prioritize stores that sell weather-ready frames and cushions. For lighting, choose string-light sets intended for outdoor use so the bulbs and cords handle moisture. For pillows, look for UV- and fade-resistant covers that you can remove and wash.
What’s the biggest mistake people make with outdoor lounge styling?
They buy decorative items first and end up with an unclear gathering point. Start with one seating anchor (the sofa), then add one central surface (the coffee table), then echo the colors in pillows and planting. If the light line isn’t even, everything else will look slightly off, even when you nailed the furniture.
More in Outdoor & Patio
Under $800: patio lounge area refresh with warm string lights
A patio lounge area gets more usable fast when you swap in an inviting outdoor sofa, add a warm string-light setup, and sharpen the seating…
Under $400: 7 renter-friendly patio swaps with terracotta color
A covered patio lounge can look styled (not rented) using 7 renter-friendly swaps like patterned and striped pillows, a warm wood coffee ta…
Under $500: plant-filled patio lounge refresh with 7 move-ready swaps
A plant-filled patio lounge already has the best bones—this refresh leans on a woven rug, olive textiles, layered wood, and warm string lig…