
- Best for
- Bringing height and texture to a tile-heavy bathroom
- Cost
- About $350 total for 7 renter-safe swaps
- Difficulty
- Easy—mostly styling plus one macramé build
- Renter-safe
- Yes—no drilling, no changes to fixtures
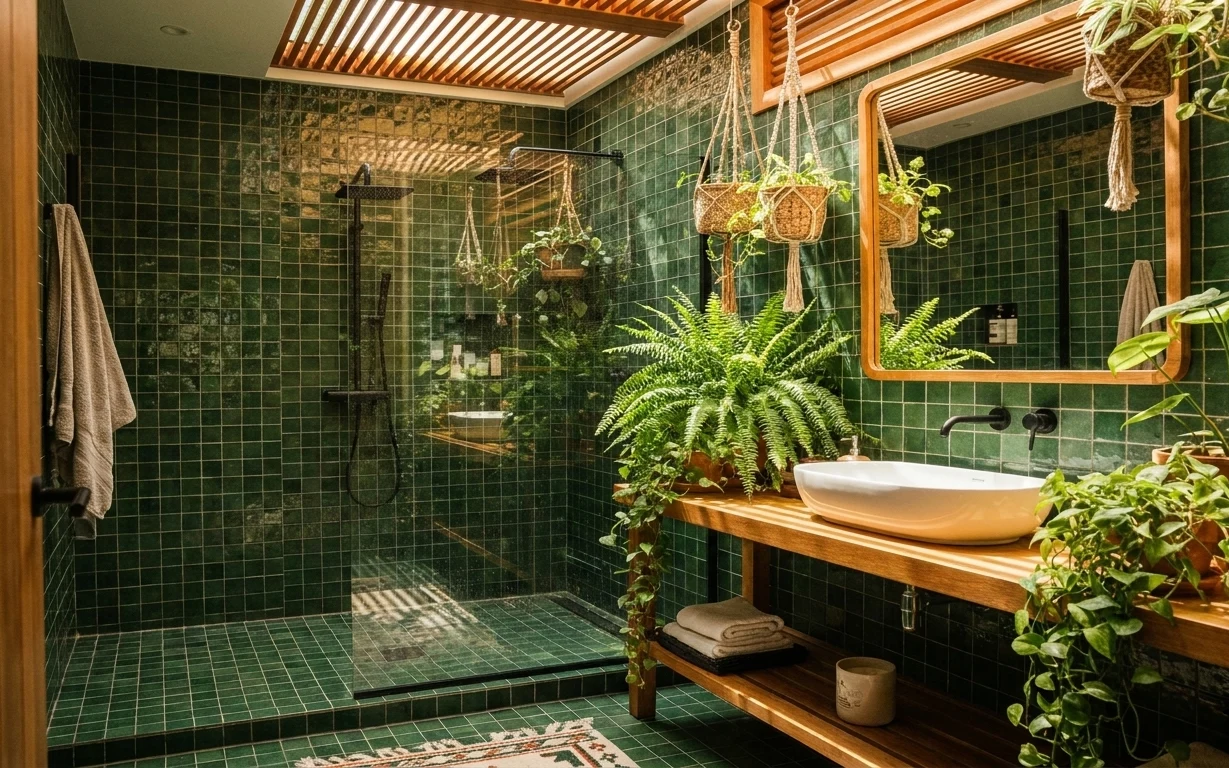
Why jungle-green tile is the plant-filled bathroom of 2026
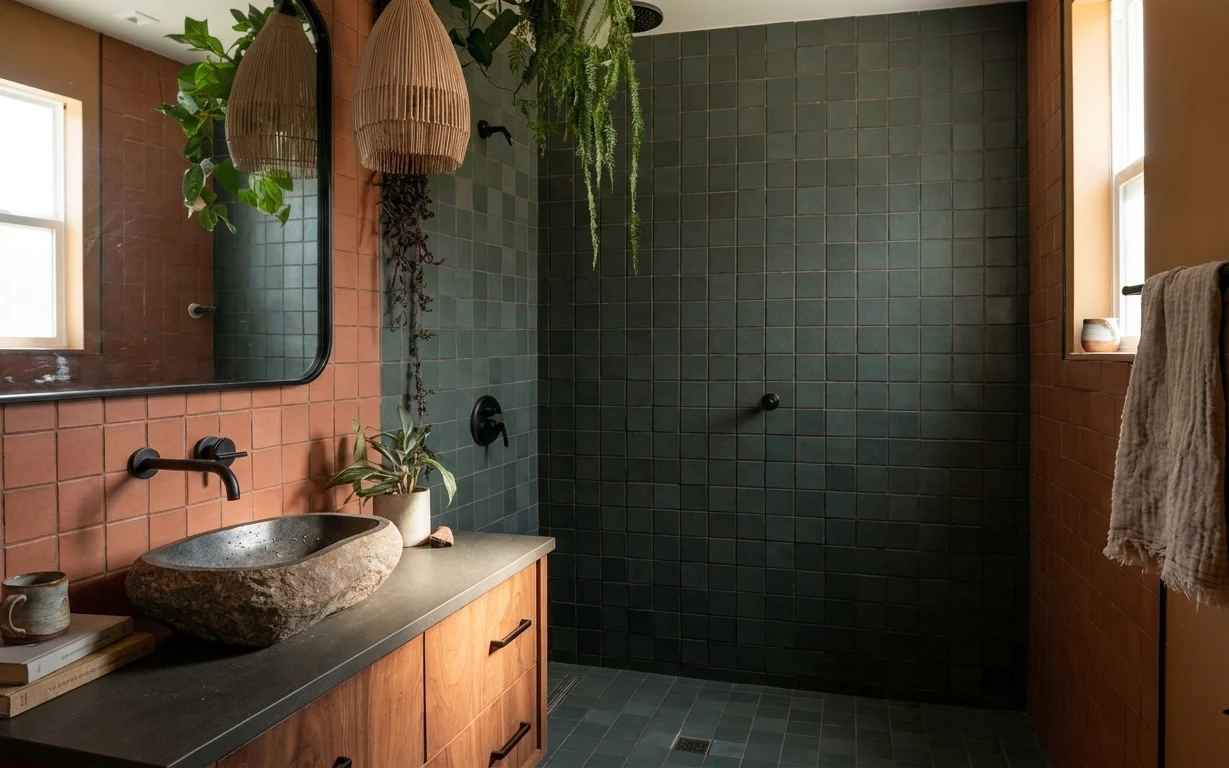
Green tile can feel like it’s doing all the work, but the trick is giving it a supporting cast in textures and layers. In this bathroom, warm wood beams and a wood-framed mirror set the tone, while the patterned bath rug grounds the tile floor. A few folded bath towels soften the hard surfaces, and greenery brings movement to the scene. This is achievable on a renter budget because everything here can be swapped without touching the plumbing or fixtures.
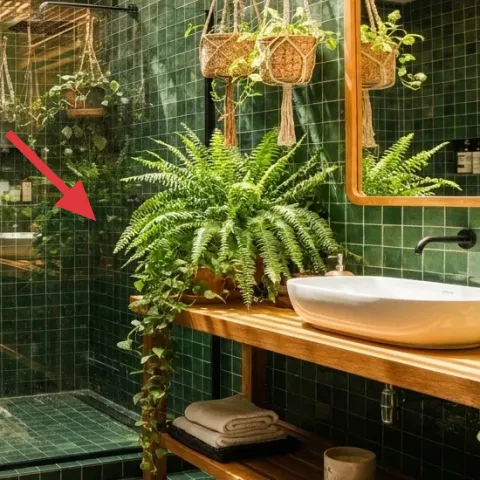
My first instinct in a tile-heavy bathroom is to overstyle the vanity and call it a day. I tried that once, and the space looked “busy” instead of intentional—like the plants were apologizing for taking up room. What changed my mind was choosing a layout in heights: a large fern for volume, a small pot for detail, and one hanging basket to pull the eye upward. Once I did that, the whole bathroom started to feel curated, not crowded.
Layer 1 — patterned bath rug ($80) Non-slip pattern underfoot
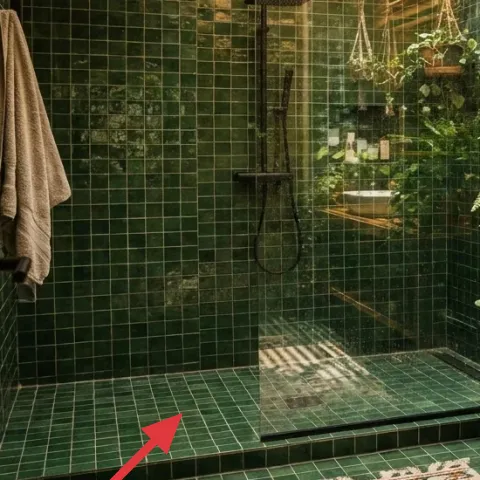
A patterned bath rug in a low, tile-masking size is the fastest way to make a green-tiled bathroom feel finished. In the photo, it sits right in the wet-traffic zone by the shower area, where it visually “anchors” the floor color and gives your feet a softer landing. The obvious alternative is a plain solid mat, but pattern helps hide water marks and keeps the tile from looking too stark. The trade-off is choosing a rug with a busy print so it doesn’t show every single splash line.
Pattern choice for real bathrooms
Pick busy enough prints to camouflage damp footprints, but keep the palette close to the tile’s dominant green.
Layer 2 — folded bath towels ($35) Cream stacks read clean and intentional
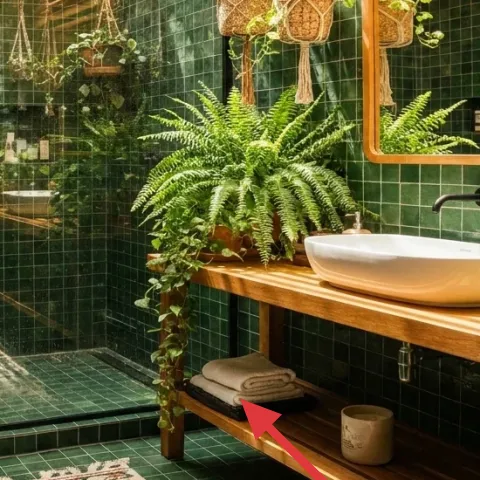
Folded bath towels give instant polish because they echo the bathroom’s light tones and create a deliberate “pause” among tile and wood. In this image, the towels sit folded on the bench/ledge zone near the vanity area, so they read at a glance without needing wall art. You could hang a towel instead, but stacks have a calmer visual rhythm and look styled even when you’re not actively using the room. The trade-off is keeping the fold consistent—one lopsided stack makes it look accidental rather than composed.
Why folded works better than draped
A draped towel can look charming, but folding keeps the shape crisp against straight tile grout lines.
Layer 3 — macramé-style hanging plant basket ($55) Vertical greenery without drilling
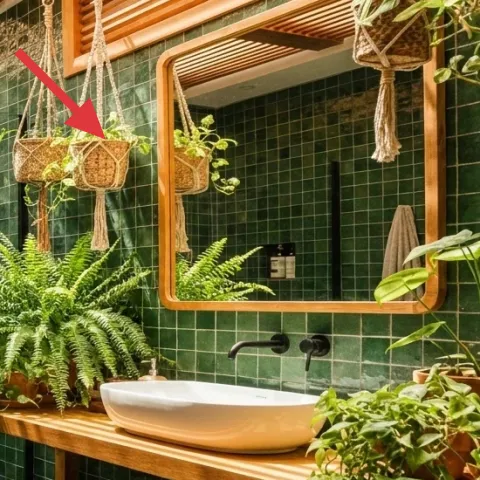
Hanging woven plant baskets add height and soften the hard geometry of the shower wall and mirror. This one sits near the warm wood-framed mirror, so the mirror reflects the baskets and makes the greenery feel fuller without adding clutter on the counter. The renter-friendly part is the structure: you’re not changing anything about the bathroom fixtures, just using Command Strips or a removable hook method. The trade-off is that hanging plants need a quick check now and then, especially if the bathroom runs humid most days.
Make it instead of buying it
DIY a macramé-style hanging plant basket so you can match the look and hang height without attaching anything permanent.
Materials
- Macramé cord — ~6–8 yd — craft store — $15
- Small wooden dowel (for the top bar) — 1 — hardware store — $10
- Command hook (for temporary mounting) — 2 — drugstore — $8
- Jute or twine (for tightening loop) — 1 spool — craft store — $8
- Hanging pot basket or inner liner — 1 — garden center — $4
Steps
- Cut macramé cords into equal lengths (enough to reach the desired basket height).
- Attach cords evenly around the dowel using a tight temporary wrap, then knot to secure.
- Form the main weave pattern toward the center so the basket hangs straight.
- Place the inner liner/pot basket, then tighten the weave to fit its opening.
- Trim cord ends evenly and tie a neat finishing knot at the bottom.
- Press and mount the Command hook on the wall where it will hold the load (dry surface only).
- Hang the dowel on the removable hook and check that the basket clears the mirror frame.
- Test stability with gentle tugging before adding the plant.
Total DIY cost: $45 — saves about $10 over buying.
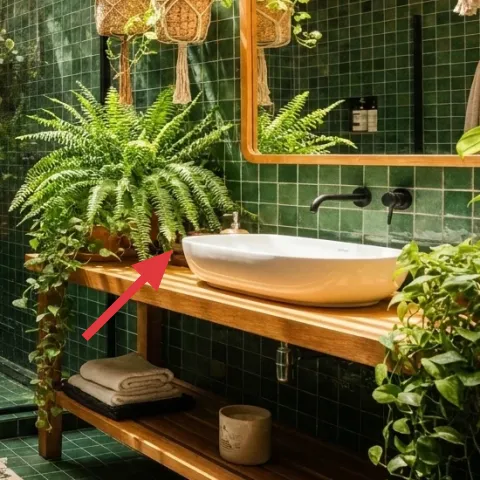
Layer 4 — ceramic jar on the vanity ($20) One small container, big visual order
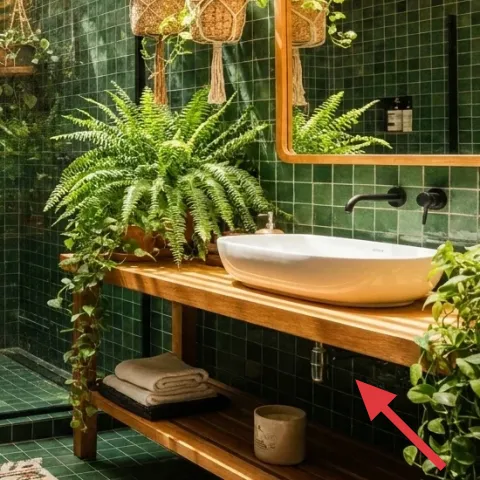
A ceramic jar is the simplest way to make “bathroom clutter” look curated. In this photo, the jar sits on the vanity top area, where it turns small daily items (cotton, sachets, minis) into a styled moment rather than random stack-piles. A labeled tray could work, but jars feel more organic alongside plants and wood. The trade-off is that glassless ceramics can look less “minimal” if it’s too large—so choose a medium scale that matches the vanity’s line, not one that dominates it.
Keep the jar footprint tight
Choose a jar that fits beside existing bottles so you don’t fight the mirror’s reflection.
Layer 5 — decorative bottle set on the vanity ($25) Matching shapes calm the counter
Decorative bottles and soap dispensers bring color and texture without adding new surfaces to clean. Here, they’re placed on the vanity top near the mirror, so their silhouettes read clearly in the reflection and create a consistent rhythm. The alternative is scattering different sizes and finishes, but that’s what makes counters look unplanned. This set works because you’re grouping items with a similar visual weight and leaving breathing room around the fern and small plant. The trade-off is that you’ll want fewer items, but better coordinated ones.
Where to put them
Keep bottles clustered toward the mirror side so the whole display reads in one line.
Layer 6 — large fern in a pot ($60) Fills vertical space with softness
A large fern in a pot is the volume-maker in this plant-filled bathroom. It sits on the floor near the vanity/mirror zone, where fronds soften the straight lines of tile and give the greenery a “main character” presence. The obvious alternative is a shorter plant, but with tall tile walls you usually need height to avoid the whole room feeling top-heavy or flat. The trade-off is choosing a plant that tolerates bathroom humidity—ferns generally do well, but they still benefit from occasional light checks.
Don’t let the pot sit in puddles
Use a tray or ensure drainage so the pot doesn’t mar the tile area over time.
Layer 7 — small potted plant on the vanity ($30) Close-up greenery for daily life
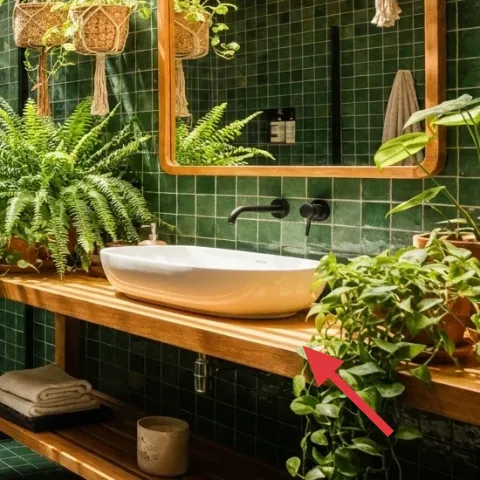
A small potted plant on the vanity adds detail you notice every time you wash your hands. In the photo, the small pot is tucked into the wood counter zone, balancing the heavier fern shape and keeping the styling from feeling one-note. You could skip it and rely only on the hanging basket, but that can make the bathroom feel staged instead of lived-in. The trade-off is watering and rotation—small plants dry out faster than you expect, especially near heat or airflow.
Use the mirror to your advantage
If the mirror reflects your plant, place the pot where the leaves align with the reflection edges.
The cost, layer by layer
| Layer | Item | Cost |
|---|---|---|
| 1 | patterned bath rug | $80 |
| 2 | folded bath towels | $35 |
| 3 | macramé-style hanging plant basket | $55 |
| 4 | ceramic jar | $20 |
| 5 | decorative bottle set | $25 |
| 6 | large fern in a pot | $60 |
| 7 | small potted plant | $30 |
| Total | $305 | |
A cheaper variant keeps the same plant layout but swaps the patterned bath rug for a solid, low-cost mat and chooses smaller budget plants. Look for 6-inch pots and secondhand trays to keep the display cohesive without overspending.
What worked, what didn't (across the whole room)
This bathroom works because the styling is layered by height—floor fern, vanity details, and a hanging basket—so the greenery feels intentional instead of random. The rug and folded towels add tactile softness that makes the green tile feel calmer.
What worked
- The patterned bath rug sits in the wet zone and makes the tile floor feel intentional.
- Folded towels create a clean, repeating shape that looks styled even between uses.
- Hanging woven baskets bring vertical movement that complements a wood-framed mirror.
- A large fern adds volume, softening hard tile lines without needing new furniture.
- Ceramic and bottle groupings on the vanity keep small items from looking cluttered.
- Small potted plants add close-up detail so the room feels cared for daily.
What didn't
- If towels are left fully draped, the bathroom reads messier against straight tile grout.
- Too many small vanity objects compete with the mirror reflection and make the counter busy.
- Skipping the hanging basket makes the greenery feel flat instead of layered.
- A small rug that doesn’t cover the traffic zone can look like it’s “floating” on tile.
What we'd skip if we did it again
Skip adding multiple countertop organizers in different shapes. With a mirror reflecting the vanity, extra containers can turn a planned vignette into visual noise fast.
Skip plain solid mats in a bathroom with regular water splashes. A patterned bath rug hides damp marks better and still looks cohesive with green tile.
Skip going all-in on the floor plants only. The bathroom already has strong vertical surfaces, so adding one hanging woven basket keeps the greenery from feeling like it’s stuck low.
Frequently asked
How long does this bathroom refresh take?
Plan on 2–4 hours total. The styling pieces (towels, rug placement, vanity groupings) are quick, and most of the time goes into plant layout and making sure everything sits where the mirror reflection looks best. The macramé-style hanging basket DIY is the longest step, but it’s very doable over a single evening if materials are ready.
Is this renter-safe with a lease and deposit?
Yes—everything in this look is replaceable at move-out. The main idea is to avoid changing landlord fixtures: no plumbing swaps, no drilling into tile. The hanging planter method is designed around removable mounting (Command-style hooks), and the rug, towels, and plants all pack up easily without leaving permanent marks.
What if my bathroom is smaller than this one?
Scale down by keeping the height layering but reducing the plant size. Choose a smaller fern or place it nearer the vanity so it doesn’t overwhelm the footprint. You can also swap the rug for a size that reaches just beyond the wet-traffic path, and keep the vanity grouping tighter—two bottles plus one small plant instead of several items.
What if my bathroom has less natural light?
Go for plants that tolerate lower light and keep the hanging basket closer to the window side of the room. You can also use light-colored towel stacks and a lighter bath rug pattern to reflect more light off the tile. The main goal is to keep greenery as a focal point, but prevent it from looking droopy.
Where should I shop to keep this budget-friendly?
Rug and textiles usually come from big-box retailers for dependable pricing, while plants can be found cheaper at local nurseries or during seasonal promotions. For the macramé-style basket, craft stores are ideal for cord and dowels, and removable hooks are widely available at drugstores. Decorative bottles and ceramic jars are often the best finds at thrift stores if you match the finishes.
What’s the biggest mistake people make with this bathroom style?
The biggest mistake is trying to style every surface at once. This room works because it uses height contrast: large plant volume, a small vanity plant for detail, and one hanging basket for movement, plus a single rug and tidy towel stacks. If everything is equally “loud,” the bathroom reads cluttered instead of calm.
More in Bathroom
What $350 buys: a plant-filled renter-friendly bathroom refresh
A plant-filled bathroom refresh for renters built around no-drill swaps. Focused on a patterned bath rug, stacked towels, and renter-safe p…
7 no-drill upgrades for a $200 vanity corner refresh
A warm, botanical bathroom vanity corner is achievable for $200 with move-friendly swaps: a softer towel, a better bath mat, a styled tray,…
What $400 buys: a no-drill bathroom vanity corner refresh
A warm bathroom vanity corner refresh built around towels, a terracotta planter, and a large framed mirror—move-ready and no-drill. This pl…