
- Best for
- Cozy balcony evenings
- Cost
- About $400 total for the full look
- Difficulty
- Easy (mostly textiles + decor)
- Time
- 1–2 hours to place and style
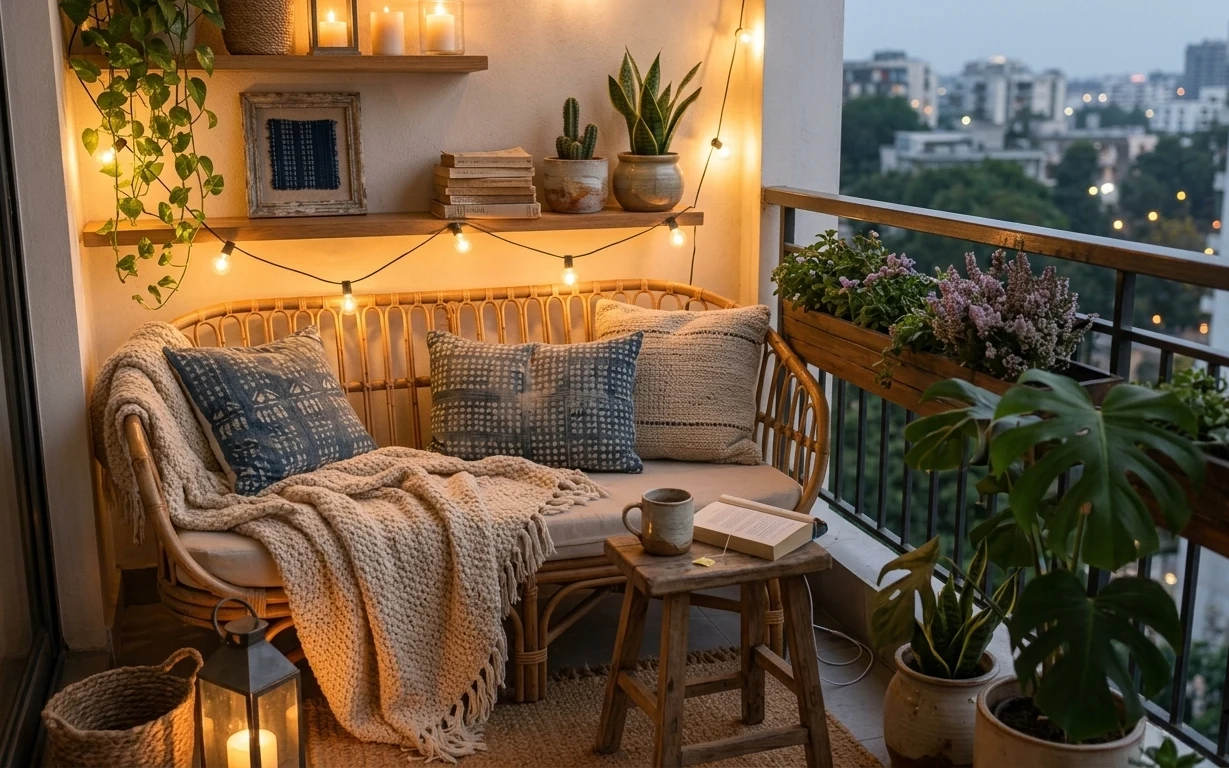
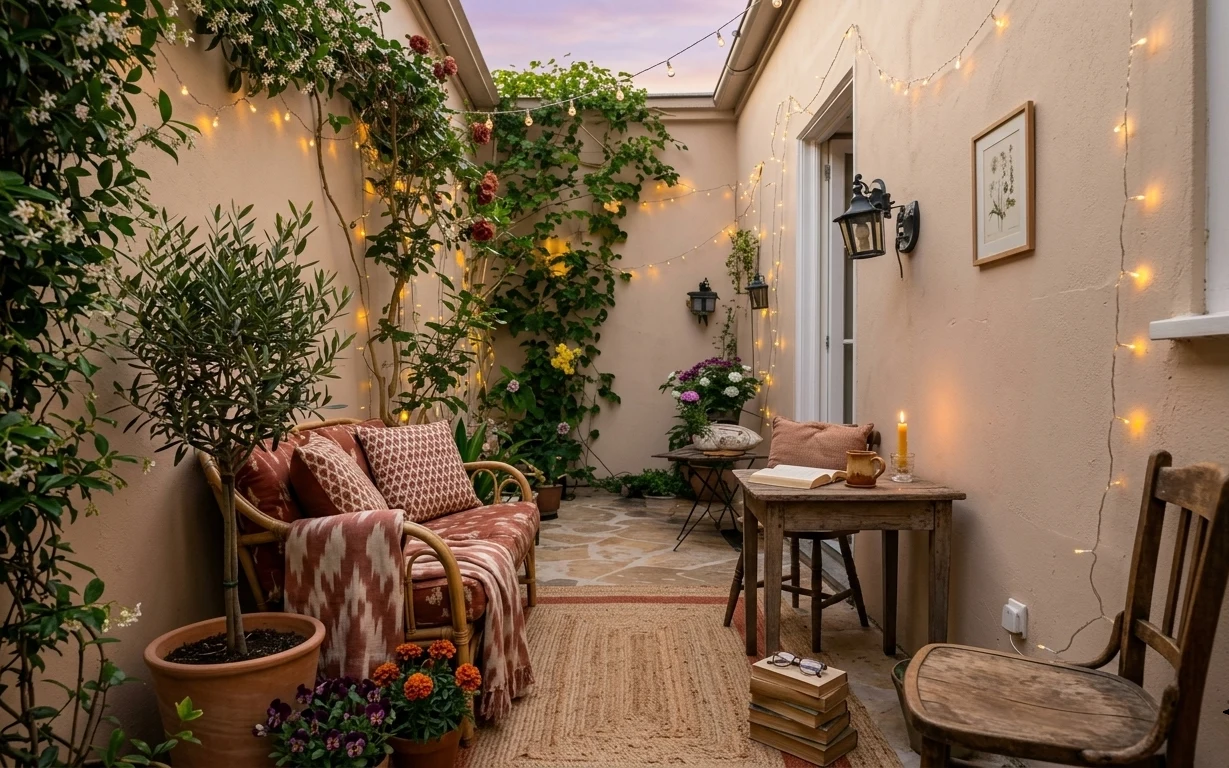
Why warm rattan-and-cotton is the balcony daybed nook of 2026
Look closely and the whole effect is basically textile layering plus warm points of light. The rattan daybed brings that honeyed, woven texture, while the chunky knit throw adds weight and contrast with the lighter pillows. A framed blue-pattern art print anchors the wall, and the string lights turn the ledge into a glowing “evening moment.” For a reference, this is the same recipe you see in boho balcony spreads from Apartment Therapy: mix natural textures, repeat one accent color (blue), then let the lighting do the mood work. Everything here is achievable on a renter budget.
I used to over-focus on matching the “big items” (blanket, pillows, rug) and ignore how much the light changes the palette. On one move, the exact same blue pillows looked almost gray in afternoon shade, then suddenly rich once I added warm bulbs nearby. That’s why this setup leans into soft, close-to-the-wall lighting and a rug that grounds the daybed. The result reads intentional without needing any permanent changes.
Layer 1 — jute-style area rug under the daybed ($120) Texture-first grounding
A jute-style rug under the daybed makes the whole nook feel rooted, not like furniture floating on tile. In the photo, the rug’s rough, natural texture contrasts with the rattan’s smooth curves and helps the chunky knit throw look even cozier when you drape it forward. It’s also a practical choice for outdoor-adjacent spaces: textured fibers help hide small scuffs from bags and shoes. The trade-off is that you’ll want to shake it out regularly, and pick a rug you can tolerate in open-air weather.
Pick a rug with a tight weave
Tighter texture looks similar to jute but holds up better to everyday balcony traffic.
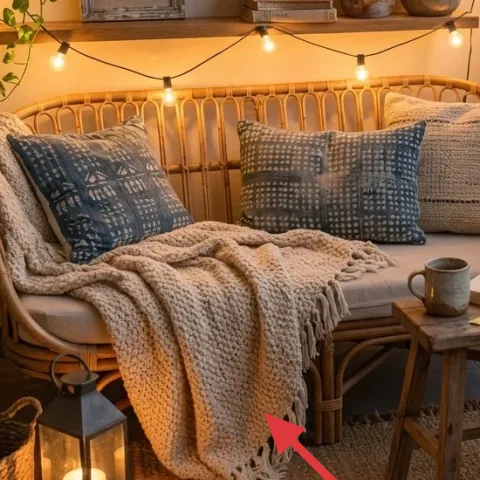
Layer 2 — chunky knit throw blanket ($45) Drape it for depth
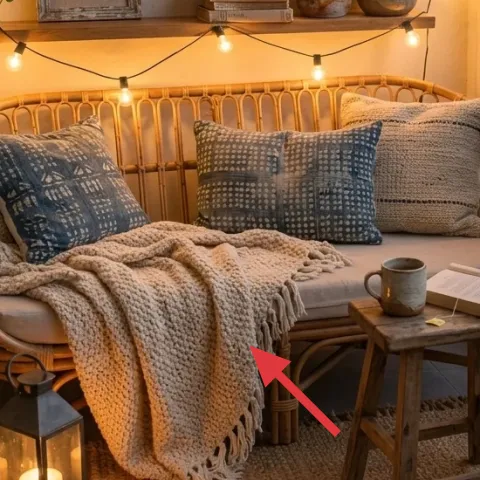
The chunky knit throw blanket is the “volume” layer here, and you can see how it softens the lines of the rattan daybed. Draped over the seat and slightly hanging toward the front, it creates movement and a casual, lived-in silhouette—very different from a neatly tucked throw. Choosing a thicker knit also means you don’t need multiple blankets to get that cozy look. The trade-off: bulky throws take up storage space, so plan for how it folds. On a balcony, the thicker texture also reads warm even before the lights go on.
Let it spill asymmetrically
A lopsided drape hides corners and makes the whole nook feel styled, not staged.
Layer 3 — blue geometric throw pillows ($30) Repeat the accent color
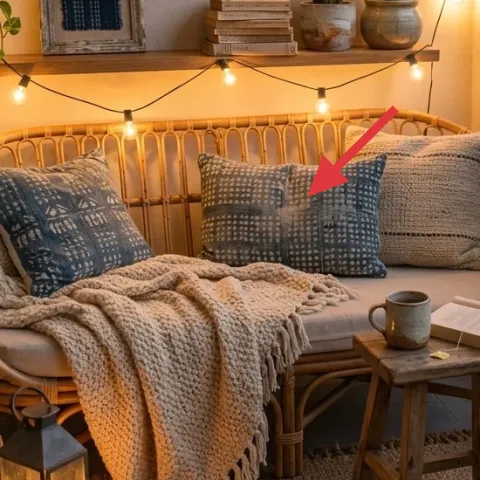
Those blue geometric throw pillows do two jobs: they add pattern without clutter, and they repeat the blue tone from the framed art. Because the pillows sit right at the back of the daybed, they’re an easy way to control the color story—warm cream on the base, deep blue on the accents. I’d rather buy one pattern-forward pillow than try to match five smaller décor pieces around the space. The trade-off is that patterned textiles can feel “busy” if they’re too large, so keep the pillow size similar to what’s shown and let the knit throw keep things calm.
Skip high-gloss fabrics outdoors
Shiny weaves and synthetic finishes catch light differently and can look out of place once the bulbs come on.
Layer 4 — framed art print (blue pattern) ($50) Anchor the wall palette
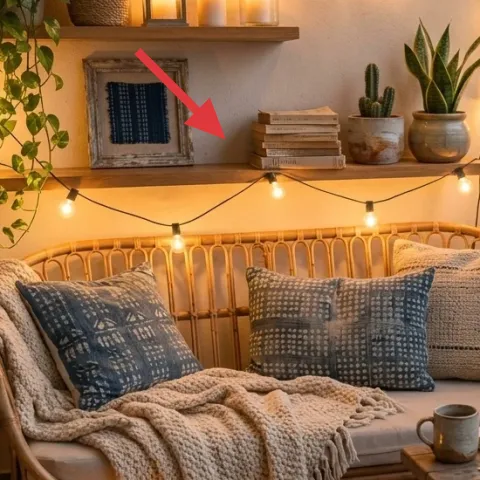
The framed art print pulls the whole palette together—blue, warm neutrals, and the crisp geometry that balances all the organic shapes (rattan, plants, knit). It sits above the shelf/ledges area in the photo, acting like a visual center so the lights and greenery don’t compete. A frame is also renter-friendly because it can be mounted with Command hooks or displayed on a shelf if hanging isn’t allowed. The trade-off is simple: measure the height so it reads centered above the daybed, not floating too high. This piece becomes the “why is this whole nook working?” moment.
Match frame finish to the railing tone
If the railing is warm wood, a similar-toned frame keeps the look cohesive.
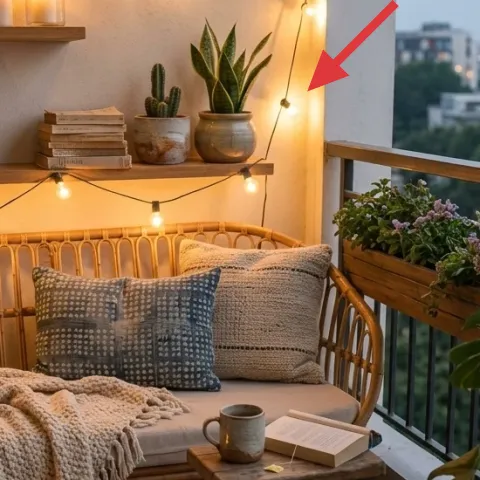
Layer 5 — warm string lights (bulb set) ($20) Make evenings feel intentional
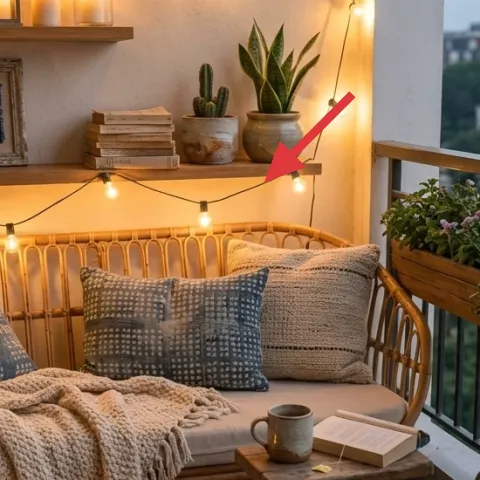
Warm string lights are doing most of the mood work here. They run along the ledge line and drape near the daybed area, which visually frames the seating without needing any permanent fixtures. The small, warm bulbs create a soft glow that flatters the rattan color and makes the cream textiles look richer. The trade-off: keep cords tidy so they don’t become a trip hazard, and choose a plug-in set you can easily unplug during storms. This is also a great “move-ready” upgrade—wrap the lights up, keep the glow, leave no marks.
Cluster the bulbs near the seating
If the light is mostly up high, the daybed can look dim when the sun drops.
Layer 6 — decorative ceramic planter (floor leaf plant) ($30) Add height and life
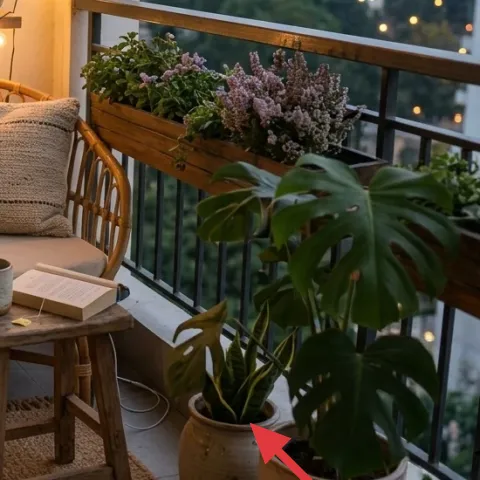
The decorative ceramic planter with floor-leaf greenery gives the nook vertical height, which is key on a balcony layout where everything else is low and horizontal. In the photo, the plant sits near the railing line, so it softens the boundary and makes the daybed feel more “inside” than “out on a balcony.” Choosing ceramic keeps the look grounded and warm, instead of letting plastic pots look temporary. The trade-off is weight and stability—ceramic is heavier, so place it on a tray or choose a location where it won’t tip when you brush past. One plant isn’t enough; height matters.
Use a planter that can handle wind
Heavier pots stay put better than lightweight planters in breezy weather.
Layer 7 — candle cluster on the ledge (candles) ($35) Warm points of light, zero complexity
The candle cluster adds that last layer of softness—small flames make the whole nook feel calm, not just decorative. It also echoes the warm string lights, so the palette stays consistent even after dark. For a renter-friendly approach, candles are one of the easiest “swap and go” upgrades: you can change scents, containers, and placement without any hardware. The trade-off is that you need to be thoughtful about ventilation outdoors and never leave candles unattended. This is the layer you’ll notice most when you’re actually sitting there with a book.
Make it instead of buying it
This candle pour DIY turns the cluster look into your own simple jar candles, so you can match the exact vibe and keep move-out easy.
Materials
- Wax flakes (enough for 2 small jars) — 1 bag — $10
- Wicks (pre-tabbed) — 2–4 — $6
- Jar containers — 2 small jars — $8
- Wick holders or a chopstick tool — 1 set — $6
- Optional scent/essential oil — small bottle — $5
Steps
- Set up jars on a protected surface with good ventilation.
- Secure wicks in the jars using wick holders or a center-tension method.
- Measure wax to jar capacity so the pour level matches your look.
- Heat wax gently until fully melted, stirring steadily.
- Remove from heat and pour slowly into each jar.
- Trim wicks to a safe height after the surface settles.
- Let candles set undisturbed until solid (no moving).
- Light-test once set to confirm an even melt pool.
The cost, layer by layer
| Layer | Item | Cost |
|---|---|---|
| 1 | Jute-style area rug | $120 |
| 2 | Chunky knit throw blanket | $45 |
| 3 | Blue geometric throw pillows | $30 |
| 4 | Framed blue-pattern art print | $50 |
| 5 | Warm string lights (plug-in set) | $20 |
| 6 | Decorative ceramic floor planter | $30 |
| 7 | Candle cluster (jar candles) | $35 |
| Total | $330 | |
If the candle cluster budget needs to shrink, swap to two single candles with coordinating glass holders instead of a multi-jar grouping—keeping the warm color temperature and the same ledge placement.
What worked, what didn't (across the whole room)
The look works because it repeats one accent color (blue) across textiles and wall art, then adds warmth through layered light sources and soft textures. The rattan base keeps the vibe natural, while the rug and knit throw stop the daybed from feeling too sleek for a balcony. The only time the setup feels off is when the plants are missing height or when the cords and candle placement get messy.
What worked
- The rug’s natural texture grounds the daybed and makes the nook feel styled, not temporary.
- Chunky knit throw weight adds comfort and visual depth against the lighter pillows.
- Blue geometric pillows echo the framed art so the palette stays intentional.
- Warm string lights create an evening focal point without any permanent installation.
- Wall art gives the plants and lights a “home base” so nothing competes.
- Ceramic planters add weight and keep the balcony look cohesive.
What didn't
- Light switches or plug locations that force long cords can make the scene look less curated.
- Too-thin throws flatten the daybed silhouette and reduce the cozy contrast.
- Small, low greenery can make the balcony feel like it’s missing vertical structure.
- Cold-toned bulbs can turn cream textiles gray and fight the warm rattan.
What we'd skip if we did it again
Skip buying a “matching set” of cushions in the same material and color family. In this nook, the charm comes from mixing textures—rattan, chunky knit, and patterned fabric—so one-note replacements make it look staged instead of lived-in.
Skip cool-white bulbs or overly blue-tinted string lights. Warm bulbs are the reason the cream textiles read soft and the blue accents look richer, especially after dusk when the whole palette shifts.
Skip lightweight planters and flimsy trays near the railing. Balcony breezes and day-to-day bumping happen, and a heavier ceramic pot keeps the look intact without constant adjusting.
Frequently asked
How long does this balcony daybed nook refresh take?
Most of the time is placement and styling. Plan for about 60–90 minutes to lay down the rug, position the daybed textiles, and set the pillow drape. The framed art and string lights are quick if cords and hanging spots are already clear, so another 30 minutes is typical. If the planters need a repot or a quick surface wipe, add 15–20 minutes.
Is this renter-safe if I have to pack it up at the end of my lease?
Yes—the core changes are rugs, removable textiles, plug-in string lights, freestanding ceramic planters, and framed wall art that can be hung with removable hardware. The look doesn’t rely on painting or landlord-installed fixtures. When it’s time to move out, you can keep the textiles together in one bundle and wrap the string lights the same way each season.
What if my balcony is smaller than the photo?
Go smaller on the rug footprint and keep the rug’s texture, not the full size. Use two pillows instead of three and let the chunky throw drape a bit closer to the seat so it doesn’t visually “spill” into the walkway. Choose one taller plant for height and skip extra small pots—vertical structure matters more than quantity.
What if my balcony is bigger and feels too bare?
Add one more volume element: either a second framed print on the ledge wall area or a taller plant with long leaves so the room has a second visual layer. Keep the same deep-blue accent so the new piece doesn’t break the palette. If there’s extra floor space, a slightly larger rug can help the daybed read like a destination instead of a corner.
Where can I shop for these renter-friendly pieces without overpaying?
For the rug and throw, focus on natural-textile lookalikes at discount home stores and online marketplaces with clear rug dimensions. For the string lights, buy plug-in sets with replaceable bulbs. Ceramic planters and framed art are often best found at local thrift shops or resale sites, then finished with a consistent blue palette.
What’s the biggest mistake people make with this kind of balcony setup?
Overbuying decor without controlling light temperature and texture. If the bulbs are cool, cream textiles go dull; if the blanket is thin, the daybed loses the cozy silhouette. Get the lighting warm first, then choose one chunky textile and repeat the blue accent in a second place like pillows or framed art.
More in Outdoor & Patio
What $400 buys: a balcony daybed nook refresh
A balcony daybed nook makeover using 7 no-drill, renter-safe swaps—rug, pillows, a knit throw, framed art, warm string lights, and planters…
7 patio details for a string-lit patio corner
A string-lit patio corner starts with an outdoor rug, then layers in warm lighting, a rattan daybed, and simple tabletop styling. This rent…
7 renter ways to soften a balcony lounge
A warm, boho-style balcony lounge look for renters—built with a big rug, layered pillows and throws, a plug-in lamp, one terracotta plant, …