
- Best for
- Botanical bathroom refreshes
- Time
- 2–4 hours (mostly styling + hanging-free items)
- Total cost
- $320
- Renter-safe
- Yes — no drilling, no fixture swaps
Why warm terracotta is the botanical bathroom of 2026
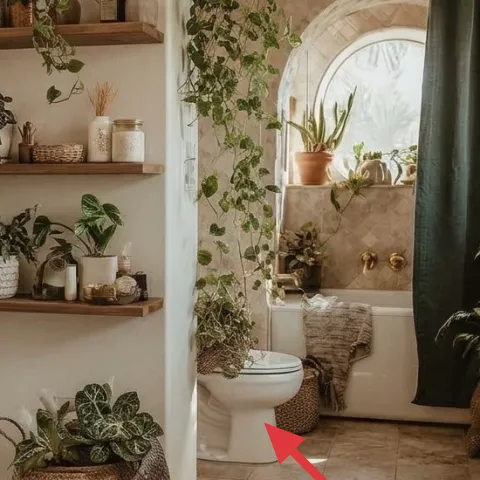
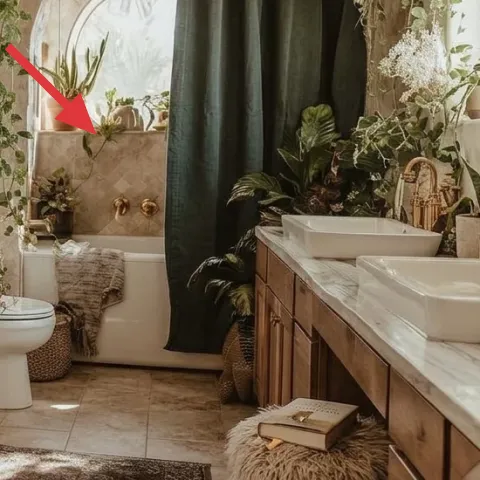
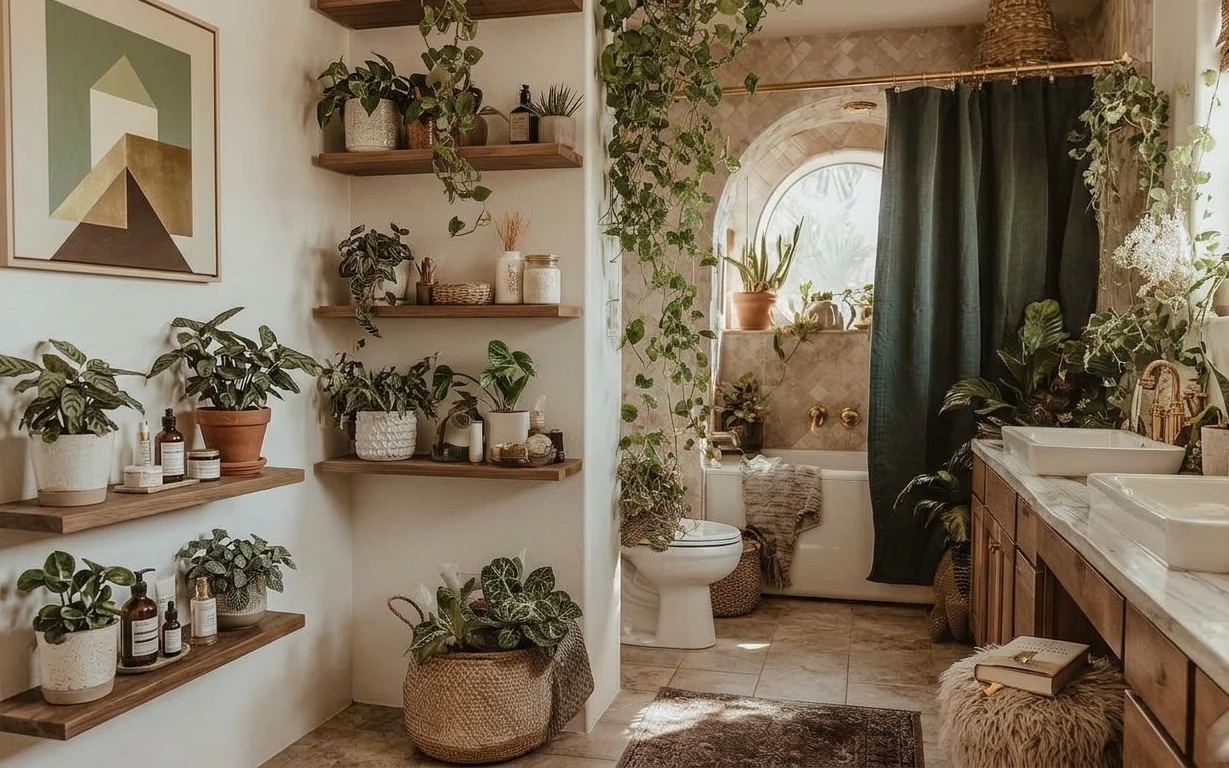
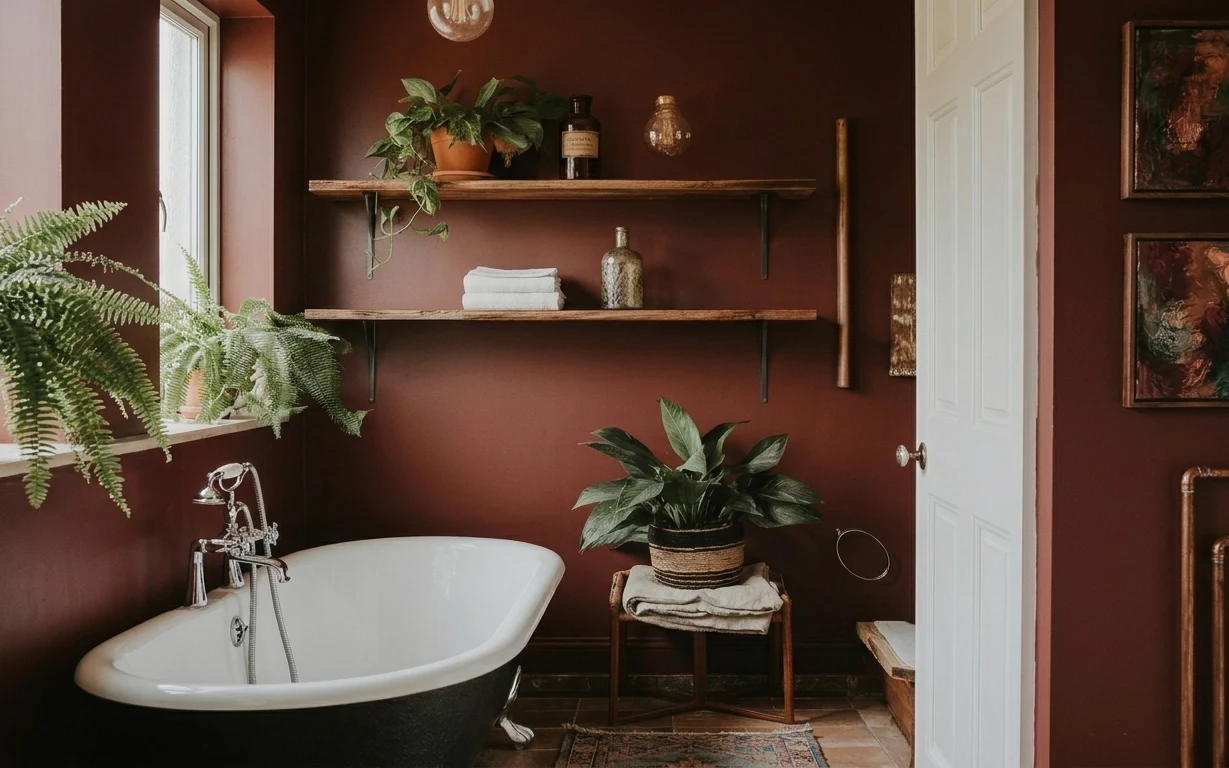
Look closely and you’ll notice the recipe is mostly soft goods and styling: a dark green shower curtain, a brown patterned area rug, and layered plant groupings that read like garden shelves. The cream tile and painted walls keep everything bright, while terracotta and leafy greens add warmth. This is the kind of look you can pull off in shared housing because the “hard” pieces are optional—what matters is where color and texture sit. Think: woven textures, matte ceramics, and that earthy green curtain framing the mirror niche.
I’ve tried to copy this style by buying just one bold item, then wondering why it still felt flat. The fix for me was stacking three texture types at once: something woven (the basket), something patterned (the rug), and something vertical (the curtain). The moment those hit together, the bathroom stopped looking like a bathroom and started looking like a small room with a point of view.
Layer 1 — framed abstract geometric wall art ($45) Balanced color without committing to paint
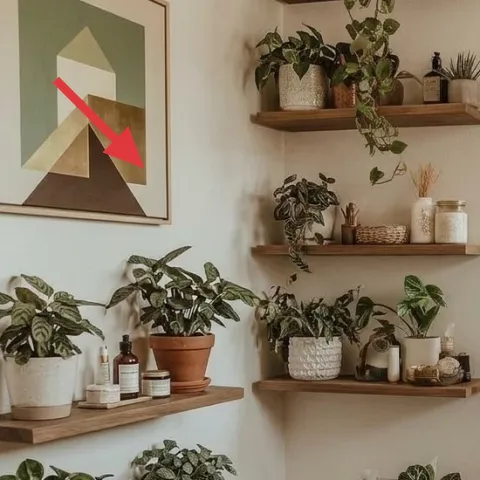
Framed abstract geometric wall art brings structure to the cream wall without asking you to touch the architecture. In the photo it’s anchored on the left side, so it counterweights all the plant “noise” happening on shelves and around the mirror niche. This choice matters more than a second plant grouping because it gives your eye a clean focal point. I’d rather swap art like this every move than chase a permanent color change. The trade-off: you’re responsible for storing it safely, but that’s still easier than repainting and way more renter-friendly.
Frame for the scale you actually have
Pick a standard 16×20-ish size so it holds up on a blank wall section and doesn’t get drowned by shelf clutter.
Layer 2 — brown patterned area rug ($80) Grounds the tile with warmth underfoot
The brown patterned area rug is what makes the light tile feel softer and less “hospital clean.” It sits in the central bathroom zone where you’d step in and out, so it catches attention even from across the room. A patterned rug also hides the reality of shared bathrooms—muddy footprints, water spots, and the occasional drip—better than a solid neutral. I like this direction because the pattern echoes terracotta tones without competing with the greenery. The trade-off is more visible texture: when you’re vacuuming, use gentle settings so it stays plush-looking for longer.
Choose pattern over pure beige
In a botanical setup, a busy rug prevents everything from turning into one flat cream sheet.
Layer 3 — dark green shower curtain ($60) Adds a vertical color frame behind the plants
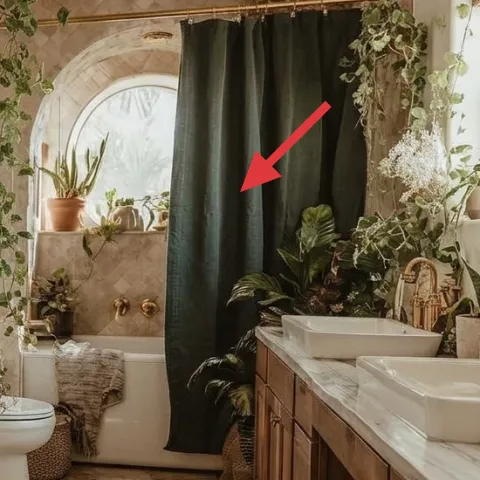
The dark green shower curtain works like a backdrop, turning the mirror niche into a styled vignette instead of a bright, bare opening. Visually, it absorbs some of the glare from daylight and makes the terracotta and leafy greens look richer. It’s also one of the easiest swaps in shared housing: it’s a textile, it doesn’t require drilling, and it folds or rolls for packing. I’d pick curtain fabric over another plant-heavy shelf option because you can shift it as a “scene-setter” for every move. The trade-off: darker colors show water marks less than light fabrics, but still require quick rinsing or a periodic wipe-down.
Skip anything too sheer
If the curtain is translucent, it won’t give you the same framed, greenhouse feel.
Layer 4 — woven basket planter on the floor ($35) Brings texture when you can’t add built-ins
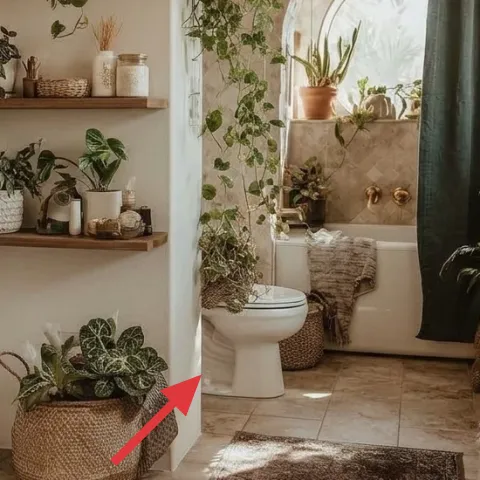
The woven basket planter on the floor adds the “hands-on” texture that makes botanical bathrooms feel collected instead of staged. It sits low and bulky, so it visually fills space between the rug and the shelves without adding height you don’t have. Woven + terracotta is a good combo because both are warm-matte materials that play nicely with tile shine. This beats buying another small pot because the basket reads as furniture-like styling. The trade-off: woven materials can snag—so if it’s near foot traffic, keep the placement a few inches away from the doorway swing.
Use one big texture, not three small ones
A single basket silhouette gives you depth; multiple tiny baskets often look cluttered.
Layer 5 — small terracotta pot on the right counter ($20) Adds a single grounded “anchor” accent
This small terracotta pot on the right counter is doing quiet work: it repeats the warm terracotta theme without making the counter feel crowded. In a bathroom like this, counter surfaces get lived-on fast, so a compact pot reads intentional instead of like clutter. It’s also easy to relocate for the next lease—pots are among the simplest things to pack in a tote with a towel. I prefer one well-placed pot over trying to recreate an entire shelf of plants because it keeps the look achievable for shared schedules. The trade-off: you need to rotate or top up soil occasionally if your plant is still actively growing.
Match the pot color, not the plant size
If the plant outgrows the pot, swap the plant and keep the terracotta container.
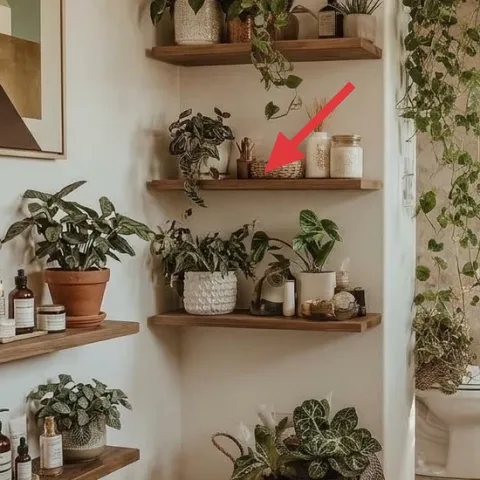
Layer 6 — decorative ceramic jar candle on the shelf ($25) Softens the room after dark
The decorative ceramic jar candle on the shelf adds a gentle glow and a second layer of ceramic texture, which is exactly what your eyes want in a plant-heavy space. Daylight shows green and terracotta; at night, the candle helps those colors feel warmer and less contrasty against the cream walls. This choice beats adding another bottle or decorative jar because the candle brings light plus height variation without changing your layout. The trade-off: a candle is temporary by nature, so treat it as a seasonal styling item and store the jar when it’s done.
Pick a scent that won’t compete
Fresh, herbal, or light vanilla notes tend to match botanical bathrooms better than heavy incense-style profiles.
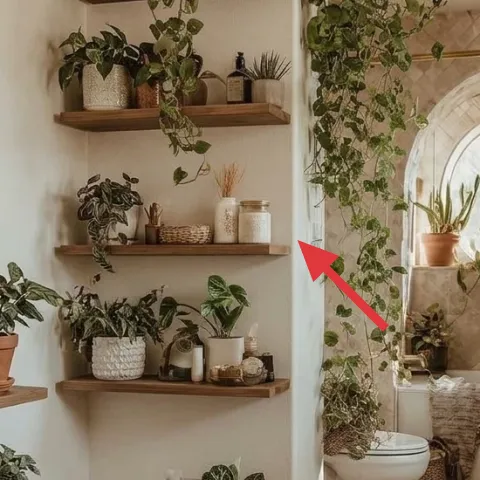
Layer 7 — terracotta potted plants on shelves ($55) Repeat the palette where your eyes already land
Make it instead of buying it
This painted terracotta planter set gives you the same warm-citrus + earthy green feel by customizing plain terra-cotta pots with a simple color story.
Materials
- Terracotta pots (2–3 small) — assorted sizes — store: garden center — $18
- Acrylic paint set (earth tones + one accent green) — 1 small set — store: craft store — $8
- Painter’s tape — 1 roll — store: hardware store — $12
- Sponge brushes — 2-pack — store: craft store — $7
- Disposable gloves + paper towels — 1 pack — store: pharmacy — $4
Steps
- Wipe pots clean and dry completely.
- Mask off shapes with painter’s tape for stripes or irregular blocks.
- Stipple or brush base colors onto the pots; let them dry fully.
- Add the accent green details with a sponge brush.
- Remove tape while the paint is still slightly tacky for sharper edges.
- Let everything dry overnight before you pot anything in.
Total DIY cost: $49 — saves about $6 over buying.
This DIY layer replaces the “terracotta potted plants on shelves” look using customized pots that still read cohesive in a botanical bathroom. In the photo, the shelves are full of warm terracotta containers, so matching the pot color is the easiest way to make a different plant feel like it belongs. Painting plain terracotta is cheaper than buying a curated set, and it’s also move-friendly: you can pack the painted pots safely and rearrange them in your next home. The trade-off: you’re adding a small weekend craft moment, but you get a set that matches the palette exactly.
Keep the paint simple
Two earth tones plus one leafy accent looks intentional; five colors starts to read random.
The cost, layer by layer
| Layer | Item | Cost |
|---|---|---|
| 1 | Framed abstract geometric wall art | $45 |
| 2 | Area rug, 5×7 (patterned) | $80 |
| 3 | Shower curtain panel pair, dark green | $60 |
| 4 | Woven basket planter | $35 |
| 5 | Small terracotta pot | $20 |
| 6 | Ceramic jar candle | $25 |
| 7 | Painted terracotta planter set (DIY) | $55 |
| Total | $320 | |
If you want a cheaper variant, focus on layers 2, 3, and 1 first—rug, curtain, and one framed piece do most of the visual work. Swap the candle and pot for thrifted versions of the same materials. Keep the plant colors consistent so the look still reads botanical.
What worked, what didn't (across the whole room)
This setup works because it layers warmth (terracotta + woven texture) with a deep vertical backdrop (the dark green curtain). The result feels lush without becoming chaotic. The main misses would be going too monochrome or skipping pattern, because tile and white walls can flatten everything fast.
What worked
- The dark green shower curtain frames the mirror niche and makes the plants feel intentional.
- The brown patterned area rug hides real-life splashes better than a solid cream rug.
- Terracotta pots repeat the same warm family across shelves and counters.
- The woven basket planter adds furniture-like texture at floor height.
- The framed abstract wall art adds structure when shelves get visually busy.
- The ceramic jar candle brings soft light for evenings without changing any fixtures.
What didn't
- Too many small decor items on shelves can start to read like clutter instead of styling.
- A sheer shower curtain doesn’t give the same greenhouse framing effect.
- If the rug pattern is too subtle, the tile glare makes the floor feel harsher.
- Using only plants (no wall art or textile anchor) can make the room feel unfinished.
- Overmatching pot colors but ignoring texture (woven vs. ceramic vs. matte paint) flattens depth.
What we'd skip if we did it again
Skip adding more small “bottle-and-candle” clusters on every shelf. A botanical bathroom looks best with fewer groupings that repeat a palette, because the plants already bring a lot of texture and shape.
Skip a light shower curtain if the goal is moody-jungle framing. Dark green does more than look good—it reduces glare and gives the greenery a clear backdrop, which reads styled from across the room.
Skip trying to match every plant and pot exactly. Instead, match terracotta tonality and one texture type (woven or ceramic), then let plant shapes vary. That mix makes the whole arrangement feel curated, not fussy.
Frequently asked
How long does this bathroom refresh take?
Plan for about 2–4 hours. The rug and shower curtain are quick because they’re textile swaps. Styling pots and a candle is usually another hour, plus a little time to step back and adjust spacing on the shelves and counter. If the DIY-painted planter set is new for you, add an extra evening for paint drying.
Is this renter-safe if I can’t change fixtures?
Yes—this approach avoids fixture swaps entirely. It uses wall art, rugs, a shower curtain, and free-standing plant styling pieces. Those are all move-friendly and pack into boxes or totes for the next lease. The only “wall” item is framed art, which can be hung with renter-safe hooks instead of drilling.
What if my bathroom is smaller or larger than the photo?
For a smaller bathroom, keep the same three anchors: a patterned rug, a dark green curtain, and one framed piece. If it’s larger, add a second plant grouping or make the framed art slightly taller so it doesn’t feel lost. The key is maintaining contrast: cream walls need deep color and at least one patterned textile.
Where should I shop for these pieces—bathroom-specific stores or home decor?
Start with home decor for the framed art and rug, and with bathroom textil e sections for the shower curtain. For terracotta pots and woven baskets, garden centers and craft stores are usually best. Candle jars can come from any home fragrance aisle as long as the ceramic texture matches the warm, earthy palette.
What’s the biggest mistake people make with this look?
They go too matchy-matchy or too minimal. If everything is the same shade of beige, the room looks flat against tile. If everything is different colors, it turns chaotic. Aim for a tight palette: cream background, terracotta accents, leafy greens, and one deep backdrop like dark green.
Can I do the DIY planter set without painting directly on the plant pot area that gets wet?
Yes—keep the painted areas mostly dry-friendly and let everything cure fully overnight before using. If you’re placing the plants in real soil, consider using a plain insert pot inside the painted terracotta container so excess water stays contained. The visual goal is the terracotta look, and the paint acts as the styling surface.
More in Bathroom
5 no-drill upgrades for a botanical bathroom under $350
A botanical bathroom refresh on a $350 budget that leans on move-friendly swaps: framed wall art, a patterned area rug, and a dark green sh…
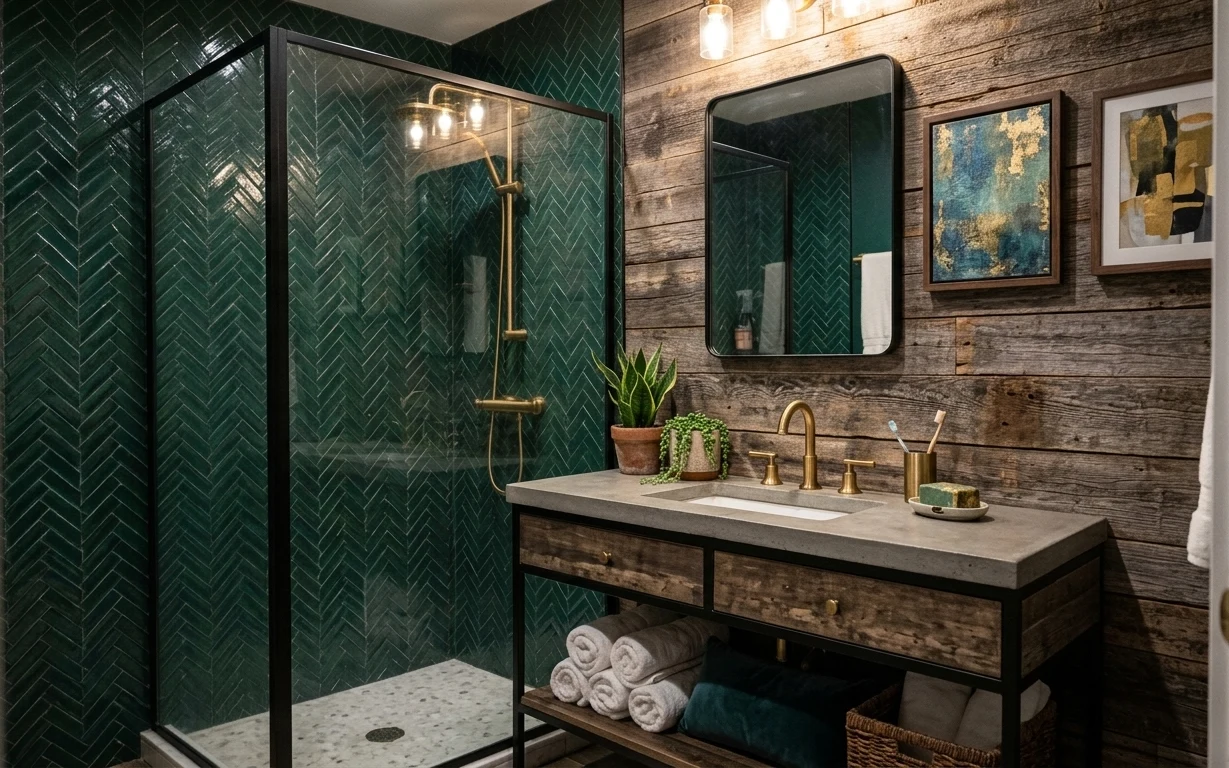
7 counter upgrades for a $600 spa bathroom
A spa bathroom already has great bones: deep green herringbone tile, warm wood panels, and brass fixtures. This weekend refresh adds 7 coun…
6 no-drill bathroom swaps for a $400 bathroom nook refresh
A warm terracotta bathroom nook look for shared housing, built from movable textiles, freestanding styling, and one no-drill DIY. This plan…