- Square footage
- Balcony corners to small zones
- Cost
- $555 total for the layers
- Difficulty
- Easy
- Renter-safe
- No-drill, portable swaps
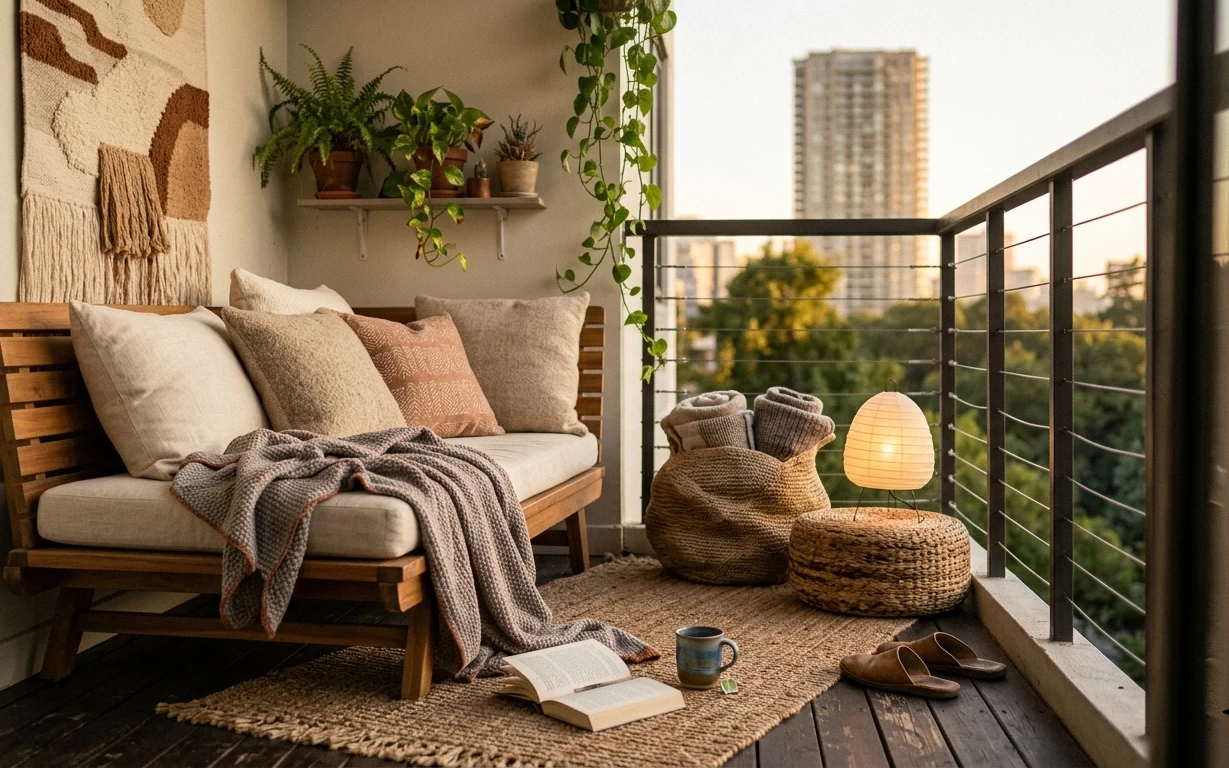
Why macramé-and-flower outdoor corner is the hammock balcony of 2026
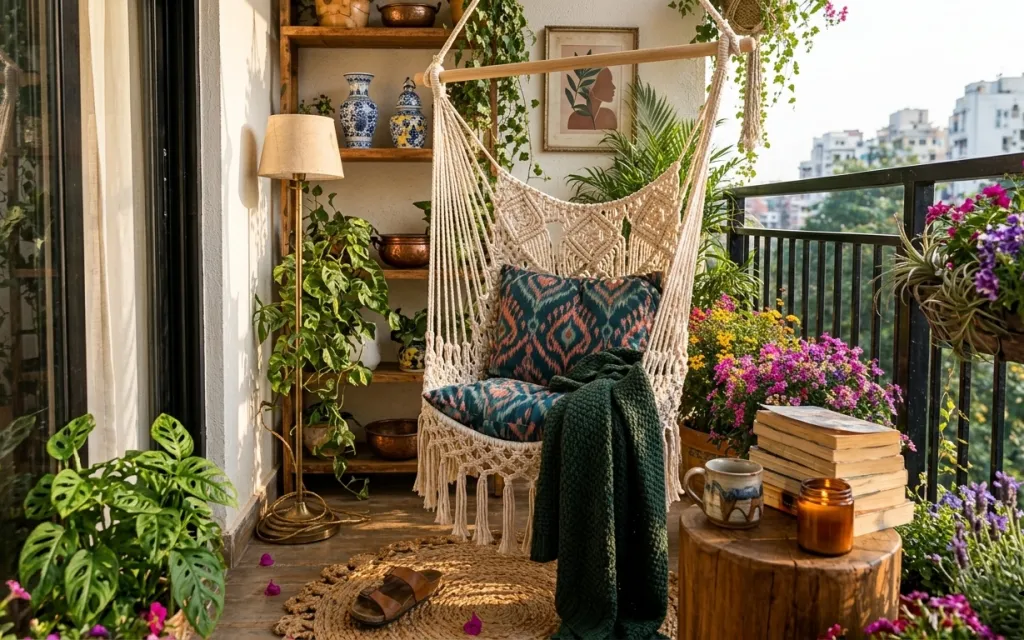
The photo gets its charm from layered texture: a woven area rug underfoot, a fringed macramé hammock, and patterned throw pillows that read clearly even in bright daylight. A floor lamp with a fabric shade adds warm contrast against the greenery, while a framed botanical print keeps the wall from looking bare. The trick for shared housing is choosing movable decor—nothing that requires permanent fixes—so you can rebuild the vibe in a new neighborhood without starting over.
I used to overthink balcony styling and buy “pretty” objects that didn’t work together once the plants arrived. Here, the balance is obvious: the rug anchors the seating area, and the macramé hammock sets the boho shape while the pillows and throw bring in color (teal, green) that matches the plants. Once I stopped chasing symmetry and went for texture first, everything started looking intentional.
Layer 1 — Woven area rug ($80) Ground the seating zone
A woven area rug is what makes the hammock feel like it has a defined “room” on an outdoor balcony floor. Look at how the rug sits right under the fringe and cushions—your eye reads it as the base layer before anything else. The boho pattern also helps hide small scuffs that happen from day-to-day balcony living. The trade-off is that you’ll want to shake and rotate it occasionally, but the upside is portability: roll it up and toss it in the next move.
Pick a rug that can take foot traffic
For outdoor balconies, choose a woven texture you can shake clean instead of a delicate shag that holds onto grit.
Layer 2 — Macramé hammock chair ($220) Bring in the main shape
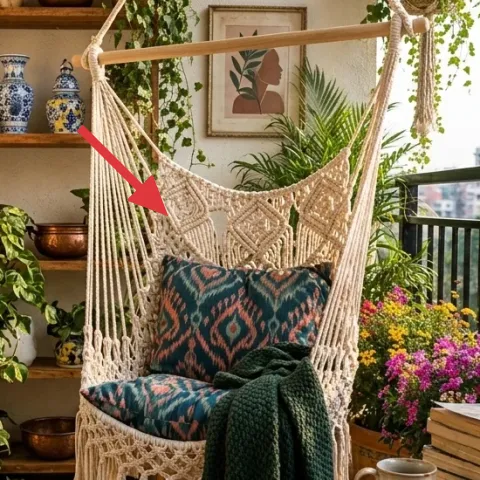
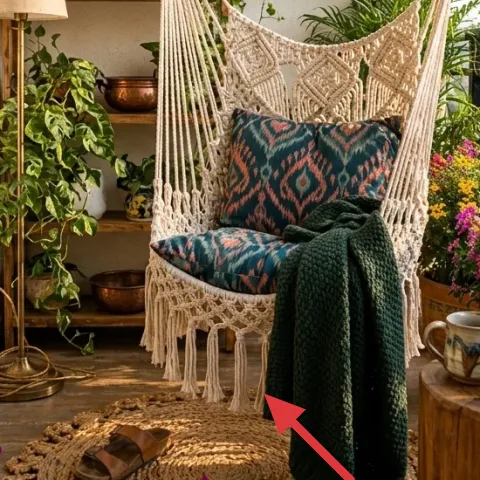
The macramé hammock chair is the headline here, and it’s doing two jobs at once: it gives a sculptural boho silhouette and it creates a cozy “hangout” spot even when the balcony is small. Because it’s a hammock-style piece, it visually softens the hard lines of the railing and the balcony wall. The downside is that you’ll need to be mindful about where it sits so it doesn’t block foot traffic, but you’re already using it as the centerpiece. This is also an easy move: pack the textiles, coil the cords, and dismantle for transport.
Match the color family, not the exact pattern
Let the hammock set the cream texture, then repeat teal/green through pillows and a throw.
Layer 3 — Floor lamp with fabric shade ($100) Add warm light after dark
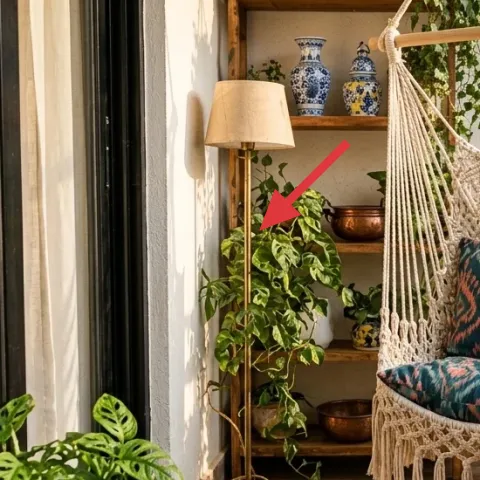
A floor lamp with a fabric shade brings the cozy, warm glow that plants alone can’t provide at night. In the photo, it’s positioned near the wall and becomes a vertical “light column,” which helps the balcony feel layered rather than flat. This is the kind of lighting that’s also forgiving: even if your bulb temperature varies slightly, the shade smooths everything into a softer look. The trade-off is footprint—make sure it won’t snag your path from the door—so measure your walking route before you buy.
Avoid very heavy bases in tight balconies
If you go for a floor lamp, choose one you can carry or reposition safely when you clean or move.
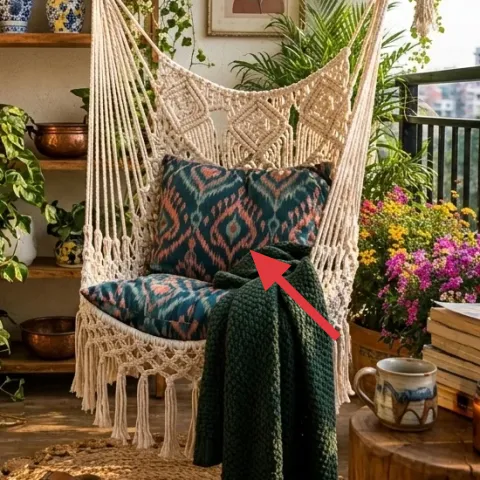
Layer 4 — Dyed pillow covers (patterned throw pillows) ($45) Tie the cushions to the plant palette
Make it instead of buying it
DIY dyed pillow covers so the teal-and-green pattern pulls directly from the colors in your plants and throw.
Materials
- Plain cotton pillow covers (2) — 20×20 in — thrift/store — $12
- Fabric dye (teal/green) — 1 bottle — craft store — $10
- Masking tape or rubber bands — 1 roll/pack — hardware/craft store — $4
- Disposable gloves — 1 pack — pharmacy — $3
- Plastic drop cloth or trash bags — 1 set — home store — $1
Steps
- Cover your workspace and pre-wet the pillow covers so the dye spreads evenly.
- Apply tape or rubber bands for resist patterns (or keep it simple with even dyeing).
- Mix dye with water to the shade you want, then soak the fabric until saturated.
- Rinse in cool water until it runs mostly clear, keeping the dye where you placed it.
- Dry fully (air-dry works), then remove tape or bands and set the fabric as directed.
- Slide the dyed covers onto the pillow inserts and style them with the throw.
Total DIY cost: $30 — saves about $15 over buying.
In this look, the patterned throw pillows add color without overpowering the hammock’s macramé texture. The teals and deep greens echo the plants, so the whole balcony reads “collected,” not randomly decorated. Buying covers in a matching colorway can get expensive, which is why dyeing plain covers is a move-friendly workaround—you’re not committing to a permanent install, and the covers pack flat. The trade-off is process time and rinse care, but the payoff is custom color that looks made for your balcony.
Go for dyeable fabrics
Cotton-style covers take dye more evenly than polyester blends.
Layer 5 — Framed botanical print ($60) Add a calm focal point on the wall
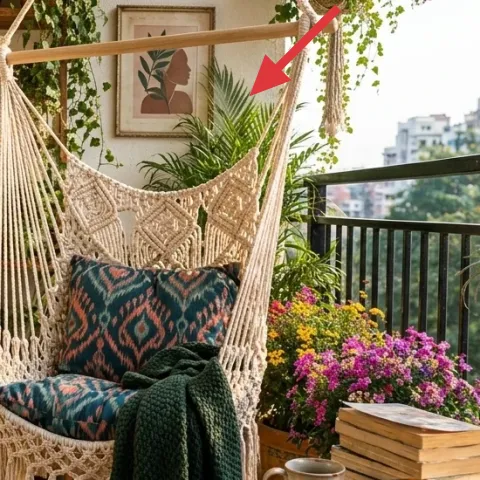
A framed botanical print gives you a contained “nature moment” that matches the real greenery outside the window frame. It’s also a grounding rectangle: the hammock is curved and textured, while the print adds a stable, picture-frame edge that makes the balcony feel intentional. In shared housing, wall art is a smart move because it packs and hangs later without replacing any fixed fixtures. The trade-off is transport—frames are easier to protect with corner cardboard—but it’s still far lighter than furniture.
Choose lightweight frames
For portability, look for thin wood or metal frames and add bubble wrap during moves.
Layer 6 — Blue-and-white decorative vases on a shelf ($30) Bring in a “collected” rhythm
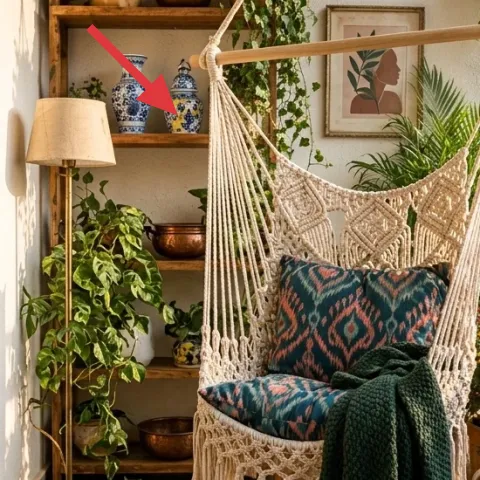
The blue-and-white decorative vases add pattern and ceramic texture to the wall shelf, which balances all the green and cream tones out on the balcony. They also help the shelving area feel styled instead of just functional storage. This matters in outdoor setups because plants can dominate the palette—ceramics are your way to introduce contrast while still feeling cohesive. The trade-off is that small objects can shift while you’re moving, so keep them in padded boxes. The upside: you’ll reuse the set anywhere with a shelf or a tabletop.
Use a “cluster of three” layout
Group vases at different heights so the shelf reads layered instead of flat.
Layer 7 — Jar candle ($20) Finish with a small, portable glow
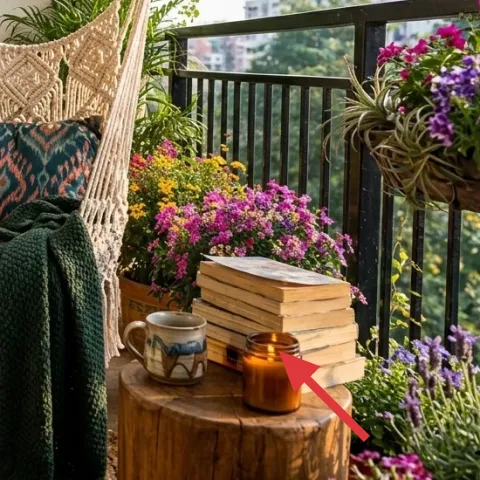
A jar candle gives that close-to-skin warmth you can’t get from daylight, especially when the lamp is off. On the wooden side table, it becomes a small styling object and a real nighttime mood source without taking up extra floor space. This is also one of the easiest move-friendly add-ons: pack the jar carefully, and even if the scent changes, the visual effect stays. The trade-off is that you’ll want to keep it away from breezes, but on a balcony with a contained table area, it fits naturally into the scene.
Keep it to one statement candle
One candle jar looks intentional; multiple jars can clutter the table.
The cost, layer by layer
| Layer | Item | Cost |
|---|---|---|
| 1 | Woven area rug (portable, jute-style) | $80 |
| 2 | Macramé hammock chair | $220 |
| 3 | Plug-in floor lamp with fabric shade | $100 |
| 4 | Dyed pillow covers (patterned covers) | $45 |
| 5 | Framed botanical print | $60 |
| 6 | Blue-and-white decorative vases | $30 |
| 7 | Jar candle | $20 |
| Total | $555 | |
If you want it cheaper, start with the rug and pillow covers, then swap the framed print for a smaller print or thrifted frame. You can also choose a simpler hammock chair version and allocate the savings to a higher-quality lamp shade.
What worked, what didn't (across the whole room)
This balcony look succeeds because it layers texture (woven rug, macramé fringe, ceramic ceramics) and repeats a tight color family (cream, teal, green). The only pieces that would need tweaking are the ones that depend on placement—lighting reach, table clutter, and where the hammock sits for comfort.
What worked
- The woven area rug keeps the hammock area from feeling like “just a spot,” especially in daylight.
- Macramé fringe adds softness that counterbalances the straight lines of the railing and door.
- The floor lamp’s fabric shade smooths light into a warm glow without needing a complicated setup.
- Patterned throw pillows repeat teal and green so the balcony feels coordinated with the plants.
- The framed botanical print adds calm structure when greenery gets visually busy.
- Blue-and-white ceramics give contrast against the dominant greens and creams.
- A jar candle makes evenings feel finished without changing any fixed balcony features.
What didn't
- Too many small objects on the side table would crowd the surface and make it harder to move around.
- A lamp placed too close to the hammock can block the seating angle and feel awkward at night.
- If the rug pattern clashes with pillow colors, the whole palette stops reading as one intentional scheme.
- Using heavy, tall decor beside a balcony door can create clutter and trip hazards.
- Overdoing candle use in breezy spots can make the flame unstable and distracting.
What we'd skip if we did it again
Skip the impulse buy of “matching set” outdoor decor. Balconies look more collected when textiles and ceramics share a color family, not when everything comes from the same product line.
Skip a wall-mounted approach that depends on landlord-permanent changes. A framed botanical print and portable shelf styling are safer for shared housing and quicker to pack.
Skip low-contrast pillow colors that disappear next to the greenery. The patterned throw pillows in this look are doing real work—if you lose that contrast, the hammock feels unfinished.
Frequently asked
How long does this hammock balcony refresh take?
Plan for one afternoon to set the big pieces (rug placement, hammock chair setup, lamp position, and pillow styling). Add another hour if you DIY dyed pillow covers, mostly for mixing, rinsing, and drying time. Decorating with plants and shelf ceramics is the last step and usually takes 30–45 minutes, because it’s mostly arranging height and spacing.
What if I’m renting and can’t change the balcony layout?
You can still copy the look by anchoring around the hammock zone. Choose a woven rug that defines the seating area, then style pillows and a throw using a tight palette (cream plus teal/green). Keep your wall add-ons lightweight and portable, like a framed botanical print, and avoid anything that requires drilling or permanent fixes.
My balcony is smaller—what changes first?
Start with the rug scale. If space is tight, choose a rug that fits under the hammock footprint without extending too far into the walkway. Then limit the table styling: one candle jar plus a small book stack is enough. Finally, keep the number of plants to what fits around the hammock side, so the balcony stays navigable.
Where can I shop for pieces like these without buying a whole set?
For the macro items, look for portable essentials at home-goods stores and marketplaces—woven rugs, plug-in lamps, and hammock chairs. For the “texture and color” details, shop craft stores and thrift shops for pillow covers, dye supplies, and ceramic accents. For wall art, pick a lightweight framed print you can protect and move easily.
What’s the biggest mistake on this kind of balcony styling?
Trying to add too many small objects at once. When every surface competes—rugs, candles, vases, extra pillows—the look stops feeling collected and starts feeling cluttered. Choose one anchor (the hammock), one grounding textile (the rug), and then repeat a single color family across pillows, ceramics, and a throw.
Can I skip the DIY pillow covers and still get the same effect?
Yes. If you skip DIY, buy pillow covers with a similar teal/green palette and a pattern scale that matches the throw. The key is contrast: the pillows should read from the door even with plants behind them. Keeping two pillow covers plus one throw is usually enough to recreate the color rhythm.
More in Outdoor & Patio

7 no-drill swaps for a $600 hammock balcony refresh
A hammock balcony refresh for shared housing: add a woven rug, macramé hammock chair, warm lamp glow, dyed pillow covers, and a few shelf d…
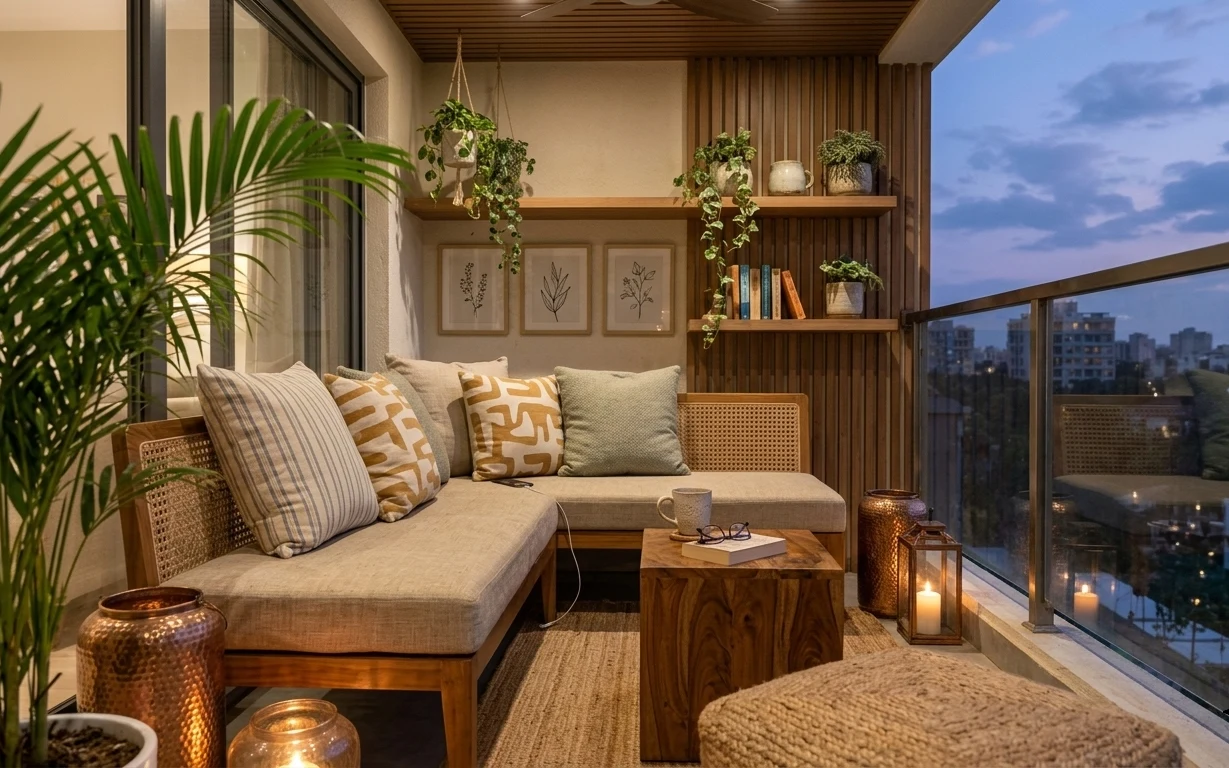
7 budget balcony upgrades for a $700 balcony lounge
A warm, plant-filled balcony lounge refresh that reads styled and intentional—on a $700 weekend budget. Focus on a bold rug, layered throw …
How to build a balcony seating nook for $300
A renter-friendly balcony seating nook built around a large woven rug, stacked pillows, a fringed wall hanging, plants, and warm plug-in la…