- Best for
- renter kitchen island styling
- Cost
- $365 for the full look
- Difficulty
- easy to moderate (mostly styling + DIY art)
- Time
- 2–4 hours including paint drying
Why sage-and-brass counter styling is the island bar zone of 2026
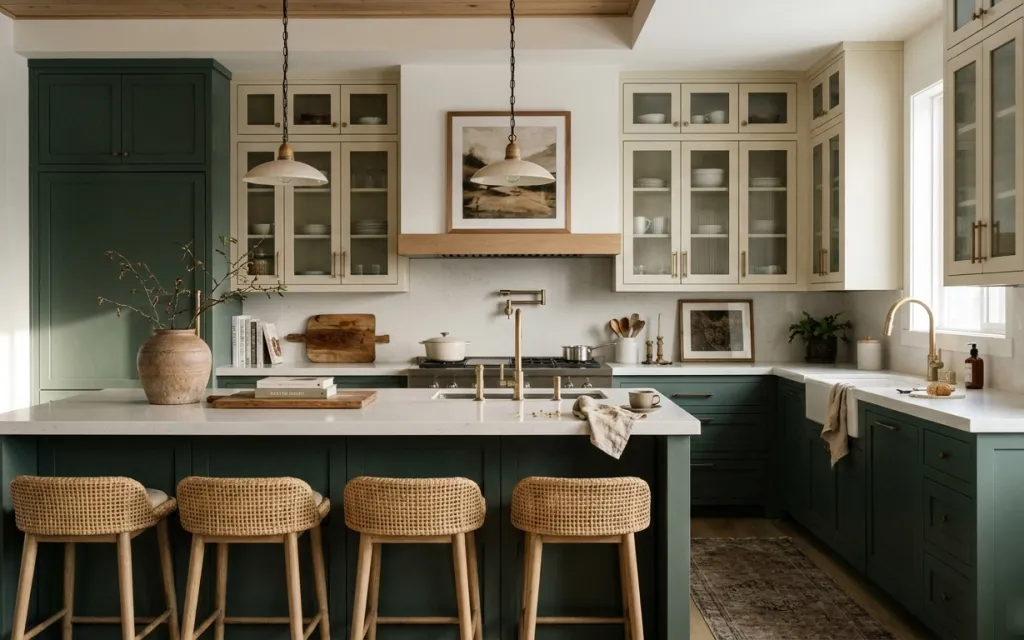
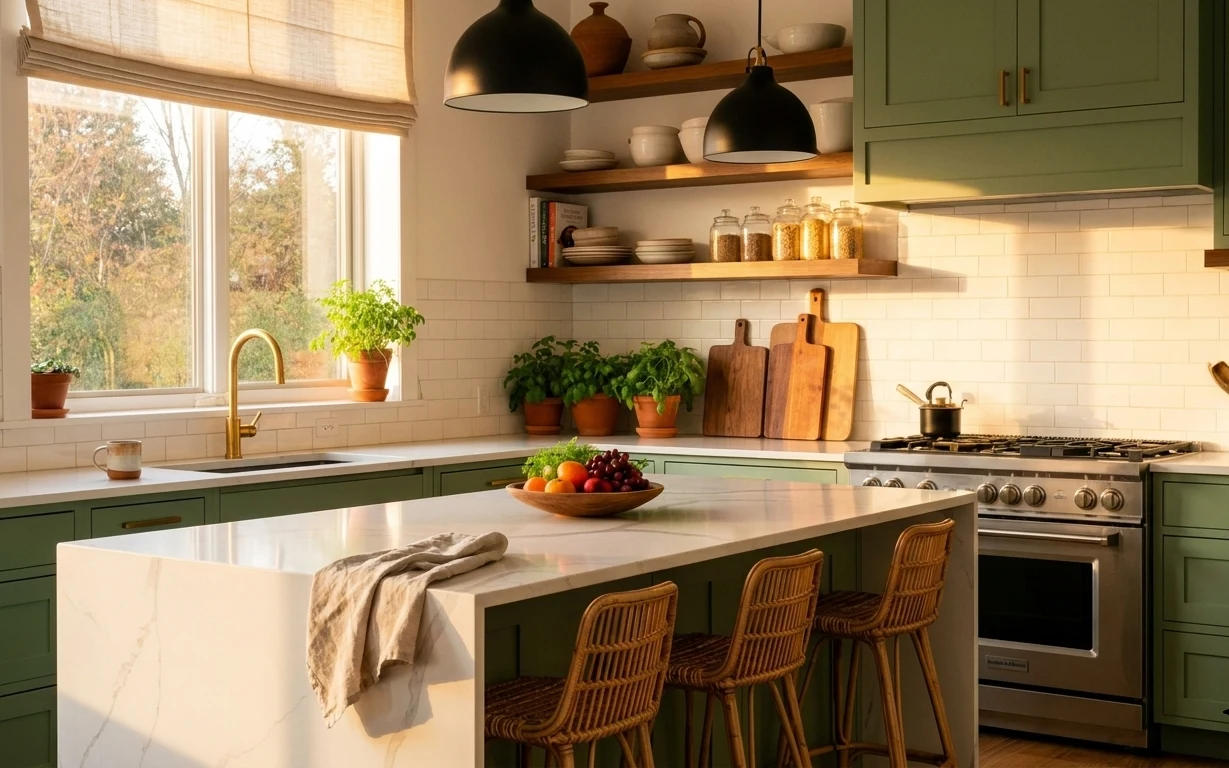
Start with the island itself: light stone, deep green cabinetry, and warm wood ceiling beams create a strong base, like a Joanna Gaines–style palette but in a cleaner, more tailored layout. The magic is in the textures you can touch—woven bar stool seats, a patterned area rug beneath the movement, and a ceramic vase with twiggy stems that read natural but intentional. Even the small things matter: a tea towel folded neatly over the counter edge and a tray that keeps the “daily use” items visually calm. For renters, this works because nothing requires drilling or permission.
I used to over-style countertops until I realized how quickly kitchens become cluttered when everything is “pretty.” The change for me was choosing one anchored moment per surface—vase on the left, a tray cluster near the middle, and one wall focal point above. Once I stopped trying to decorate every inch, the room started looking composed even on ordinary mornings.
Layer 1 — Tea towel on kitchen counter ($25) Softens the stone countertop edge
A tea towel might sound like a tiny detail, but in this island bar zone it does a lot: it breaks up the uninterrupted countertop color and adds a light, absorbent texture you can swap with the seasons. In the photo, the towel is draped over the front-right counter edge, which keeps it visually “on display” without taking up cabinet or drawer space. The trade-off is practical—fold it so it stays where you put it, because a towel that’s too bulky will sag or fall. Compared with bigger decor, this is the cheapest move that still makes the island feel lived-in.
Fold for visual rhythm
One clean fold beats a messy bunch—aim for soft drape lines that echo the rug’s pattern.
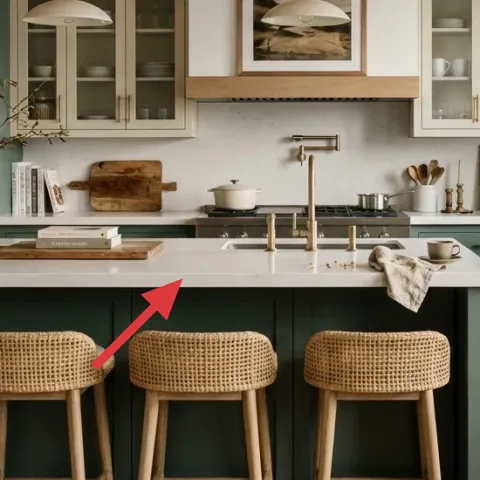
Layer 2 — Large ceramic vase on left island ($30) Gives the greens an earthy anchor

This large ceramic vase on the left side of the island brings warmth that the deep green cabinetry can’t do on its own. The finish looks matte and slightly textured, which keeps it from reading glossy or “store-bought shiny” next to the stone. It also gives height without adding clutter—especially because it’s positioned where your eye lands when you look across the island. The obvious alternative is a small bottle or tiny jar, but those tend to disappear from this distance. Here, the vase acts like a styling base for any twig stems, branches, or simple store-bought greenery.
Let the stems do the work
Stick to slender, branchy stems rather than bulky bouquets so the silhouette stays airy.
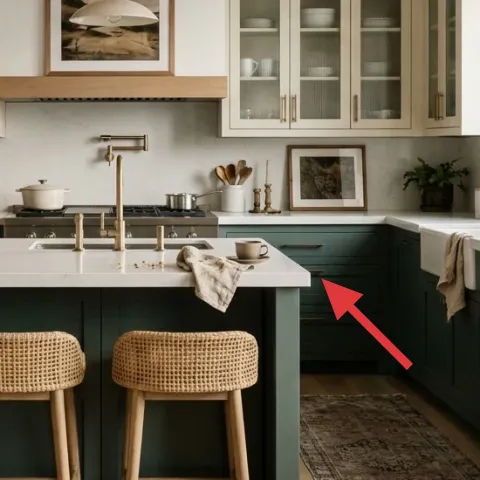
Layer 3 — Decorative tray on kitchen island ($35) Keeps small items from turning into countertop noise
A decorative tray is the fastest way to make “stuff” look intentional on a kitchen island. In the hero, the tray sits near the middle and collects smaller objects into one tidy rectangle, so your eye doesn’t hop across scattered surfaces. Look for a tray with warm wood or a wood-tone edge so it echoes the ceiling beams and balances the coolness of the cabinets. The trade-off is that you’re committing a bit of organization—you’ll want to put the everyday items back onto the tray each time. Compared with spreading decor around, a tray cluster looks better from multiple angles and packs away cleanly when you move.
Choose one “home” for everyday objects
Use the tray for the same category each day (coffee tools, small bowls, or candles), so it stays effortless.
Layer 4 — Hand-painted abstract wall art (DIY) ($80) Pulls the whole palette together
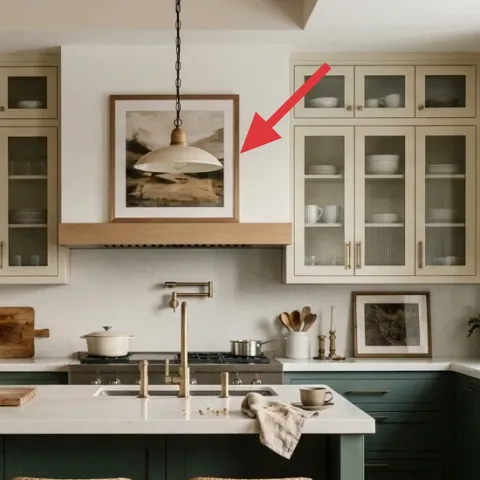
The framed abstract piece above the backsplash is doing visual heavy lifting: it adds a lighter focal point between two rows of cabinets and gives the eye a place to rest. Because it’s centered, it also makes the island feel intentional rather than “decorated by accident.” For renters, the best version of this look is one you can make—then swap or reframe at move-out. The obvious alternative is buying a print, but DIY is a practical way to match exactly the tones you see here: warm creams, soft browns, and a hint of green. Keep the strokes loose so it reads like art, not wallpaper.
Make it instead of buying it
DIY a hand-painted abstract on cardstock and place it in the same size frame opening so you get the centered focal point without replacing anything landlord-installed.
Materials
- Cardstock sheet—one 8.5×11 or cut-to-size—paper supply—$6
- Acrylic paint set—cream, warm brown, muted green—craft store—$18
- Black fine-tip marker—one—craft store—$28
- Painter’s tape—one roll—hardware store—$10
Steps
- Measure the frame opening and cut your cardstock to fit with a small margin.
- Tape off 2–3 loose “zones” on the cardstock to control where color lives.
- Paint broad cream and brown shapes first, leaving some paper showing for airiness.
- Layer in muted green as thin strokes so it echoes the cabinetry without taking over.
- Let the paint dry fully before pulling tape; if edges smudge, re-tape and touch up.
- Add a few black marker lines last for contrast and a finished, graphic look.
- Dry completely, then test the fit in the frame opening before inserting.
- Place the finished cardstock into the frame and clean any fingerprints on the glass/cover.
Total DIY cost: $62 — saves about $18 over buying.
Layer 5 — Stack of books on kitchen island ($15) Adds height without extra clutter
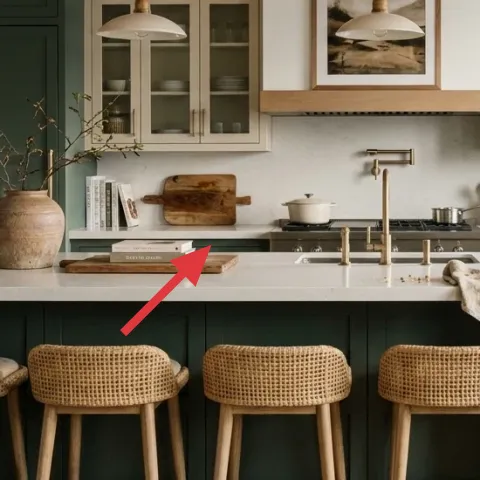
A stack of books is one of those “invisible” styling tricks that makes everything look more layered. In the hero, the books sit next to the vase area and give a small step up in height, which helps the tray and decor read at the right scale from across the room. The most important detail is how you stack: keep the spines mostly neutral or warm, and don’t overthink the exact titles. The trade-off is that books on an island need a home—otherwise they’ll drift into clutter and look accidental. Compared with a random knickknack, books add both texture and practical function while still staying move-friendly.
Avoid a tall tower
Keep the stack low enough that it won’t block the view of the framed art above the backsplash.
Layer 6 — Small potted plant on cabinet top ($30) Brings softness above the countertop line
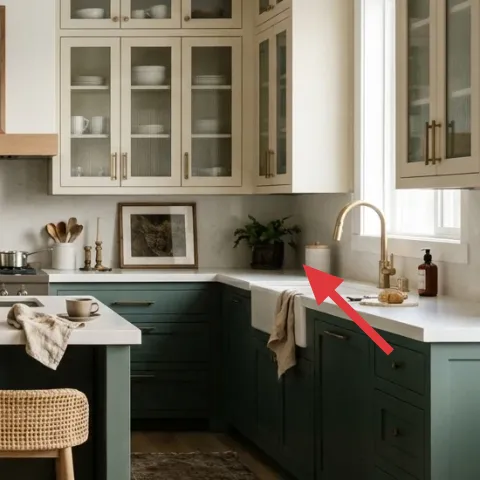
Plants are what make this island bar zone feel relaxed instead of staged. The small potted plant on the cabinet top adds a gentle height variation above eye level and fills the “negative space” created by the glass-front doors. Look for a plant with a compact silhouette so it doesn’t compete with the framed art in the center. The trade-off is maintenance: even a low-light-friendly plant will need occasional watering, and renters benefit from choosing something forgiving. Compared with adding another decor object, a real plant brings subtle texture and life that stays interesting day to day.
Match the plant scale to the doors
Choose a pot that doesn’t loom in front of glass panels—small and airy reads best.
Layer 7 — Patterned area rug under the stools ($150) Grounds the seating and hides everyday marks
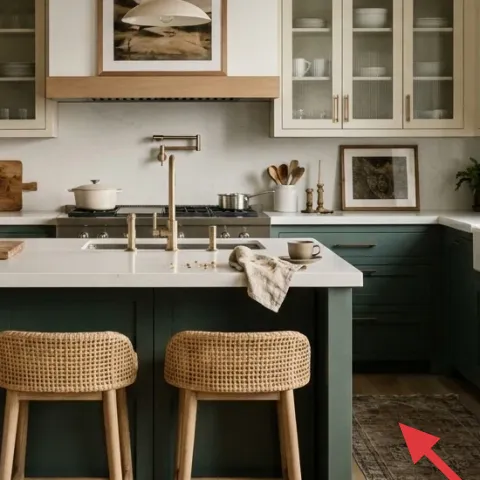
A patterned rug under the stools is the foundation of this look because it makes the bar zone feel like a “defined area,” not just an island in open floor space. In the hero, the rug’s warm, earthy pattern balances the crisp cabinetry and gives the woven stool seats a matching texture note. The main trade-off is sizing: too small, and it’ll look like a decorative runner; too big, and it can crowd the walkway. The right middle is a rug that tucks under at least the front legs of the stools, so sliding chairs don’t yank the whole effect away. This is also renter-safe—roll it up at move-out.
Anchor with the stool legs
Before buying, measure so the rug extends beyond where stool feet land.
The cost, layer by layer
| Layer | Item | Cost |
|---|---|---|
| 1 | Tea towel on kitchen counter | $25 |
| 2 | Large ceramic vase on left island | $30 |
| 3 | Decorative tray on kitchen island | $35 |
| 4 | Hand-painted abstract wall art in frame (DIY) | $80 |
| 5 | Stack of books on kitchen island | $15 |
| 6 | Small potted plant on cabinet top | $30 |
| 7 | Patterned area rug under the stools | $150 |
| Total | $365 | |
If you want a cheaper version, swap the rug for a simpler patterned runner and keep the rest of the palette: one ceramic vase, one tray, the stack of books, and DIY wall art. That keeps the island feeling styled without paying for a larger floor piece.
What worked, what didn't (across the whole room)
The strongest wins were the “anchor” pieces: the framed abstract centered above the backsplash, the rug beneath the stools, and the tray cluster on the island. Together, they create structure so the smaller items can feel casual instead of chaotic.
What worked
- The patterned rug under the stools makes the bar zone feel defined instead of floating in open floor space.
- The centered framed art gives the eye a focal point that balances the island’s long countertop line.
- The ceramic vase adds warm texture that softens the deep green cabinetry.
- The tray prevents small kitchen items from looking scattered or accidental.
- The stacked books add height so decor reads at the right scale from across the room.
- The plant on the cabinet top brings softness above eye level without taking counter space.
What didn't
- Keeping decor items spread out across the island makes everything look busier than it is.
- A too-small rug reads like a decorative accent and doesn’t anchor the stool seating.
- Counter textiles that are too bulky can slump and look untidy by midday.
- Using a dark-framed print with no warm tones can fight the cream stone and feel heavy.
- Plants that are too large for top-of-cabinet placement start to feel crowded near glass doors.
What we'd skip if we did it again
Skip swapping major kitchen fixtures or attempting any wall changes. This look is built from renter-safe layers—textiles, art, and tabletop styling—so you keep your security deposit intact and pack everything up at lease end.
Skip buying several small decor pieces with no “collector” object. Without a tray and a vase serving as anchors, you end up with visual noise, especially on busy mornings when you’re moving through the island.
Skip choosing rug size based on aesthetics alone. A rug that doesn’t extend under the stool area will shift visually every time chairs move, so it stops grounding the bar zone and starts looking temporary.
Frequently asked
How long does this $400 kitchen island refresh take?
Most of it is placement and styling, so plan on about 1–2 hours for the non-DIY pieces (tea towel, tray cluster, books, plant, and rug positioning). The DIY wall art is the time variable—budget another 1–2 hours including drying, plus a few minutes to test fit in the frame. Overall, it’s a weekend project, not an all-day ordeal.
Is this truly renter-safe if the kitchen is small?
Yes—every layer here is either freestanding or textile/wall art that doesn’t require drilling. If the kitchen is smaller, go slightly smaller on the rug and keep the countertop objects in two clusters: one tray area and one vase area. The framed abstract stays the same size because it’s centered and balances the visual weight of the cabinets.
What if my ceiling or lighting layout looks different from the photo?
The pendant lights in the photo are part of the existing kitchen setup, so this refresh doesn’t depend on changing them. The goal is to add softness and focus where renters can: the rug under the stools, the island countertop styling, and the framed art. Those choices work whether your kitchen lighting is bright and direct or warmer and dim.
Where should I shop for these pieces?
For the fastest matching palette, start with a patterned rug and a warm wood-tone tray at home stores or online marketplaces, then build the smaller objects around them. Look for a matte ceramic vase and neutral books at thrift stores, antique shops, or resale sites. The DIY wall art can be made with craft-store acrylics and an inexpensive frame.
What’s the biggest styling mistake people make in kitchens like this?
The biggest mistake is trying to decorate every inch of the island at once. Kitchens need breathing space—so use one anchor (tray cluster) and one sculptural element (vase), then keep the rest minimal. If everything is equally “decor,” the island loses focus and starts looking cluttered even when it’s technically tidy.
Can I do the same look with a colder color palette?
Absolutely. If your cabinets lean cooler than deep green, swap the vase for a warmer ceramic finish and choose a rug with more tan or ochre in the pattern. For the wall art, keep the same DIY approach but shift the paint mix toward creams and warm browns. The structure—rug grounding, tray grouping, and a centered focal point—stays the same.
More in Kitchen & Dining

7 renter-friendly swaps for a $400 kitchen refresh
A rented kitchen can look like this $400 island bar zone with small, no-drill swaps: a patterned area rug, a few counter styling pieces, an…
Under $300: green-and-wood kitchen counter-and-shelf refresh
A green-tile kitchen counter-and-shelf setup that looks styled but stays renter-safe: layered countertop objects, linen towel texture, and …
7 renter-friendly swaps for a $400 kitchen island refresh
A renter-friendly kitchen island refresh using olive cabinetry cues, warm pendant lighting, and move-friendly styling—everything packs up w…