
- Best for
- Outdoor, shared-housing patio glow
- Time
- 1–2 afternoons
- Total cost
- $373 (about $400 budget)
- Renter-safe
- No drilling, all removable swaps
Why warm tan-and-cream outdoor seating is the covered patio seating area of 2026
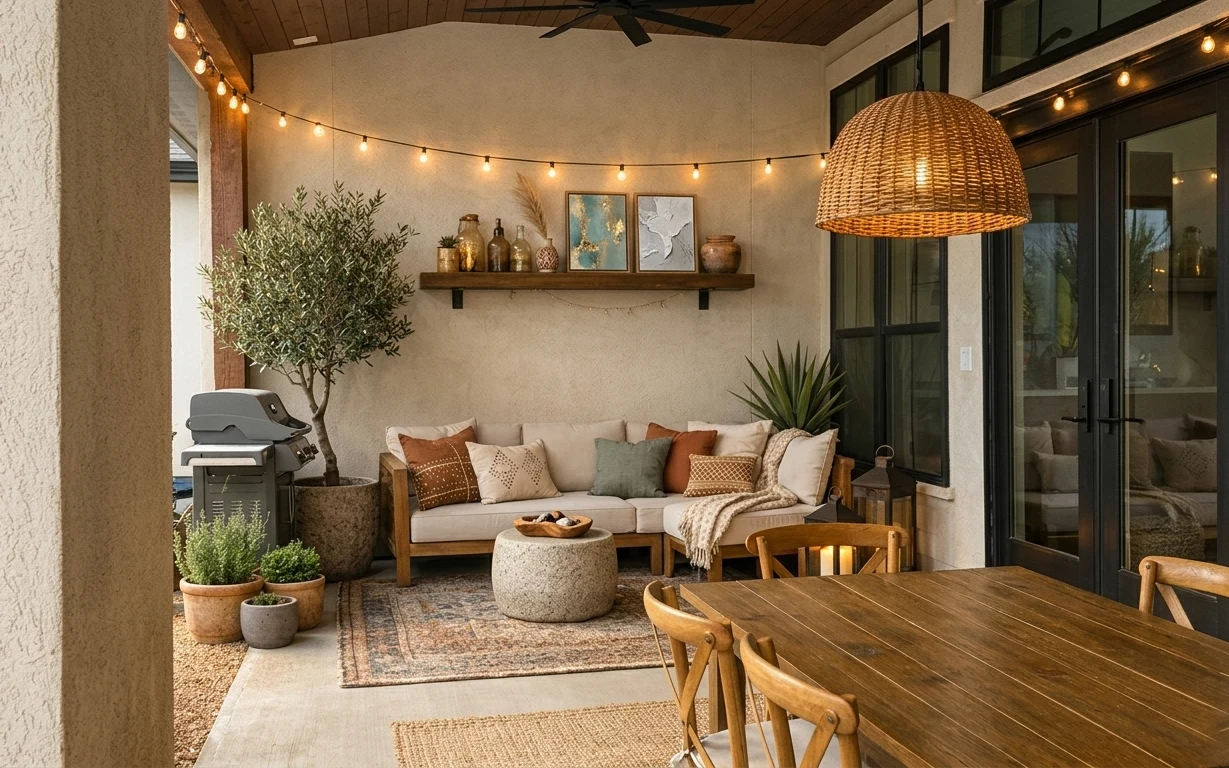
The easiest way to get this exact feeling is to borrow its material mix: a chunky neutral rug underfoot, a cream runner with fringe across the table, and that crisp leaf-print pillow against rattan. The background reads as concrete and wood beams, so the styling leans on texture—wooly loops in the rug, woven texture in the baskets, and glass lantern glow. Even if the patio belongs to the building, these changes are all “take-it-with-you” swaps, not landlord territory. It’s also very magazine-friendly: the woven-and-dried-plant moment is pure boho, but the palette stays restrained.
I’ve been burned by “outdoor” decor that can’t survive being moved. In one shared house, I went too matchy with tiny, delicate pieces and everything felt fussy once we had people over. What clicked here was going bigger on texture (that rug) and simpler on the accessories (one runner, one pillow pattern, and warm string lights). The result looks styled, but it’s still made of things that pack into cardboard boxes and tote bags.
Layer 1 — neutral area rug ($200) Texture underfoot that reads as grounded
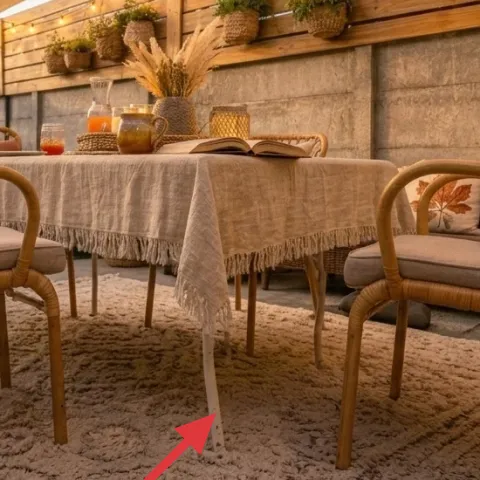
This neutral area rug is the base layer because its dense, looped texture anchors the whole patio. In the photo it sits under both rattan armchairs and extends beyond their legs, which makes the seating feel intentional instead of “furniture on concrete.” The obvious alternative is a smaller doormat-style rug, but that makes the chairs float. Going bigger also helps the leaf-print pillow and lantern light look richer by contrast. The trade-off is a thicker rug that takes more space in storage, but it rolls and gets you the biggest visual payoff for the least fuss.
Pick the rug size by chair legs, not by the table
If both chair feet land on the rug, the layout instantly looks planned.
Layer 2 — cream fringed table runner ($40) Fringe that softens hard edges
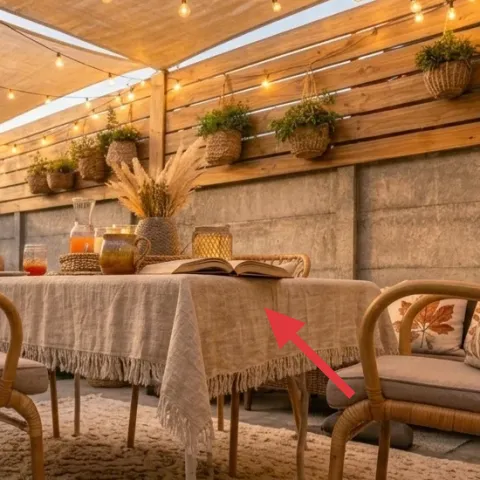
The cream fringed table runner is what turns a plain round table into a styled “center moment.” You can see it draped across the tabletop, adding a vertical texture line that breaks up the warm wood beams and the concrete wall behind. The runner’s fringe also catches the lantern and string-light glow, which is why the whole scene reads warm even without overhead fixtures. A single placemat would look cheaper and wouldn’t stretch across the table the way this one does. The trade-off is that a runner wrinkles in transit, but it smooths out quickly once it’s laid back down.
Stick to a single color family
Keeping the runner cream prevents the patio from turning into a pile of separate patterns.
Layer 3 — cream leaf-print throw pillow ($18) One bold motif on a neutral base
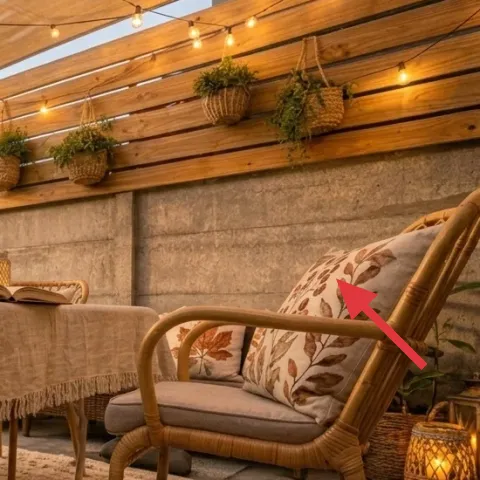
This leaf-print throw pillow gives the room its boho signature without adding multiple competing patterns. It’s scaled to sit comfortably on the chair back and stays crisp against the rattan arms, so the design looks deliberate instead of random. The easy alternative would be adding another solid pillow, but repeating only solids can feel flat next to the concrete backdrop. Leaf print brings movement, while still working with the neutral rug and cream runner. The trade-off: patterned pillows show lint and fuzz sooner, so it’s worth choosing a washable cover and keeping a lint roller nearby.
Balance pattern with texture
Leaf print looks best when paired with a looped rug or woven basket, not a smooth tabletop.
Layer 4 — lantern ($35) Warm light you can relocate room to room
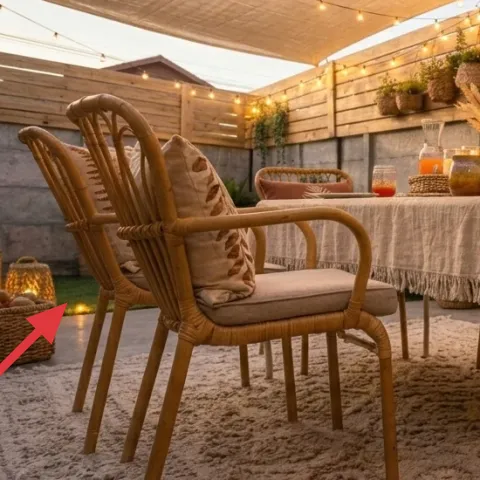
The lanterns are doing double duty: they add that amber glow and they create a “nighttime finish” that string lights alone can’t match. In the photo, the lantern sits off to the side and reads like a portable mood source—great for parties, dinners, and late study sessions. The obvious alternative is only overhead lighting or only string lights, but then the light feels one-note. Lantern light lets the patio feel layered, especially next to the rug’s texture. The trade-off is safety and maintenance, so keep it protected from wind and wipe the glass before you pack it back up.
Don’t rely on fragile glass parts for move days
Wrap lanterns in a towel or bubble wrap before packing so they survive the next lease.
Layer 5 — string lights on hooks ($35) Warm glow that stays rental-safe
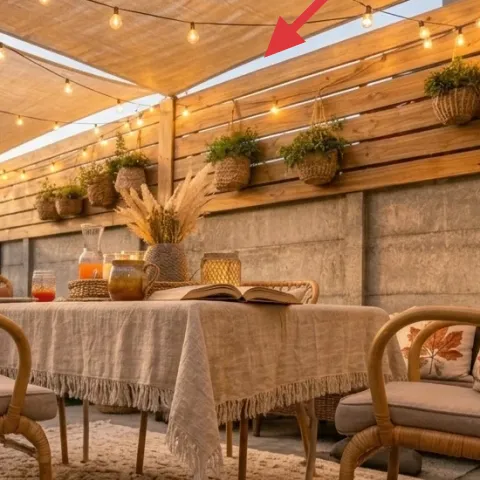
These string lights are the reason the patio feels cozy after dark, and they’re also one of the most move-friendly “upgrades” here. The strands run across the wood beams and create a gentle overhead canopy effect, which makes the concrete wall feel softer. The alternative is a battery-only tabletop setup, but that tends to look scattered and doesn’t create the same continuous glow line. With hooks, you can tension the layout where it looks best and then remove everything when you move. The trade-off is that you’ll spend a little time measuring where the hooks go so the line stays even from chair to chair.
Make it instead of buying it
DIY this string-light canopy using a string lights set and removable Command hooks so the warm overhead line disappears when the lease does.
Materials
- Outdoor string lights set — 1 — store — $15
- Command hooks (multi-pack) — 1 — store — $8
- Twine or cord ties (for spacing) — 1 roll — store — $4
- Measuring tape (borrow or buy) — 1 — store — $3
Steps
- Decide the start and end beam points, then mark them lightly with removable tape.
- Wipe the beam surface so adhesive hooks grab well and evenly.
- Attach Command hooks at measured intervals for an even sag line.
- Hang the string lights on the hooks, adjusting slack before plugging in.
- Use cord ties to steady any sections that bounce in wind.
- Test the spacing with the lights on, then tidy the line and secure loose plugs.
Total DIY cost: $30 — saves about $5 over buying.
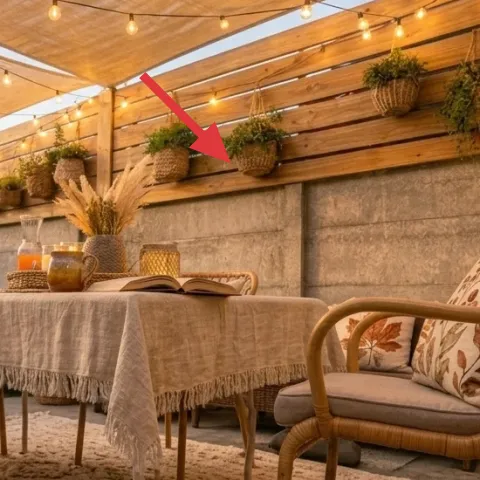
Layer 6 — hanging woven plant basket ($20) Green that frames the space
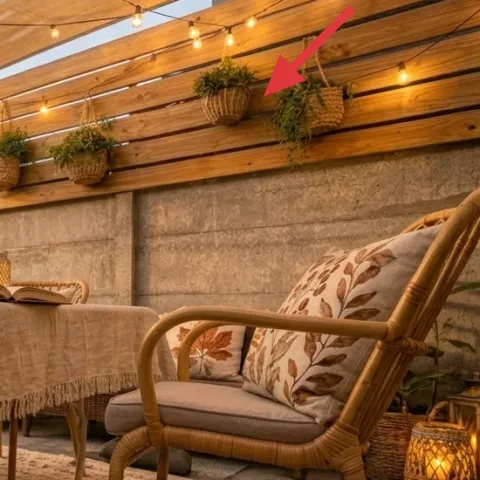
The hanging woven plant baskets bring the patio’s “boho layer” up toward eye level, so the look doesn’t rely only on items at table height. In the photo they line the wall area and repeat the woven texture that’s already in the chairs and baskets. The alternative is placing all the greenery on the table, but that can clutter the center and make the runner look smaller. With wall hangers, you get rhythm and depth behind the seating. The trade-off is that hanging pieces can sway a bit in breeze, so choose sturdy planters and keep the stems trimmed so nothing tangles with the light strands.
Match woven with woven
If the chairs are rattan, woven baskets on the wall keep the textures coherent.
Layer 7 — dried pampas grass in glass vase ($25) Height and movement without constant watering
Dried pampas grass in a glass vase adds height, movement, and a soft “feathery” texture that works beautifully against both concrete and wood. The vase sits on the table area, so it ties the runner styling to the lantern light—especially when the warm strands are on. A cheaper alternative would be a small bud vase with short stems, but the composition would feel bottom-heavy next to the tall chair backs. Pampas creates a vertical silhouette that makes the whole setup look styled even with only a few objects. The trade-off is dust on dried stems, but it’s easy to shake outside before you pack.
Use height to make small setups feel bigger
One taller dried arrangement reads more intentional than three shorter ones.
The cost, layer by layer
| Layer | Item | Cost |
|---|---|---|
| 1 | Neutral area rug | $200 |
| 2 | Cream fringed table runner | $40 |
| 3 | Cream leaf-print throw pillow | $18 |
| 4 | Lantern | $35 |
| 5 | String lights on hooks (DIY retail-equivalent) | $35 |
| 6 | Hanging woven plant basket | $20 |
| 7 | Dried pampas in glass vase | $25 |
| Total | $373 | |
A cheaper variant keeps the same layout but swaps in a smaller rug (or a flatter weave) and uses one lantern instead of multiple glow points, while still keeping the string-light canopy.
What worked, what didn't (across the whole room)
The biggest win is how the look is built in layers: rug texture on the ground, a runner at table height, and string lights across the beams. That combination makes the concrete backdrop feel intentional instead of stark.
What worked
- The neutral rug grounds both chairs and makes the seating read like a dedicated zone.
- The cream fringed runner adds movement and catches warm light, especially at night.
- One leaf-print pillow brings a clear motif without starting a pattern pile.
- Lanter glow adds depth that string lights can’t replace on their own.
- Woven hanging baskets add height and repeat the chair texture for cohesion.
- Dried pampas gives vertical drama with zero watering during busy weeks.
What didn't
- Overloading the table with small decor makes the runner look smaller and the center feel busy.
- Skipping a larger rug makes chairs feel “floating,” especially against flat concrete.
- Using only battery candles flattens the light—warmth needs a hanging line above, too.
- If the string-light sag is uneven, it draws the eye more than the furniture.
What we'd skip if we did it again
Skip tiny rugs. In a covered patio setting, chairs need a rug that reaches under the seating zone, not a mat that only covers the walkway.
Skip buying a matching “set” of lanterns or pillows from one brand. Mixing one strong motif (like the leaf print) with neutral textures reads more current.
Skip placing all greenery at table level. Hanging woven baskets create depth behind the seats and keep the center open for dinners.
Frequently asked
How long does this kind of patio refresh take?
Most of it is quick: lay the rug, drape the fringed runner, place the pillow, and set the lanterns. The longest part is string lights—measuring beam-to-beam spacing and adjusting sag before you commit. For a first-time setup, plan for 2–3 hours spread across a couple of sessions, plus 20 minutes to pack everything back into bins.
Is this renter-friendly if the patio belongs to the building?
Yes, because the main changes are soft goods and freestanding decor. The only “hardware” in this look is string lights attached with removable Command hooks. If the surface is delicate, test one hook first in a hidden spot. Everything else—the rug, runner, pillow cover, lanterns, and dried arrangement—comes down without tools.
What if my patio is smaller than this one?
Keep the same layering idea but scale the rug and the centerpiece. A smaller rug should still tuck under both chair fronts. For the table, use the same runner color but shorten it so the fringe doesn’t overwhelm the tabletop. For lights, aim for one continuous line overhead rather than spreading strands everywhere.
What if I have a bigger outdoor area to fill?
Extend the rug area so the seating is fully framed, then add a second glow point with an extra lantern on the opposite side of the table. The string-light layout can also span wider between beams as long as the sag looks even. Keep the palette consistent—cream, warm tan, and one green accent—so the bigger space still looks cohesive.
Where should I shop for these pieces on a shared-housing budget?
For the rug and pillow, look for washable covers and easy-to-roll rugs in larger sizes; discount home stores and online marketplaces work well. Lanterns and string lights are often cheaper in seasonal outdoor sections. For dried pampas and woven baskets, thrift stores and craft suppliers can be a great match, and the exact stems can vary while still reading as “boho.”
Biggest mistake people make with this patio look?
Overdoing the tabletop and under-sizing the rug. When the runner is competing with too many small objects, it loses the “styled” effect. And when the rug is too small, the chairs don’t form a zone, so the lights and greenery look decorative instead of intentional.
More in Outdoor & Patio

A cozy covered patio seating area for $400
A $400 covered patio seating refresh that’s easy to pack: a neutral area rug, a fringed table runner, one leaf-print pillow, lantern light,…
7 porch upgrades for a $600 renter-friendly refresh
Turn a sunlit porch seating area into a more polished, move-with-you setup with $560 worth of renter-friendly swaps (plus one DIY). This pl…
7 patio seating nook swaps for a $600 outdoor refresh
A patio seating nook can feel finished without a renovation: warm woven light, string lights, and a layered rug. This $600 weekend refresh …