- Best for
- Fire pit evenings + easy curb appeal
- Cost
- $360 ($400 cap)
- Difficulty
- Easy swaps + 1 paint DIY
- Renter-safe
- No drilling, packs into boxes
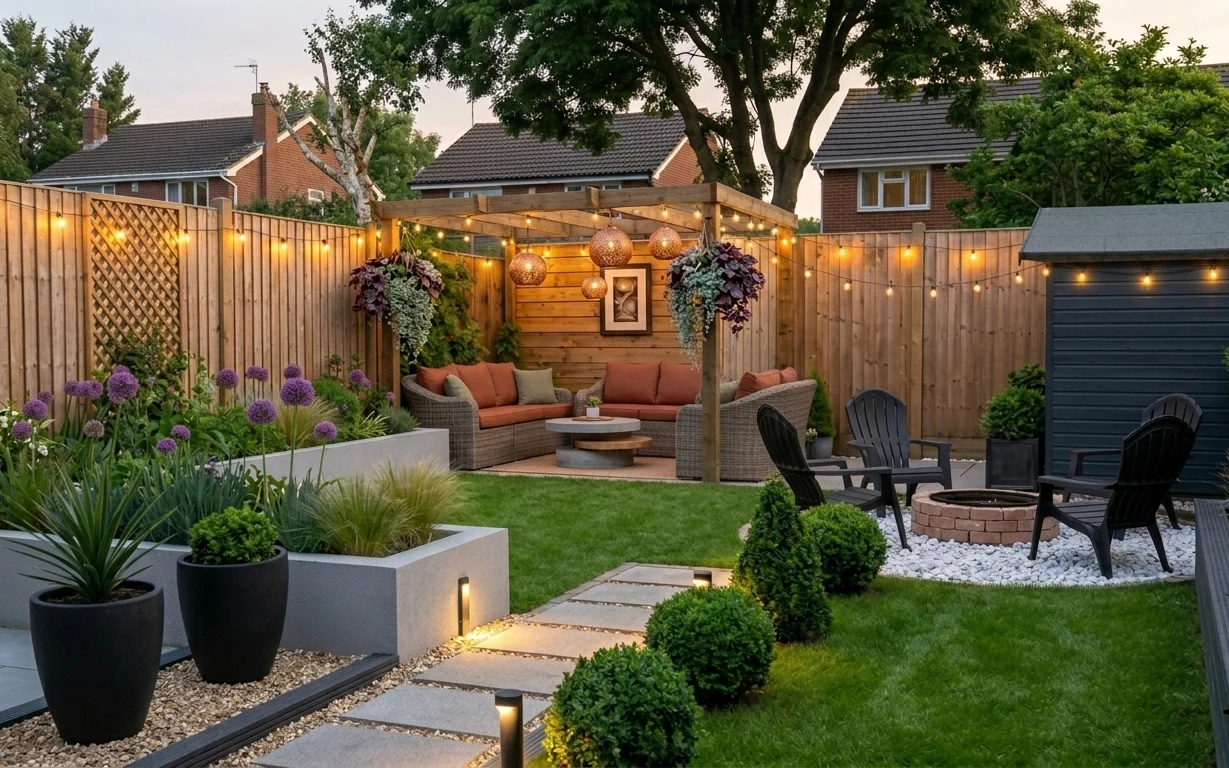
Why terracotta-and-rattan seating is the fire pit patio corner of 2026
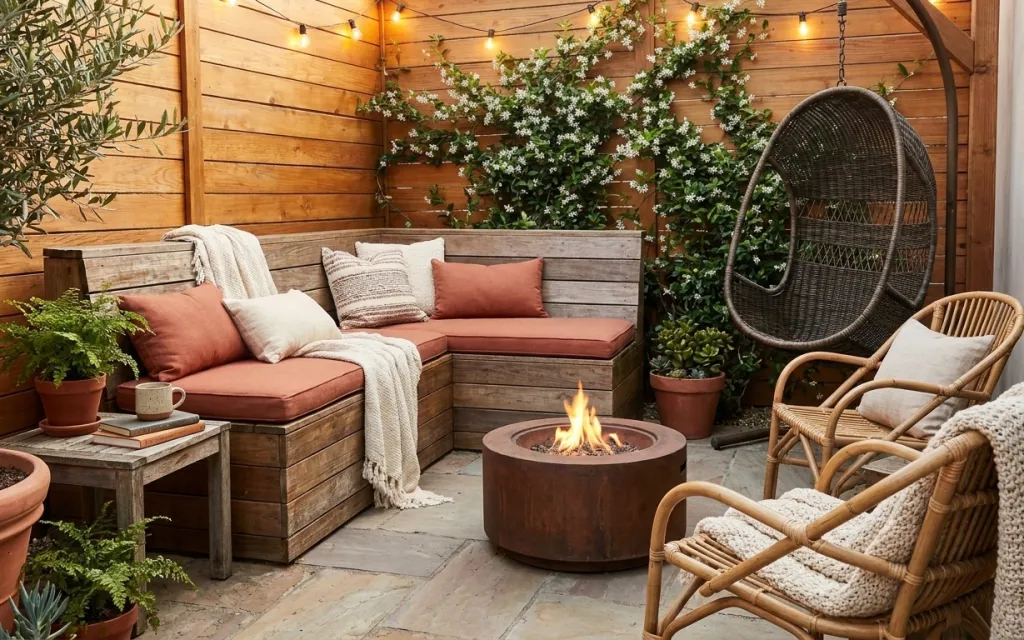
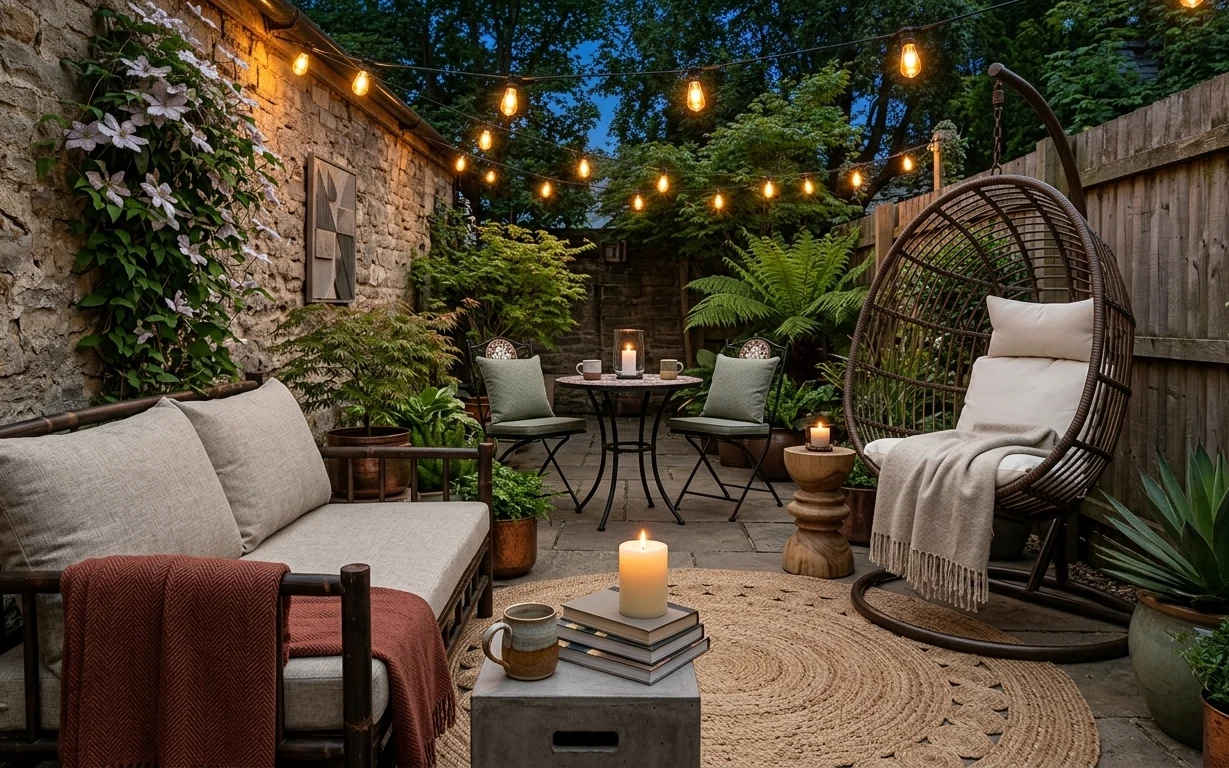
On the patio in the photo, the warmth is doing two jobs: it softens the wood-plank wall and it makes the fire pit feel like the focal point instead of just an object in the middle. You can see how rust cushions and a cream throw blanket add texture against the smooth stone pavers. Then the string lights pull the whole scene upward, so it reads intentional even in early evening. This is achievable for shared housing because every swap can come with you when the lease ends.
I once tried to “fix” an outdoor space by buying one big statement piece—then realized it didn’t match the scale of everything else. Here, the better move is stacking small, movable layers: seat texture, a warm light line, and planters that frame the fire. That approach keeps the look cohesive without requiring any permanent changes.
Layer 1 — rust throw pillow ($18) pillow color that reads warmer next to the fire

Swap in a rust throw pillow that matches the terracotta-red tone already in the cushions. In this corner, it matters because the fire pit’s glow is also warm, so repeating the color keeps the scene from looking accidental. Choose a medium-thickness fabric (like cotton canvas or a textured weave) so it doesn’t look flat beside the wood. The trade-off: you’re giving up a “bright pop” color and committing to an earth palette, which is exactly what makes the lounge feel cohesive. This also stays easy to pack—pillows fold into flat, stackable boxes.
Color-match by undertone, not exact shade
Rust with a slightly brown base will look related to terracotta planters and warm wood, even if it isn’t a perfect match.
Layer 2 — cream throw blanket ($35) soft contrast over stone pavers
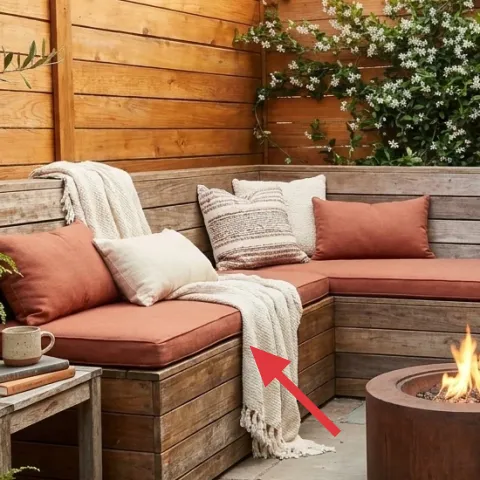
Add a cream throw blanket to drape where the lounge seating meets “empty space,” like the edge of the L-shaped wooden sofa. The photo’s cream knit/waffle texture breaks up the warmer reds and gives the whole corner a softer landing against the stone paver floor. This works especially well in shared housing because blankets act like décor and function as the thing you actually grab when it cools off. The trade-off is practical: cream shows lint faster than a darker throw, so keeping it in a washable cover (or planning a quick shake) makes it workable.
Let the blanket look intentionally wrinkled
Over-draped throws read more natural outdoors than perfectly folded ones.
Layer 3 — string lights ($20) warm line of light across the top rail
Hang a strand of string lights across the patio fencing line (no permanent installs needed—use the existing structure or removable hooks where allowed). In the photo, the lights create a warm band that makes the fire pit feel like part of a “night scene,” not just a heat source on the ground. Look for warm-white bulbs for a similar golden tone, and keep the string taut enough that it doesn’t bunch. Trade-off: string lights can tangle in storage, but they coil easily into a bin and they’re one of the fastest ways to change the mood between seasons.
Don’t store lights by yanking the cord
Coil gently so the plug end and bulb sockets don’t stress—shorted sections are the biggest hassle later.
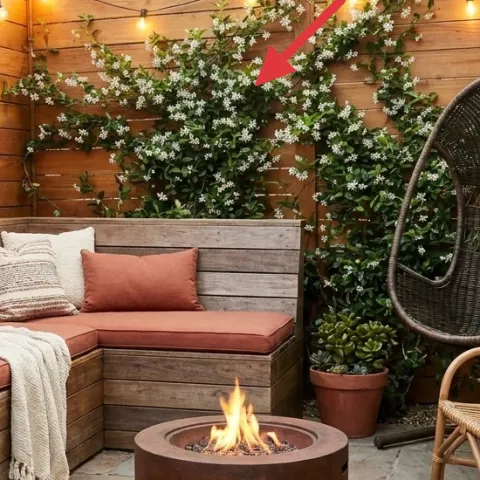
Layer 4 — painted terracotta planter set (2 pots) ($45) frame the corner with a removable earthy pop
Paint a small terracotta planter set so it looks more curated than “random pots” around the edges. In the hero, the terracotta containers repeat the warm palette from the cushions, while the greenery adds scale and movement behind the fire pit. Painting keeps the color consistent even if you swap plant types later—succulents, herbs, or hardy greens all work as long as their shapes vary. The trade-off is that painted terracotta needs a little extra care (avoid harsh scrubbing), but it’s still far easier than committing to anything permanent.
Make it instead of buying it
Paint two small terracotta pots so they match the patio’s rust-and-warm-wood palette, then reuse them with whatever greenery you bring home next.
Materials
- Terracotta pots (2 small) — — $20
- Acrylic paint (rust-terracotta shade) — ~8 oz — $10
- Craft brush — 1 — $4
- Painter’s tape — 1 roll — $2
- Nitrile gloves — 1 pair — $3
Steps
- Wash the terracotta pots and let them dry fully.
- Mask any spots you want to keep unpainted with painter’s tape.
- Apply 1 thin coat of acrylic paint, keeping the layer even.
- Let it dry, then add a second coat for solid color.
- Remove tape while the paint is still slightly flexible (so edges stay crisp).
- Let the pots cure for a full day before adding soil.
Total DIY cost: $39 — saves about $6 over buying.
Layer 5 — light plaid cushion ($22) repeat the cozy textile note on the chairs
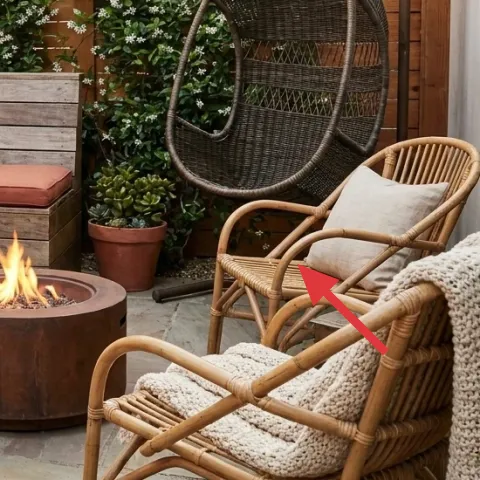
The rattan lounge chair reads airy, so it needs one “soft landing” textile that visually anchors it. A light plaid cushion does that in a way plain solid fabric can’t, because the subtle pattern echoes the woven chair texture. Keep it in a light neutral so it doesn’t fight the terracotta cushions and still looks bright against the warm wood fence. The trade-off is styling time: plaid can look a little “busy” if you add too many other patterns, so keep the rest of the palette simpler—just rust and cream is enough here.
Match scale: big chair weave likes mid-size patterns
A medium plaid sits nicely on textured rattan without overwhelming the look.
Layer 6 — round metal fire pit bowl ($150) make the center feel intentional
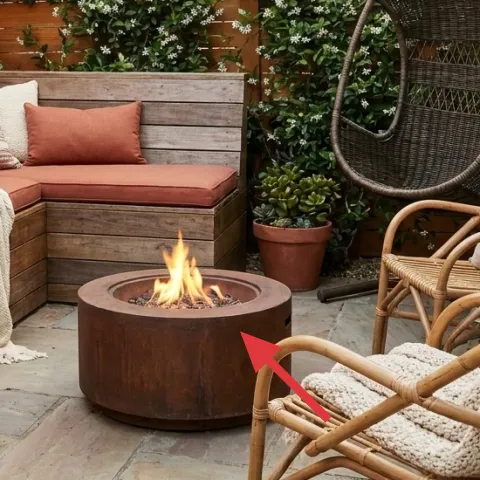
If you’re working with a fire pit already, style around it rather than hiding it. In the photo, the bowl is a grounded, circular shape that balances the angular feel of the L-shaped sofa. For shared-housing portability, prioritize a pit or insert that’s easy to lift/transport within your move plan, and keep its silhouette clean—simple metal reads modern and doesn’t compete with planters. The trade-off is safety and logistics: an outdoor fire feature has rules, so plan for safe placement and storage, but the payoff is that you can set the whole mood with one focal object.
Keep greenery slightly behind the pit, not in front
Framing the sides keeps the fire as the “reading” point for the corner.
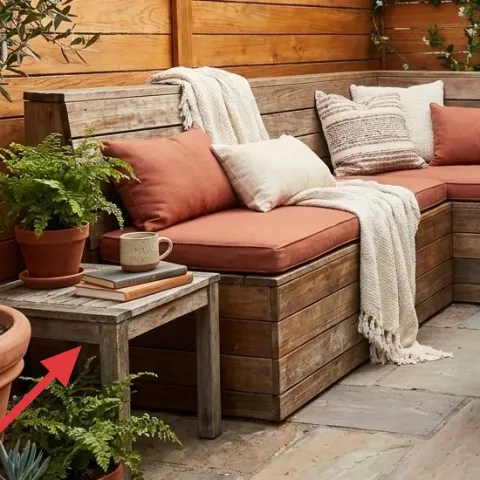
Layer 7 — wood side table ($70) one surface for a mug and a book
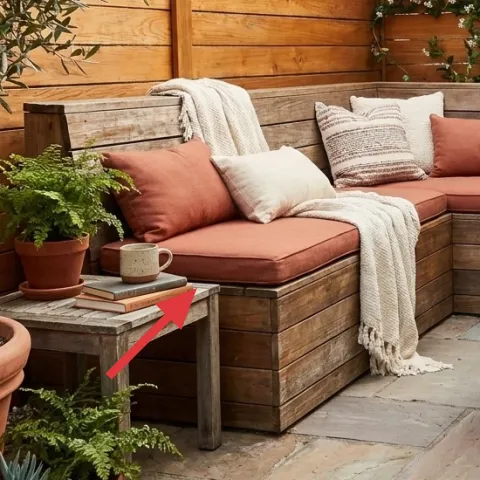
A small wood side table does more than hold objects—it makes the patio corner feel like a room, not a collection of items. In the hero, the table sits close to the sofa cushion, so it becomes the natural landing for a mug and a quick snack before you turn back to the fire. Choose a lightweight, sturdy table that can be moved without a two-person lift, and keep the top clear-ish for a calm look between guests. The trade-off: outdoor tables can weather, so storing it covered when you can extends its life and helps it look good through moves.
Pick a finish that won’t fight the fence
Warm wood tones look cohesive next to a wood-plank wall and stay readable in low light.
The cost, layer by layer
| Layer | Item | Cost |
|---|---|---|
| 1 | Rust throw pillow cover | $18 |
| 2 | Cream throw blanket | $35 |
| 3 | String lights (set) | $20 |
| 4 | Painted terracotta planter set (DIY retail equivalent) | $45 |
| 5 | Light plaid cushion | $22 |
| 6 | Round metal fire pit bowl | $150 |
| 7 | Wood side table | $70 |
| Total | $360 | |
If you want to keep it cheaper, skip the fire pit bowl upgrade and put the budget into a second cushion cover plus more greenery in terracotta planters. That keeps the same cozy “corner framing” effect without raising the biggest-ticket item.
What worked, what didn't (across the whole room)
The look succeeds because it repeats a tight palette—rust and cream textiles, warm wood, and terracotta planters—around a single focal point. The warm lighting line also keeps the corner readable after dark. The main risk is over-stacking patterns on textured wicker and rattan, which can make the space feel busy fast.
What worked
- Rust textile color ties the fire pit glow to the sofa cushions instead of looking separate.
- Cream throw texture softens the stone pavers and makes the corner feel more lived-in.
- String lights create a warm top “frame” so the corner looks intentional at night.
- Terracotta planters repeat the palette and make greenery feel curated, not random.
- Patterned cushions give rattan chairs enough visual weight without heavy furniture.
- A side table adds practical landing space, which keeps the setup from feeling staged.
What didn't
- Too many patterned textiles at once can fight the woven chair texture and feel crowded.
- Leaving a pale cushion unchecked for lint can make cream look neglected outdoors.
- Planters placed in front of the fire pit can interrupt the center focal point.
- String lights stored poorly can cause socket failures that are annoying mid-season.
- A top-heavy table can tip visually if it’s too large for the sofa-to-pit spacing.
What we'd skip if we did it again
Skip swapping in a bunch of new furniture pieces. On a fire pit patio corner, the layout already reads; the bigger win is adding removable soft goods and small accents that pack easily when you move.
Skip “cool-toned” accessories like icy blues or stark grays. The warm wood fence and fire glow need earth tones, so going blue-heavy makes everything look mismatched when the lights come on.
Skip painting anything that needs curing chemicals. Stick to simple painted terracotta pots and washable textiles—keeping it low-commitment is the shared-housing-friendly version of the same styling effect.
Frequently asked
How long does this patio refresh take in a shared-house schedule?
Most of the changes are fast: swap cushion covers, add one throw, set out planters, and hang a string-light strand. If you already have the fire pit area, plan for about 1–2 hours for setup plus another 15 minutes to coil and store everything between nights. The DIY terracotta painting takes the longest because of dry time; treat it as a “start one evening, finish the next day” project.
What if I can’t change anything permanent—like the fence or the fire pit?
That’s fine—this refresh is designed around moveable layers. The biggest visual shifts come from textiles (rust and cream cushions, a cream throw), removable string lights, and painted terracotta planters. Even if the fire pit bowl stays exactly as-is, the corner still looks intentional when the surrounding soft goods repeat the same palette and scale.
Will this work if my patio is smaller than the one in the photo?
Yes, but keep the scale tight. Use one statement textile moment (one main throw plus two cushions max) and reduce planter count to two at most. Choose a shorter string-light run so the lines stay visually clean, and consider a smaller side table so it doesn’t crowd the path between seating and the fire.
What if my patio is bigger—how do I avoid it looking empty?
Repeat the framing. Add a second planter grouping on the opposite side of the fire pit or mirror the cushion color on the chair facing the pit. If you want more light, extend the string-light span outward in one direction so the scene grows like a rectangle, not like scattered bulbs.
Where should I shop differently for this look on a budget?
For textiles and cushions, look for multipacks of outdoor pillow covers and washable throws at general retailers or home basics stores, since you’re matching undertones rather than chasing one brand. For terracotta planters, garden centers are usually cheaper than decor shops, and the DIY paint is what makes it look styled. String lights can be found in seasonal sections—prioritize warm-white over extra-bright daylight bulbs.
What’s the biggest mistake people make with fire pit patio styling?
Overdoing patterns and trying to balance too many competing colors at once. Woven rattan already has texture, and the fire pit adds a warm glow—so the safest formula is repeating rust and cream with terracotta planters, then limiting patterns to one cushion at a time.
More in Outdoor & Patio

A fire pit patio corner that feels finished for $400
A renter-friendly refresh for a fire pit patio corner with 7 move-ready swaps, kept under $400. The key is pairing warm lighting and earth-…
Under $600: move-friendly patio seating area refresh
A budget-friendly refresh for a patio seating area using warm string lights, a textured outdoor rug, and simple candle styling. Designed to…
Under $800: patio lounge area refresh with warm string lights
A patio lounge area gets more usable fast when you swap in an inviting outdoor sofa, add a warm string-light setup, and sharpen the seating…