
- Best for
- Evening hangouts
- Weatherproof
- Outdoor-rated lighting + sealed planters
- Difficulty
- Confident DIY
- Cost
- $770 total, ~$1000 ceiling
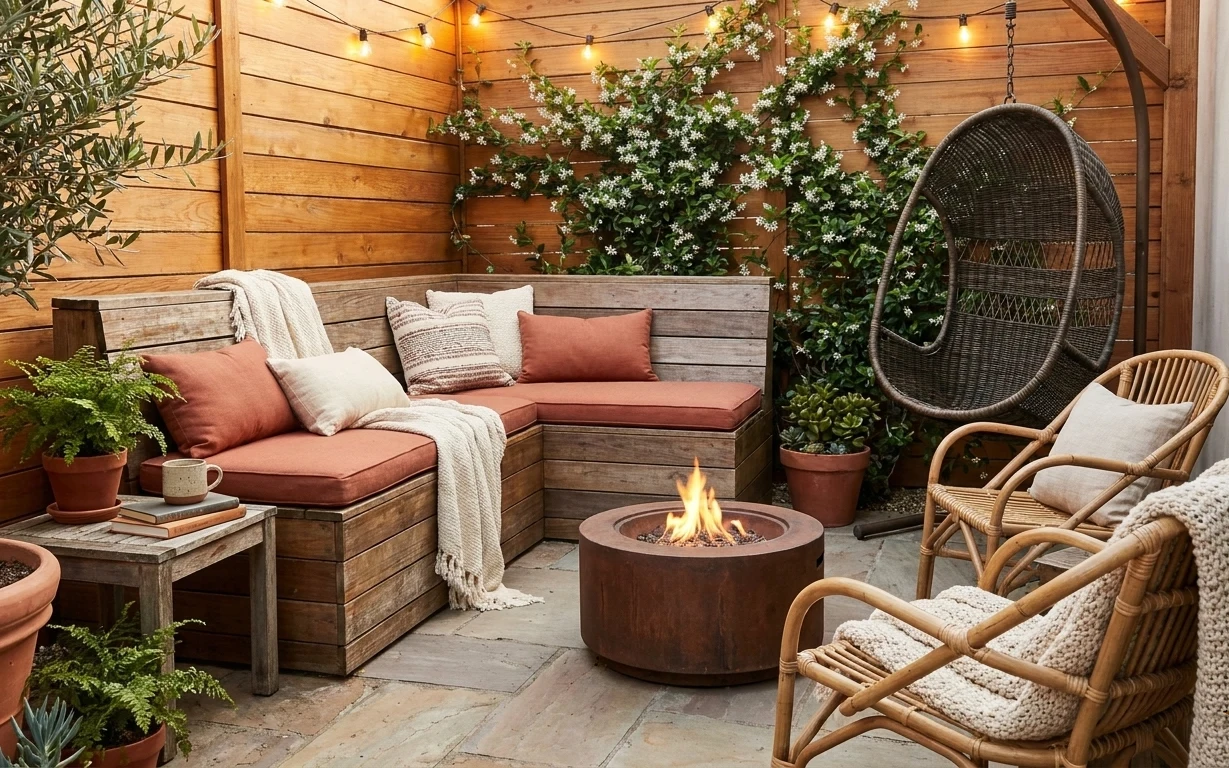
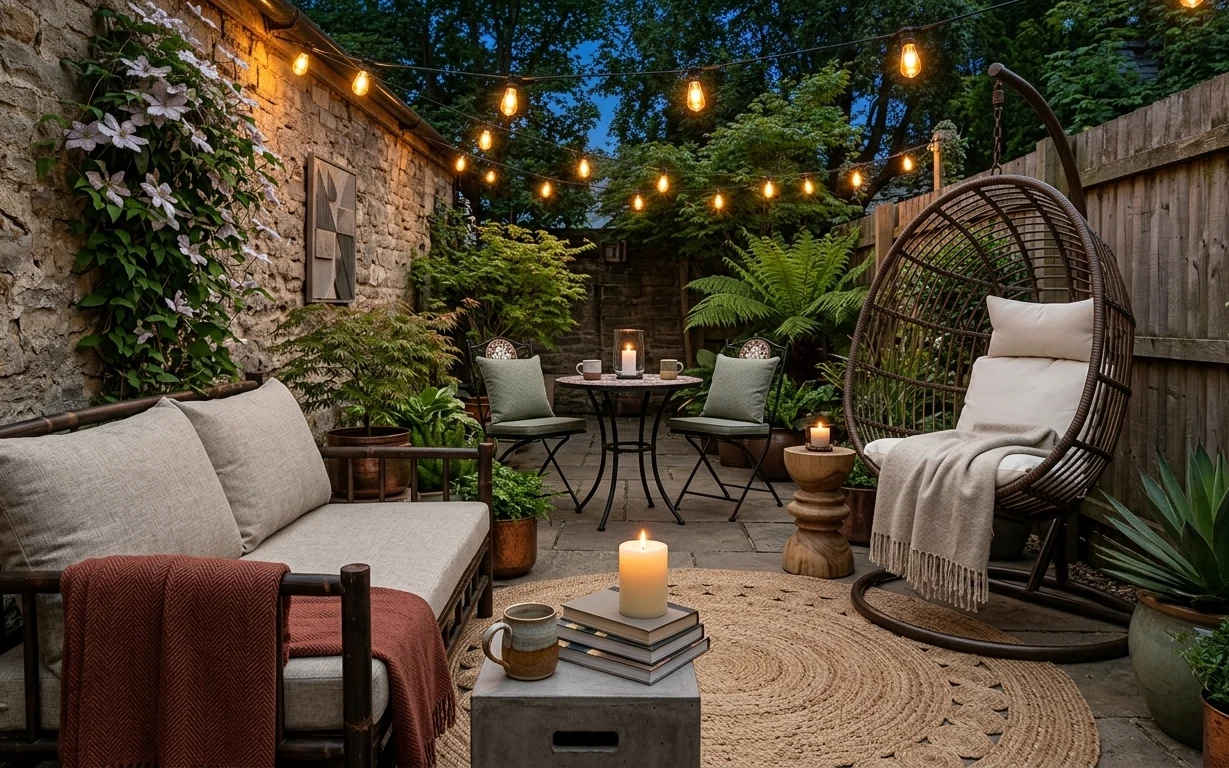
Why a string-light boho palette is the outdoor patio seating area of 2026
The starting point here is the warm, green backdrop, but what really makes it livable is the way the textures stack: a tan natural-fiber rug underfoot, a light gray woven throw on the cream sofa, and rust-toned accent pillows that pick up the lantern glow. Even the coffee table styling matters—the light wood looks like it belongs outside, not like it was dragged in from a living room. For homeowners working with limited weekend time, this approach is doable because you’re buying a few hero pieces, then repeating the same earthy color family in smaller doses.
I almost overdid it the first time I tried a patio like this—more lanterns, more greenery, more pillows—until it started looking busy instead of cozy. The change that fixed it was choosing one clear anchor: rug first, then the coffee table, then bringing in string lights for height. After that, I treated the pillows and throw like punctuation, not the main sentence.
Layer 1 — natural-fiber area rug (tan, textured) ($200) defines the foundation
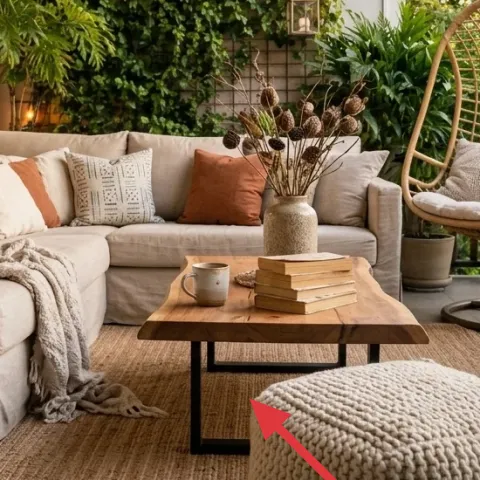
This tan natural-fiber area rug sits under the whole seating zone, grounding the cream sofa and keeping the patio from feeling like “just a walkway.” It’s textured enough to hide the little scuffs you’ll get from outdoor shoes, and it visually connects the wood tones of the coffee table to the terracotta planters. The trade-off is that you’ll want the right care plan—vacuuming and blot-cleaning beats deep scrubbing. Compared with a slick outdoor mat, the fiber look reads warmer and gives you that relaxed boho base.
Use it as your color map
Pick rug tones that already contain your patio’s repeats (cream + tan + rust) so pillows and planters look intentional, not random.
Layer 2 — rectangular wood coffee table (light oak tone) ($150) gives you a focal surface
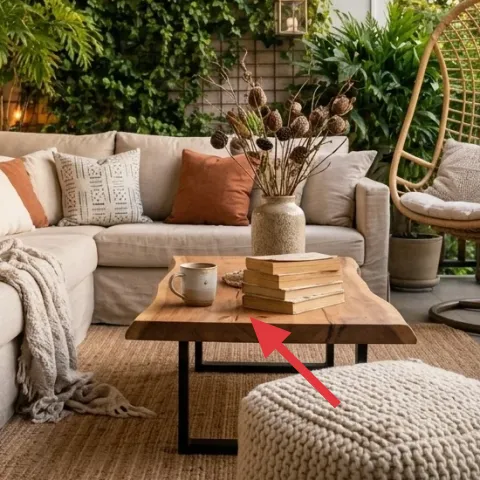
The rectangular light-wood coffee table is the practical “center” of the patio—where cups, candles, and books land. It also bridges materials: it looks warm next to the cream sofa and it harmonizes with the green wall instead of fighting it. A round table would soften the geometry, but it would also make the arrangement for the candles and stacked books harder to balance. The straight edges here keep the styling neat, even when plants crowd the edges. If you’re measuring, focus on the seating clearance first, then match the table’s height so it’s comfortable from the sofa.
Keep the height sofa-friendly
If the table is too high, it crowds the sofa; too low and the surface stops feeling useful.
Layer 3 — light gray woven throw blanket draped on sofa ($35) adds soft contrast
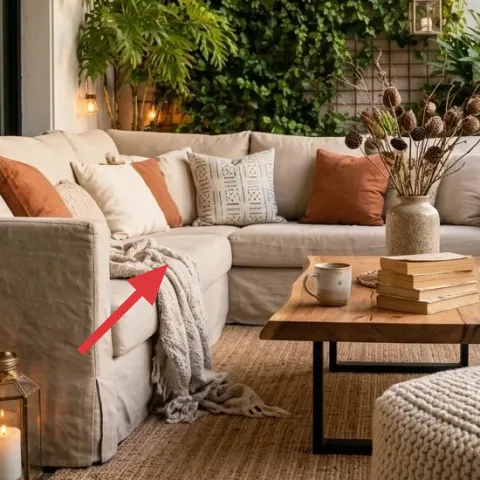
Draping the light gray woven throw over the cream sofa does two jobs at once: it cools the palette slightly, and it creates that casual “you can actually lounge here” texture. Because it’s gray, it won’t compete with the rust pillows, and it helps the natural rug look warmer by contrast. I’d skip a chunky knit blanket in this setup—the sofa already has enough visual weight from the cushions and the greenery wall. The throw’s airy weave keeps the whole patio feeling breathable, even when string lights are on. It’s also an easy swap for seasons: swap colors without changing anything else.
Let it slump, not stack
Press the fabric lightly into a natural fold so it looks placed by use, not styled like a showroom.
Layer 4 — rust/burnt-orange accent throw pillows ($30) repeats the warm candle tones
These rust/burnt-orange accent pillows are what connect the lighting mood to the rest of the palette. In the hero photo, the lantern candles create an amber glow, and the pillow color echoes that without needing more orange objects everywhere. The trade-off is that a bold color is noticeable—so keep the rest of the textiles neutral (cream + light gray) and let the rust do the heavy lifting. Compared with a patterned pillow, a solid rust tone is easier to style with plants and lanterns because it doesn’t add extra visual “busy.” Aim for a mix of pillow shapes that mirrors how you naturally lean on the sofa.
Repeat once more, not everywhere
Bring rust into one or two places (pillows, candle holders, planter paint) so it feels curated.
Layer 5 — string lights along the greenery wall ($15) brings evening height
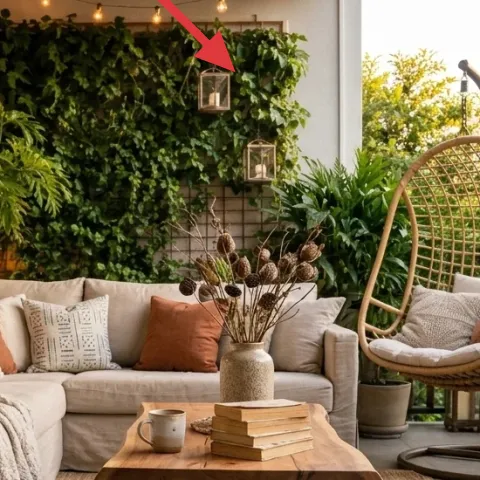
String lights are the quickest way to make an outdoor seating area feel “done” after dark, and placing them along the greenery wall gives you height without adding new furniture. The small amber points also make warm surfaces—like wood and terracotta—look richer. If you’re choosing between overhead lighting and string lights, go string every time here: overhead would flatten the scene and compete with the hanging metal lantern frames. The only caution is power and routing—use outdoor-rated cords and keep connections protected from drips. Once you’ve got them up, you can keep everything else simple because the lights provide the atmosphere.
Don’t run indoor cords outdoors
Use only outdoor-rated string lighting so the connections stay safe in wet weather.
Layer 6 — rattan hanging chair with woven seat ($300) turns one corner into a destination
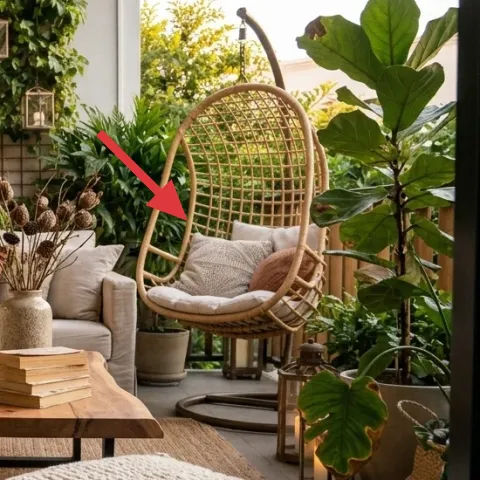
The rattan hanging chair is the vertical statement piece, and it’s what makes this patio feel like more than a sofa area. The woven texture echoes the natural rug fibers, so everything reads connected instead of random decor. I’d choose a hanging chair over a floor chair here because it adds height and a second “layer” of seating—perfect for small gatherings where one person wants to lounge away from the table. The trade-off is that it needs room and a clear route for getting in and out. If the patio is tight, choose a slightly smaller footprint style so it doesn’t feel like an obstacle.
Leave a clear entry path
Plan where you’ll step before you install so the chair always feels inviting, not blocked.
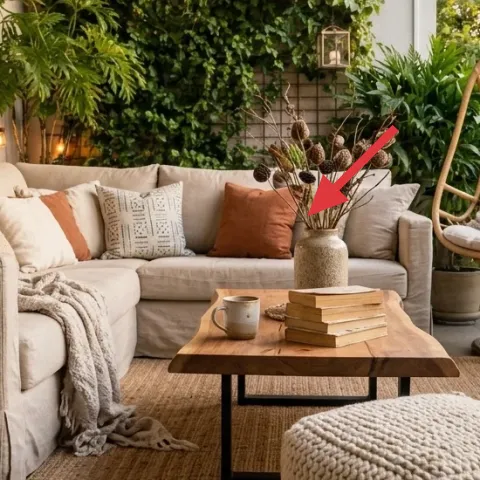
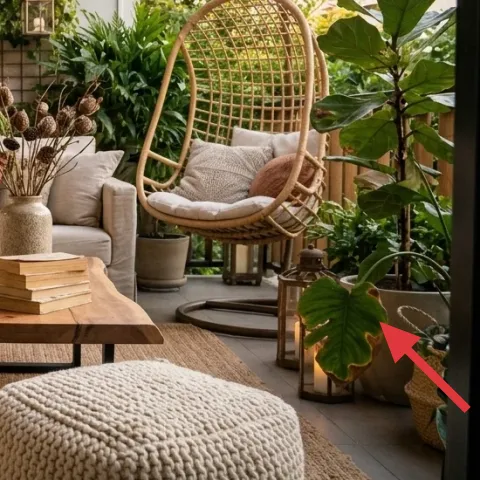
Layer 7 — terracotta planter pots (medium) for floor plants ($40) makes the greenery look intentional
Make it instead of buying it
Paint medium terracotta planter pots in a warm neutral so the floor plants match the rug and lantern glow, without buying a whole new planting setup.
Materials
- Acrylic paint (warm neutral) — 1 small bottle — $10
- Primer for terra cotta — 1 can — $5
- Sandpaper (medium grit) — 1 pack — $5
- Water-based outdoor sealer — 1 small can — $8
- Foam brush or small paintbrush — 1 — $4
Steps
- Lightly sand the pots to scuff the surface for paint grip.
- Wipe off dust with a dry cloth so the primer adheres.
- Apply primer in thin coats and let it fully dry.
- Brush on 2 even paint coats, letting each coat dry completely.
- Apply a thin outdoor sealer layer.
- Let the sealer cure fully before you move the planters back outdoors.
Total DIY cost: $32 — saves about $8 over buying.
In this patio, terracotta pots don’t just hold plants—they visually unify the whole arrangement. Painted in the same warm neutral family as the rug and lantern glow, the pots become part of the palette instead of a color “interrupt.” The DIY option also gives you control: if your plants are already deep green, a softer pot color keeps the look fresh and bright. The trade-off is that painted pots need a little extra care outdoors (especially if you get heavy rain), which is why a simple outdoor sealer matters. If you’d rather buy, matching terracotta sets work—but DIY is quicker for targeted upgrades.
Use the pot color to echo the rug
Pull a tone from the rug’s undertones so every plant feels placed, not accidental.
The cost, layer by layer
| Layer | Item | Cost |
|---|---|---|
| 1 | Area rug 8×10, natural-fiber look | $200 |
| 2 | Coffee table (rectangular wood) | $150 |
| 3 | Light gray woven throw blanket | $35 |
| 4 | Rust accent throw pillow covers | $30 |
| 5 | Outdoor string lights (set) | $15 |
| 6 | Rattan hanging chair | $300 |
| 7 | Medium terracotta planter pots | $40 |
| Total | $770 | |
If you want a cheaper variant, swap the rattan hanging chair for a floor lounge chair with the same woven texture and keep everything else identical (rug + pillows + string lights). It keeps the layered boho feel while shaving the biggest-ticket furniture cost.
What worked, what didn't (across the whole room)
This setup works because the colors stay in a tight warm neutral range (cream, tan, rust) while the textures multiply: woven rug, woven chair, and a draped throw. The lighting mood also does real work—string lights and candles create depth after dark. The only part that’s easy to misjudge is how much accessory clutter to add around the coffee table.
What worked
- The tan natural-fiber rug grounds cream seating and makes the patio feel intentionally zoned.
- Light wood on the coffee table ties together plants and textiles without adding visual weight.
- Rust pillows echo the amber lantern glow, so the palette feels coherent even at night.
- The gray woven throw cools the look and prevents the greenery wall from feeling too intense.
- String lights add vertical atmosphere, which helps the hanging chair feel purposeful.
- Rattan texture repeats across rug and chair, so the whole corner reads “same world.”
What didn't
- If too many small lanterns crowd the coffee table, the warm look becomes visually busy.
- A second bold color (besides rust) fights the greenery, making the plants look less lush.
- If the string lights hang too low, they block sightlines and compete with the greenery backdrop.
- Using all matching planter tones can look flat; a slight variation helps texture look natural.
What we'd skip if we did it again
Skip buying everything in one color at once. When a patio has a dense greenery wall, the best approach is one warm neutral foundation (rug + coffee table) and then a single accent (rust) repeated in just a couple textile spots.
Skip the urge to add more hanging decor once string lights are up. The metal lantern frames already provide interest at the same height range, and extra small objects can make the scene feel cramped instead of layered.
Skip a “perfectly matched” planter set if it flattens the natural look. Painting a few terracotta pots in a warm neutral is enough—let the plants bring the variation, and keep the containers in the same family.
Frequently asked
How long does this outdoor patio refresh take for one weekend?
Plan on 1–2 hours for the big layout pieces (rug positioning, coffee table placement, chair positioning) and another hour for styling textiles and candle surfaces. String lights usually take 60–90 minutes depending on cord routing. If you DIY planter painting, the active time is quick, but drying and sealing add the real waiting—factor in a second day if possible.
Can this work if I rent my place?
Yes, if the hanging chair isn’t a rental-friendly install. Replace it with a floor chair that matches the rattan texture or use a cushion on a sturdy outdoor chair. You can still keep the core look by focusing on the rug, pillows, and string lights, and by painting planters that match the warm neutral palette.
What if my patio is smaller than the photo?
Keep the rug and sofa scale first, then downsize the “second seat.” In a tight space, use fewer pillows (two accent cushions plus neutrals) and reduce candle surfaces. String lights are still key, but keep the cord run simple so you don’t clutter walkway zones.
What’s the best place to shop for the rug and lighting?
For rugs, look for natural-fiber or natural-fiber-look outdoor options at home goods retailers and garden centers that carry patio textiles. For lighting, buy an outdoor string light set with a sealed plug and outdoor rating—outdoor hardware stores usually have the most reliable specs.
What’s the biggest mistake to avoid with an outdoor boho setup?
The most common misstep is adding too many warm objects at once—too many lanterns, too many rust accessories, and a second accent color. When everything is “statement,” nothing looks intentional. Pick one anchor (rug), repeat one accent (rust), and let plants provide the rest of the texture.
Do painted terracotta planters hold up outdoors?
They can, especially with a water-based outdoor sealer. Use thin coats, let each layer dry fully, and avoid placing pots where they’ll sit in standing water for long periods. If rain is intense where you live, reseal seasonally for the longest look.
More in Outdoor & Patio
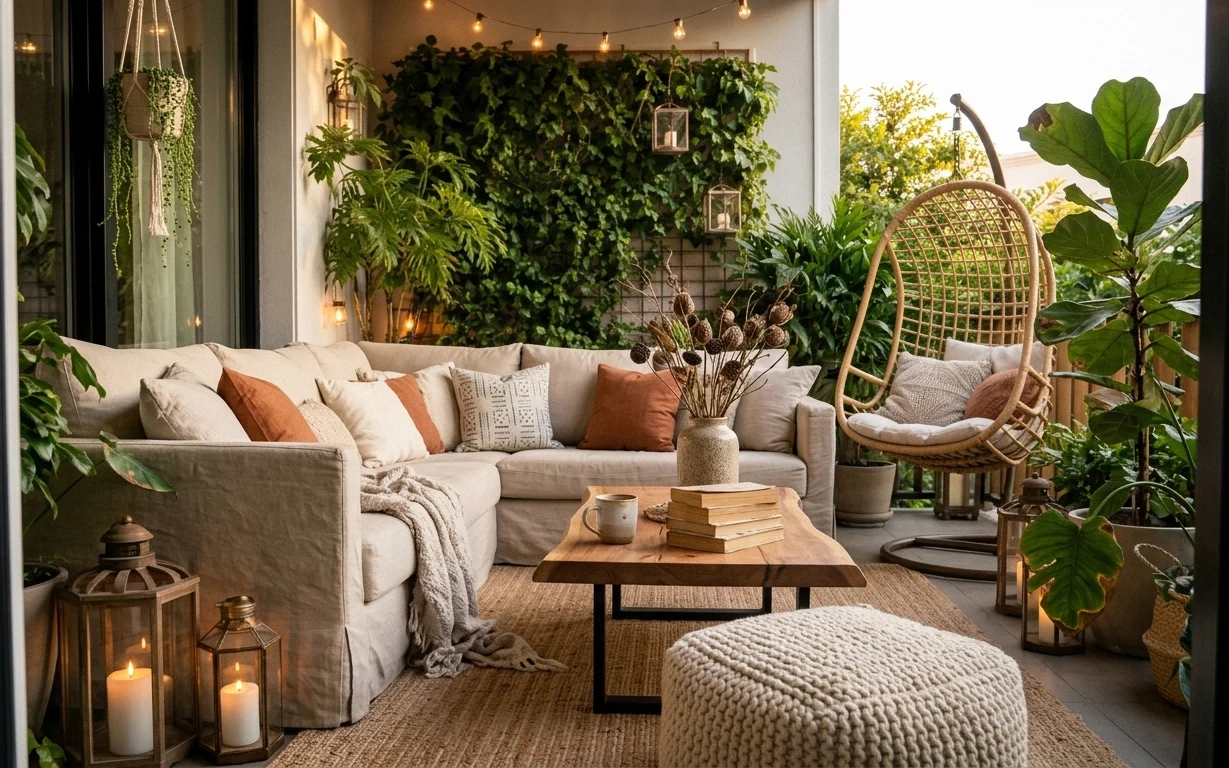
A layered outdoor patio seating area for $1000
A string-light and greenery outdoor patio seating area with cozy texture, built around a natural-fiber rug and a rattan hanging chair. This…
A fire pit patio corner that feels finished for $400
A renter-friendly refresh for a fire pit patio corner with 7 move-ready swaps, kept under $400. The key is pairing warm lighting and earth-…
Under $600: move-friendly patio seating area refresh
A budget-friendly refresh for a patio seating area using warm string lights, a textured outdoor rug, and simple candle styling. Designed to…