
- Best for
- Bathroom vanity area refresh
- Cost
- $620 total (about $700 ceiling)
- Time
- One to two weekends
- Renter-safe
- No (DIY paint needs homeowner control)
Why mirrored-light warmth is the vanity area of 2026
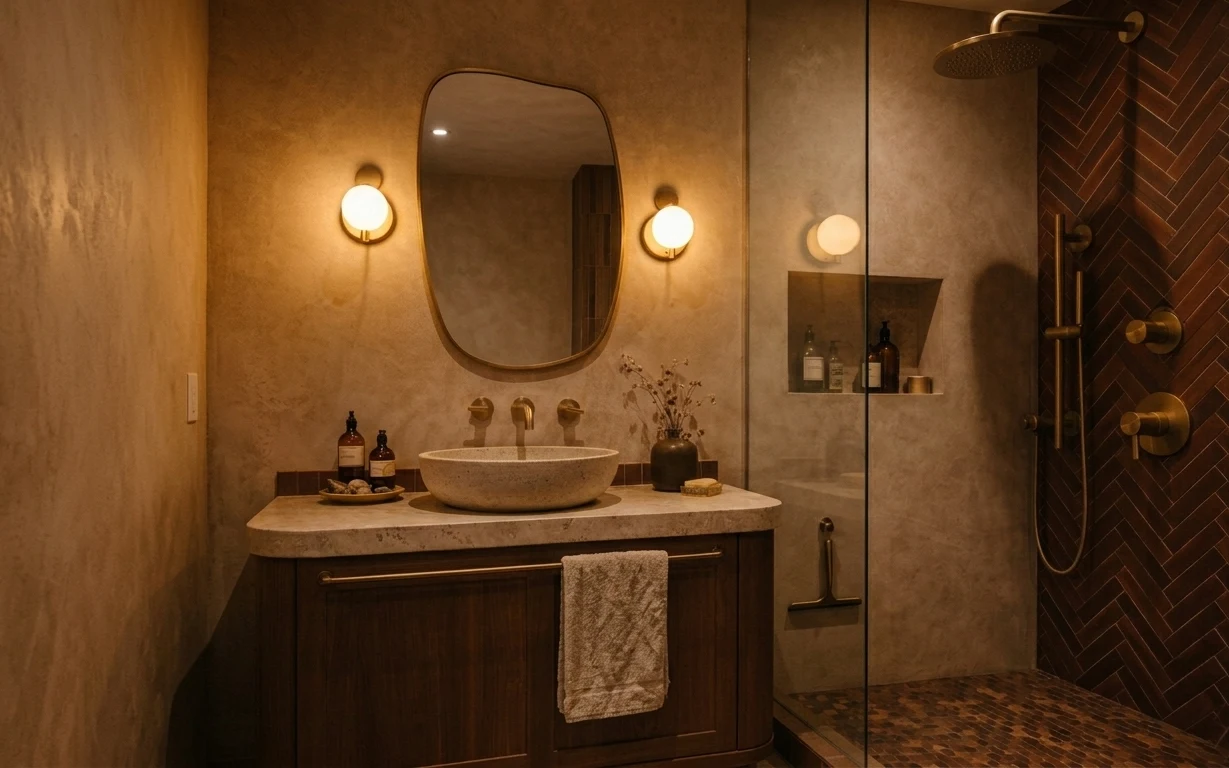
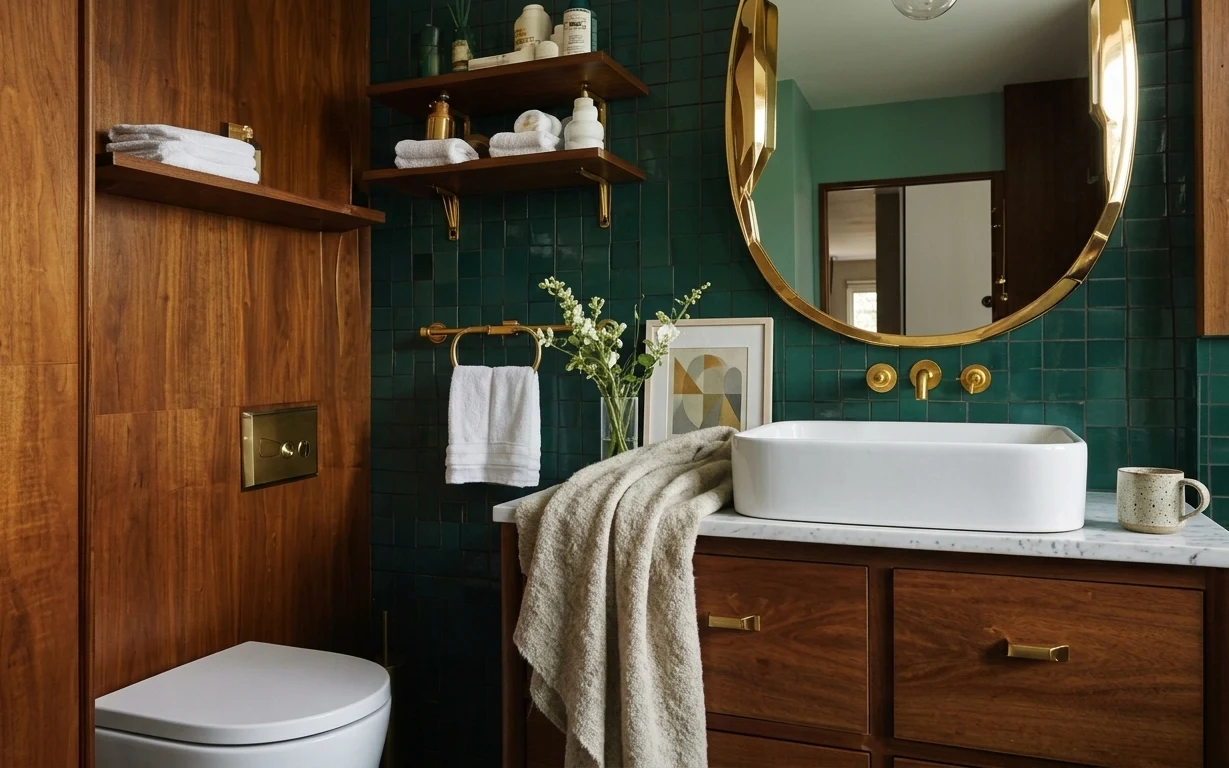
The first thing I notice in this bathroom is how the oval mirror and the two round wall lights make the whole sink zone feel brighter without turning it harsh. The dark wood vanity brings weight, while the marble-style countertop adds that smooth, spa-like calm. Even the folded hand towel adds a “finished” note—like someone thought about where linens should land. For US homeowners working in tight timeframes, this is a great weekend strategy: choose changes that readers will see instantly every time they wash their hands.
I used to overdo it in bathrooms—one too many decorative bottles and then the mirror got crowded. What changed my mind was noticing how this counter arrangement leaves breathing room: the glass bottles sit together, the vase adds height, and the soap stack grounds it. The result feels intentional, not staged. That’s the balance to aim for when you’re refreshing a bathroom vanity area at homeowner speed.
Layer 1 — oval wall mirror ($120) Wider reflection for the sink zone
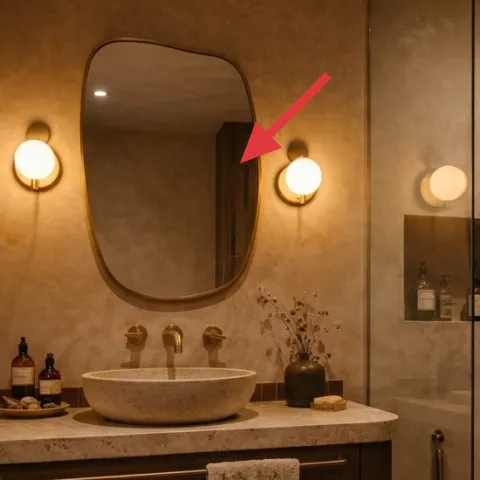
An oval mirror is doing more than decoration here—it’s shaping the light and keeping the eye moving around the vanity. If you’re starting from a dated rectangle, switching to an oval gives softer lines that suit the warm plaster walls and the arched feel of the mirror. Go for a size that spans most of the sink width, because the mirror needs to “own” the center of this wall. The trade-off: you’re committing to that silhouette, so match it with similarly rounded details elsewhere (like the round wall lights).
Pick the right mounting height
Center the mirror so the middle of the oval lands around eye level for standing use; it makes every lighting change look better.
Layer 2 — two wall-mounted round lights ($80) Soft pools of light instead of glare
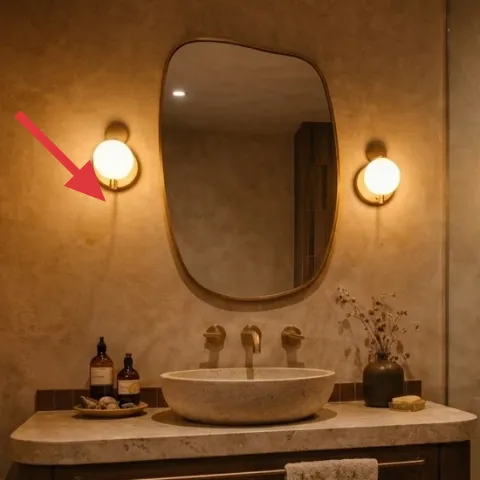
Those two wall-mounted round lights are what keep the vanity area from feeling flat at night. Round fixtures also echo the oval mirror shape, which is why the whole zone reads as cohesive instead of “random upgrades.” If you’re swapping older light placements, keep them roughly symmetrical on either side of the mirror so the light lands evenly across the countertop and sink bowl. The trade-off is that you may not get the same “bright blast” as a vertical bar fixture, but the warm, even glow is better for day-to-day use.
Warm bulbs matter more than fancy shades
In bathrooms, warm light flatters skin and countertops—especially when you have warm beige walls and a darker vanity.
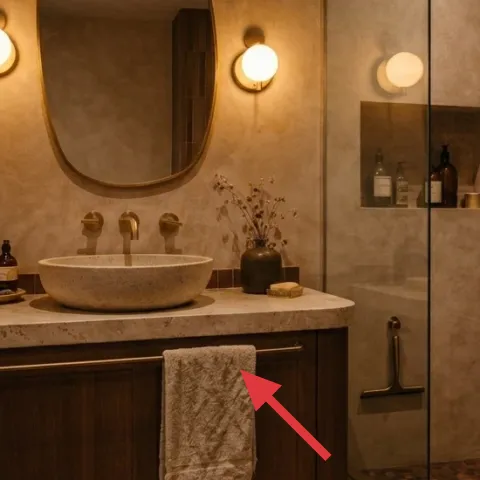
Layer 3 — folded hand towel ($20) A small linen cue that reads finished
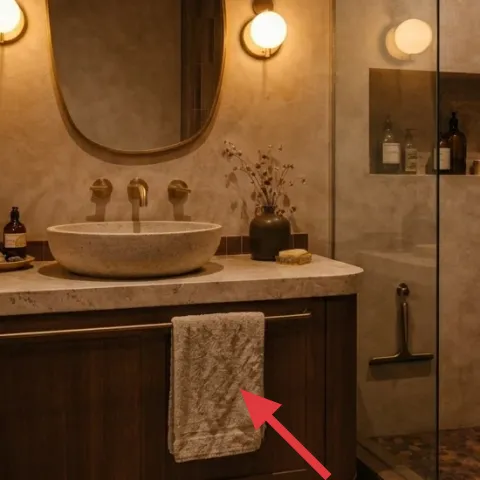
The folded hand towel might be the smallest item in the photo, but it’s the “signal” that the room is lived-in on purpose. Choosing a towel with texture (not just slick white) adds visual depth against the marble-style countertop and the warm walls. Fold it so it sits centered and relaxed—no sharp hotel corners unless that’s the look you’re going for. The trade-off: towels don’t last forever, so treat this as a styling layer you’ll refresh whenever it starts to look tired.
Use the towel as your color bridge
Pick towel tones that echo the vanity wood or the warm beige walls so the counter stays calm.
Layer 4 — dark wood bathroom vanity cabinet ($250) DIY paint refresh for a warmer finish
This dark wood bathroom vanity cabinet is the big anchor in the sink zone, and refinishing it is the fastest way to change the room’s mood without touching any structural stuff. In this photo, the warmth and depth come through because the vanity feels intentional—not just “whatever came with the house.” If yours is looking dated or too red/brown, a paint refresh can pull it toward a more balanced warm tone while keeping the cabinet’s scale. Trade-off: it’s a messier DIY than swapping decor, but it’s still weekend-realistic if you prep carefully.
Make it instead of buying it
Refinish the dark wood bathroom vanity cabinet with paint so the sink zone looks updated while keeping the same layout and storage.
Materials
- Degreaser (bathroom-safe) — 1 bottle — Home improvement store — $12
- Primer for wood (bonding) — 1 quart — Home improvement store — $20
- Bathroom cabinet paint (semi-gloss or satin) — 1 quart — Home improvement store — $35
- Foam roller + angled brush set — 1 set — craft/hardware store — $10
- Sandpaper assortment (120/220) — 1 pack — hardware store — $8
- Nitrile gloves — 1 pair — hardware store — $5
Steps
- Remove the folded hand towel and clear everything off the countertop and cabinet doors.
- Degrease the vanity surface thoroughly, then let it dry completely.
- Lightly sand to dull the finish (focus on glossy spots), then wipe off dust.
- Prime with a bonding primer using a foam roller for flat areas and brush for edges.
- Wait for primer to fully dry (follow the can’s recoat window), then sand very lightly.
- Apply the first paint coat in thin layers, brushing only where needed.
- Let the first coat cure fully before sanding lightly for adhesion (follow paint label).
- Apply a second paint coat for even coverage.
- Let the final coat cure fully before reinstalling hardware or placing items back.
- Return bottles, soap, and the folded hand towel once everything is dry and stable.
Total DIY cost: $90 — saves about $160 over buying.
Layer 5 — bathroom faucet handles ($90) Keep the hardware feeling intentional
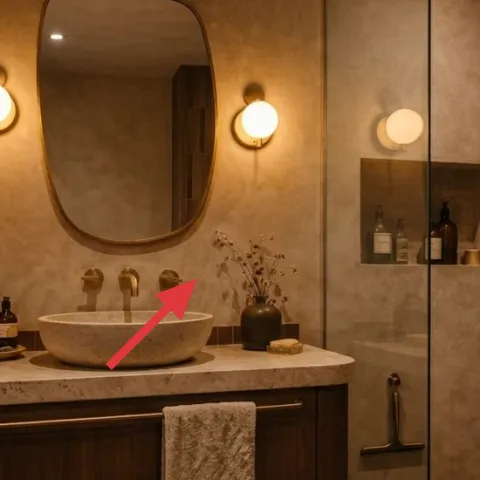
The faucet handles are small in the frame, but they’re one of the first things people notice up close. If yours feels mismatched—wrong finish, worn coating, or awkward shape—upgrading can pull the whole vanity area into the same visual family as the warm bronze/brass tones in the lighting. Aim for a finish that harmonizes with the wall lights and the shower hardware so the eye doesn’t bounce between different metal worlds. The trade-off: faucet swaps can take a little time, but you can usually keep it a straightforward weekend project if you’re only replacing the faucet and not altering plumbing.
Match metals by undertone
Warm bronze/brass reads different than shiny chrome—pick what looks right next to the round lights.
Layer 6 — glass bottles on bathroom counter ($35) One tidy moment instead of clutter

Those glass bottles on the counter bring structure to the sink area: they’re grouped, they’re the same material family, and they add vertical height without visually shouting. Styling is the point here—use bottles that look cohesive in shape (or at least in finish) so the countertop feels curated rather than accidental. If you have random pump bottles now, swapping to a set or refilling matching glass containers is a quick win that still looks “real.” The trade-off: it’s less about brand-new products and more about consistency, so focus on uniformity over filling every corner.
Don’t stack bottles too high
When the counter gets tall, the mirror and round wall lights start competing with the bottles.
Layer 7 — small vase with flower stems ($25) Add vertical softness near the mirror
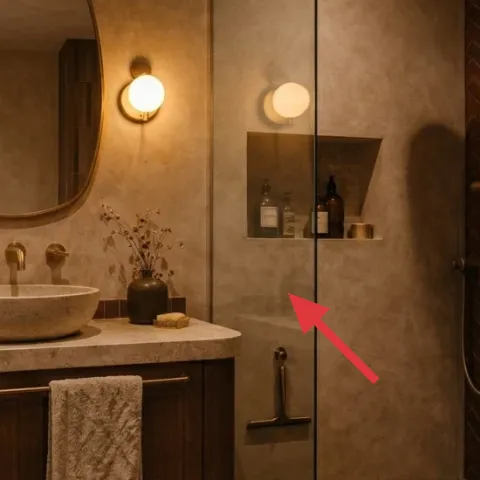
The small vase with flower stems is what keeps the vanity area from feeling purely utilitarian. A simple arrangement adds organic movement against the straight lines of the shower glass panel and the herringbone brick-style tile wall. For this look, keep the stems slightly taller than the bottles so they catch the eye under the mirror, but don’t let them crowd the space around the faucet. The trade-off: real stems need a little attention—trim ends when they start to wilt, or choose an option you can refresh without stress.
Let the stems echo the round mirror
Choose curved or angled stems so the shapes feel connected to the oval reflection.
The cost, layer by layer
| Layer | Item | Cost |
|---|---|---|
| 1 | Oval wall mirror | $120 |
| 2 | Two wall-mounted round lights | $80 |
| 3 | Folded hand towel | $20 |
| 4 | Dark wood bathroom vanity cabinet (DIY paint refresh at retail-equivalent) | $250 |
| 5 | Bathroom faucet handles | $90 |
| 6 | Glass bottles on bathroom counter | $35 |
| 7 | Small vase with flower stems | $25 |
| Total | $620 | |
If you want to spend less than the mirror-and-light combo, start with the towel, glass bottles, and the vase first. Then swap the vanity color later—color control is the biggest mood lever, and it lets you spread costs across weeks.
What worked, what didn't (across the whole room)
This bathroom vanity area succeeds because the lighting and reflection are doing the heavy lifting while the countertop stays restrained. The warm round lights plus the oval mirror create an even glow, and the dark wood vanity gives the room a grounded base.
What worked
- The oval mirror keeps lines soft and matches the round wall lights for a cohesive look.
- Warm wall lighting makes the marble-style countertop read richer instead of gray.
- The folded hand towel adds texture so the counter doesn’t feel too smooth and blank.
- Grouped glass bottles create order without needing extra countertop clutter.
- The vase and flower stems add vertical interest near the sink without blocking sightlines.
- A cohesive dark wood vanity makes the whole vanity zone feel anchored and complete.
What didn't
- If the lighting is too cool, the warm beige walls and bronze tones can look mismatched.
- Overstyling the countertop (too many items or tall stacks) competes with the mirror reflection.
- If the vanity paint is applied too thickly, brush marks can show—thin coats matter.
- Hardware with a very different metal finish can make the faucet feel like an afterthought.
- Too-small towel placement reads random; folding and centering are worth the extra minute.
What we'd skip if we did it again
Skip replacing the shower glass panel or touching the tile wall first. In this photo, the shower area is already visually strong, and the vanity area is where reflection and everyday light hit hardest.
Skip buying a mismatched “trend” faucet finish. If it doesn’t harmonize with the round wall lights and warm bronze/brass tones, the countertop will feel like it belongs to a different bathroom.
Skip leaving the vanity hardware or cabinet looking patchy after painting. A well-primed, evenly coated cabinet reads premium at a glance—uneven coverage is the only mistake that will show every day.
Frequently asked
How long does a vanity paint refresh take on a weekend?
Plan for one weekend of prep and coats, but don’t rush the cure windows. Degreasing and sanding are quick; the main time is waiting for primer and paint to dry and cure between coats. If you can do one coat Saturday and one coat Sunday, you’ll usually need a little extra time before fully putting items back.
What if I’m renting instead of owning?
If you can’t paint or swap the faucet, you’ll get more mileage from non-invasive styling: switch to a cohesive oval mirror, update the folded hand towel, and standardize the glass bottles and vase. You can also choose replacement lighting only if your landlord allows electrical work or you can use a safe plug-in option for the round wall lights.
My bathroom is smaller—should I size the mirror differently?
Yes. For a smaller vanity area, choose a mirror that still spans most of the sink width, but don’t go oversized. The goal is to keep the oval silhouette as the focal point, so it reflects light across the countertop instead of shrinking into the background.
Where should I shop for the oval mirror and round wall lights?
Start at big-box home stores for mirror sizes and warm-toned wall lights, then check lighting showrooms or reputable online brands for better finish matches. For the countertop styling items (glass bottles, soap stack, vase), home goods stores and kitchen sections often have better bundle options than bathroom aisles.
What’s the biggest mistake people make with bathroom vanity styling?
Overfilling the counter. In a vanity area with an oval mirror and warm round wall lights, too many objects compete for attention and the reflection looks messy. Keep the bottles grouped, add only one vase for height, and let the folded hand towel provide texture.
Can I do the faucet update without changing plumbing?
If the mounting points match and you’re replacing only like-for-like hardware, it’s often a weekend-friendly swap. Use the new faucet’s instructions to confirm the required connections and check what tools you’ll need. If the setup doesn’t match, it’s smarter to pause and plan a proper plumbing approach.
More in Bathroom
A warm modern bathroom for $700
A $700 weekend refresh for the bathroom vanity area: swap in a crisp mirror, soften the lighting with round wall lights, and refinish the d…
7 move-friendly swaps for a $400 bathroom corner refresh
A terracotta-and-brass bathroom corner refresh on a $400 shared-housing budget—built from move-friendly textiles, wall art, and decor. This…
A teal-and-gold tub-and-vanity bathroom for $350
A tub-and-vanity bathroom refresh built for renters, using teal-tile contrast, gold mirror shine, and layered towels. This look comes toget…