- Best for
- Layered rugs + renter-friendly styling
- Cost
- About $600
- Difficulty
- Easy (no drilling)
- Time
- 2–3 hours total
Why cream-and-sage biophilic styling is the plant-filled living room of 2026
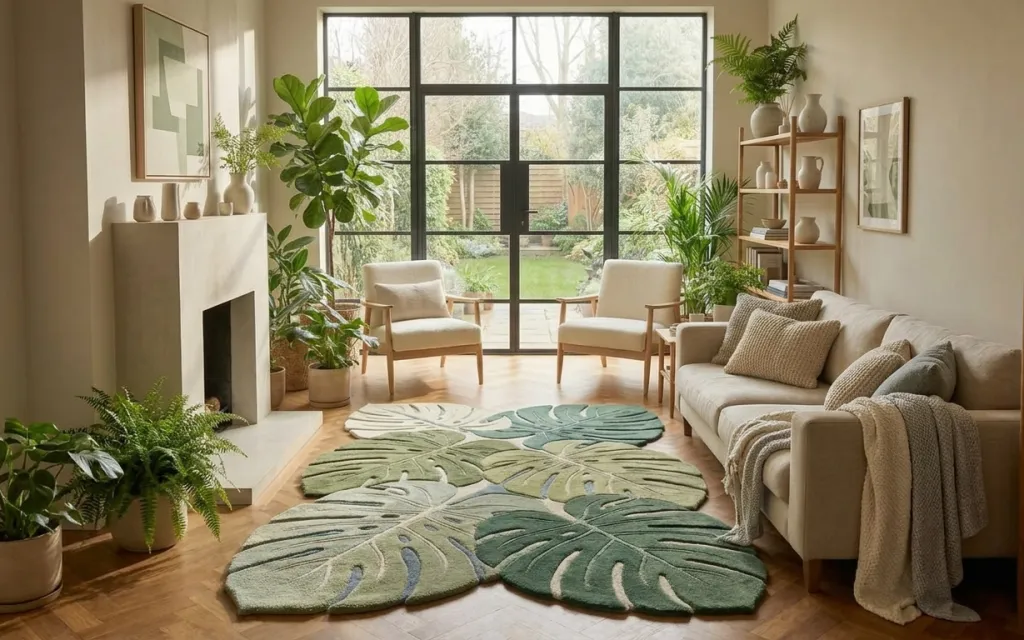
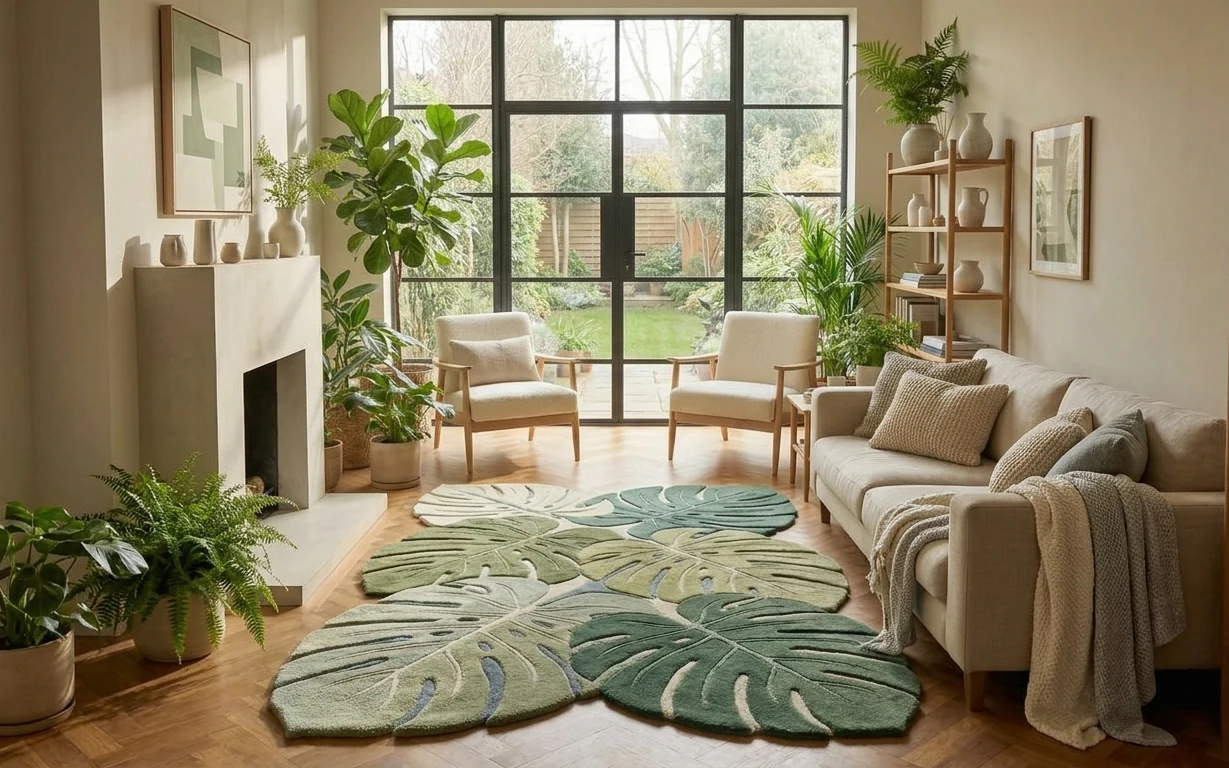
In this photo, the mood comes from contrast: warm cream upholstery and wood tones against a bold, botanical rug palette. The layered area rugs bring movement underfoot, while the beige throw blanket and textured throw pillow soften the lines of the sofa. On the wall and shelving unit, framed wall art prints and decorative ceramics keep the room from feeling “all plants, all day.” This look is achievable for renters because the heavy lifting is textiles and styling, not landlord-installed fixtures.
I used to think the key was buying one “perfect” rug and calling it done. What changed my mind was seeing how a second, smaller rug can echo the same leaf shape without matching the entire room. Here, the overlap makes the seating zone feel intentional, even with daylight doing most of the work. I also learned the hard way that too many random plant heights can fight the sofa lines—this arrangement stays balanced.
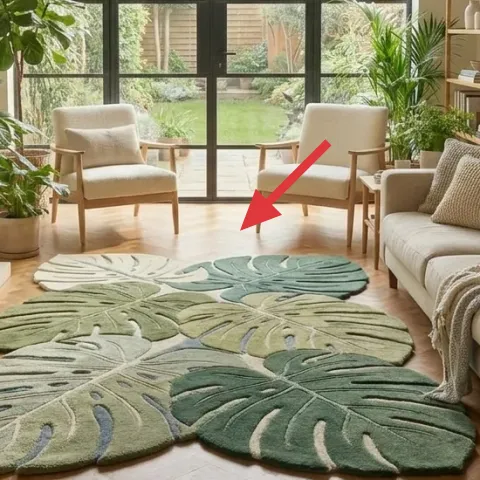
Layer 1 — large sage leaf area rug (8×10) ($200) Rugs anchor the sofa zone
The large sage leaf area rug is the foundation piece because it sits under the sofa and armchairs, visually “holding” the whole layout together. In the hero, the leaf pattern repeats across the cream-and-wood furniture and pulls the room toward a biophilic color story instead of a flat neutral. The obvious alternative is a solid-color rug, but that can make all the plants and framed wall art feel busy. A patterned rug is doing double duty here: it adds texture at floor level and keeps the room looking designed even on a plain day.
Build your palette from the rug
Pick throw colors and ceramics that echo the rug’s sage tone, not the brightest plant leaf.
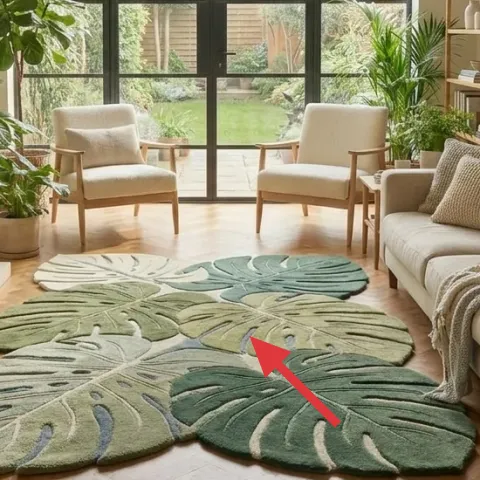
Layer 2 — smaller sage leaf area rug (5×7 overlay) ($150) Adds depth without repainting
The smaller rug overlay is where the room turns from “nice plants” into “thoughtful styling.” By layering a second sage leaf area rug on top, the hero creates a clear center for foot traffic and gives the room dimensionality—especially around the rug’s leaf curves. A single rug can look a little flat in bright daylight, because the pattern doesn’t get to “move” across the floor. The trade-off is that rug stacking means more vacuuming and occasional reshuffling, but it’s still removable, and it packs away easily for a move.
Let the overlap be intentional
Center the smaller rug so the leaf motifs line up loosely, not perfectly, for a natural look.
Layer 3 — beige throw blanket draped on sofa ($45) Softens the furniture lines
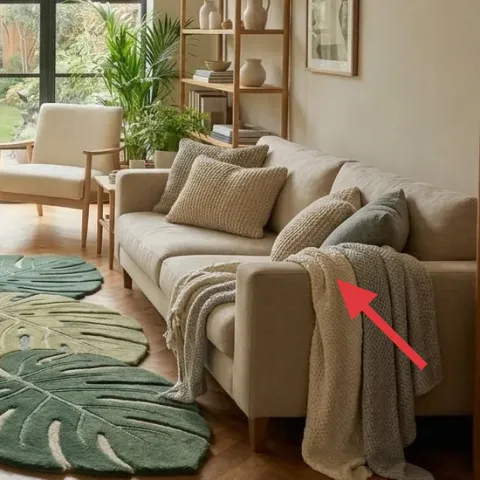
This beige throw blanket adds warmth and texture on the sofa arm, where it naturally catches light. The hero’s blanket is chunky and softly structured—exactly the kind of fabric that makes cream upholstery feel less formal and more lived-in. The obvious alternative is skipping the blanket to keep things minimal, but that often makes the sofa look unfinished against the patterned rugs. The trade-off with a draped throw is practical: it needs a quick fluff now and then so the fold stays looking deliberate, but it’s lightweight and easy to swap seasonally.
Choose a knit with visible texture
If the weave is too smooth, it disappears next to the leaf pattern.
Layer 4 — decorative tray with ceramics on shelving unit ($35) Creates a curated shelf moment
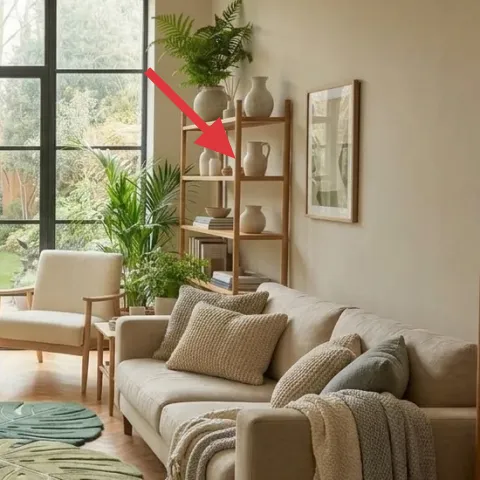
On the shelving unit, the decorative tray with ceramics is doing the styling work that shelves can’t do on their own. In the hero, the tray groups small vases and decorative ceramics into one readable “cluster,” which keeps the space from looking like items are randomly placed. The alternative would be to style directly on the shelves, but that’s harder to keep balanced, especially when you’re also working with multiple plant pots. The trade-off is fewer items total on the shelf—fewer pieces looks more intentional than filling every square inch.
Don’t make the cluster the same height everywhere
Vary vase heights slightly so the tray reads like a composition, not a lineup.
Layer 5 — large potted fern in beige pot ($30) Adds biophilic texture at floor level
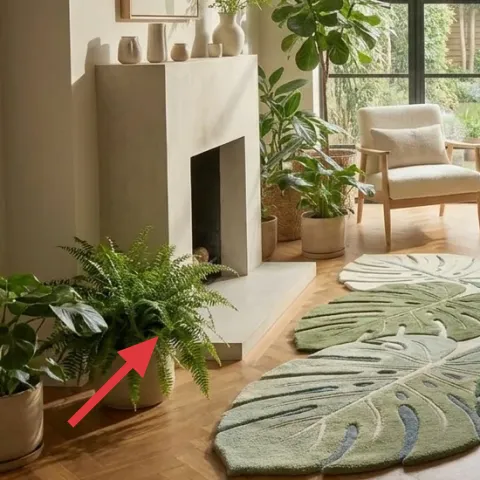
The large potted fern in a beige pot brings the “living” texture that makes japandi styling feel softer, not sterile. In the hero, the pot sits low near the left side of the room, which balances the taller greenery by the window and prevents the composition from leaning too high. The obvious alternative is a smaller tabletop plant, but then the rug pattern and sofa cushions take over visually. The trade-off is that ferns want consistent light and watering, yet they’re still renter-friendly: pots lift out, and you can repot later without touching walls.
Place near corners for instant structure
Corner placement helps plants frame furniture without needing extra wall decor.
Layer 6 — framed wall art print (DIY hand-painted abstract on cardstock) ($80) Brings calm color to the wall
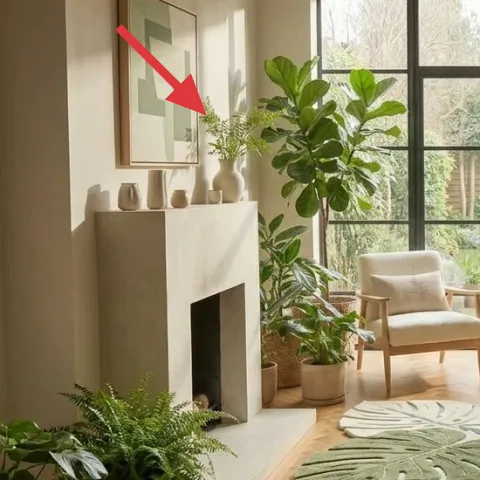
A framed wall art print on the side wall keeps the botanical look from turning purely “natural objects.” The hero’s print is restrained and graphic, and it works because it doesn’t compete with the leaf rug—think calm shapes and a limited palette. The DIY move here is to keep the frame you already have (or buy a budget frame once) and swap in a hand-painted abstract made on cardstock. The trade-off is time: painting takes a little patience, but it’s cheaper than buying another print, and it’s easy to change when your tastes shift.
Make it instead of buying it
DIY a small hand-painted abstract on cardstock for the existing framed wall art print so the wall matches the sage-and-cream rug palette.
Materials
- Cardstock sheets — 2 sheets — craft store — $6
- Acrylic paint set (starter colors close to sage/cream) — 1 set — art store — $18
- Assorted small paintbrushes — 1 pack — craft store — $8
- Painters tape — 1 roll — hardware store — $6
- Paper towels — 1 pack — grocery/box store — $4
Steps
- Measure the art opening inside the frame and cut cardstock to fit with a small border.
- Tape off 2–3 simple shapes (soft rectangles or leaf-like curves) for a controlled abstract look.
- Paint a light cream base using a dry brush technique so the texture shows through.
- Layer sage green shapes next, keeping edges slightly imperfect for a softer, modern feel.
- Remove tape while paint is still slightly tacky so lines stay crisp.
- Let the piece dry fully, then add one tiny darker accent shape for visual balance.
Total DIY cost: $42 — saves about $38 over buying.
Layer 7 — textured throw pillow on sofa ($35) Finishes the sofa styling
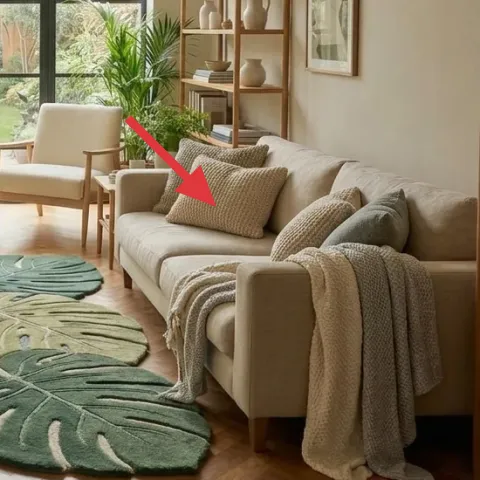
The textured throw pillow on the sofa ties the upstairs softness of the blanket into the main seating. In the hero, the pillow has a woven, tactile surface that reads warm against the sofa’s cream tone—especially under daylight. The alternative is matching pillows exactly, but that can look flat when the room already has a bold leaf rug pattern. A textured throw pillow gives micro-contrast: it’s subtle enough not to compete, yet it reinforces the cozy, natural materials theme. The trade-off is choosing a fabric that won’t snag easily, since textured weaves can pick up pet hair or lint.
Repeat one texture, not three
Keep pillow texture in the same family as the rug pile or the blanket knit.
The cost, layer by layer
| Layer | Item | Cost |
|---|---|---|
| 1 | Large sage leaf area rug (8×10) | $200 |
| 2 | Smaller sage leaf area rug (5×7 overlay) | $150 |
| 3 | Beige throw blanket | $45 |
| 4 | Decorative tray with ceramics | $35 |
| 5 | Large potted fern plant (beige pot) | $30 |
| 6 | Framed wall art print (DIY substitute using cardstock) | $80 |
| 7 | Textured throw pillow | $35 |
| Total | $575 | |
For a cheaper variant, keep the rug overlay but swap one rug for a lower-pile solid jute look in a similar sage/cream family, then invest the saved money into the framed wall art print and one better-texture throw pillow.
What worked, what didn't (across the whole room)
This setup succeeds because it layers texture in a planned order: rug first, then soft textiles, then plants and ceramics. The result looks bright and intentional without needing any wall changes.
What worked
- Two sage leaf rugs create a clear seating zone even in bright daylight.
- Beige knit textures (blanket + pillow) soften the graphic pattern instead of fighting it.
- The framed wall art print keeps the plant theme from feeling “all floor.”
- A decorative tray clusters ceramics so shelf styling reads as one composed moment.
- A low fern balances taller window plants and keeps sightlines calm.
- Warm wood tones in the shelving and floor make sage greens feel richer.
What didn't
- Overlapping rugs can shift during regular use, so plan for quick smoothing.
- If the pillow weave is too flat, it disappears next to the rug’s pattern.
- Putting too many small ceramics on shelves makes the tray grouping harder to read.
- Picking a framed print with busy colors can compete with the leaf rug motifs.
- Ferns that don’t get consistent light can look leggy, which breaks the balanced silhouette.
What we'd skip if we did it again
Skip a matching “set” approach where every textile is the same color and texture. With a bold leaf rug already in play, you want variety in weave and scale so the sofa zone feels layered, not uniform.
Skip adding more wall decor than needed. In this layout, the framed wall art print is enough to balance the plants and rugs; extra prints can overload the room’s green-forward palette.
Skip low-commitment plant sizing where everything is tabletop. A larger potted fern at floor level adds structure and keeps the room from looking like decor scattered on surfaces.
Frequently asked
How long does this kind of living room refresh take?
Most of the time goes into rug placement and getting the overlap looking intentional, which usually takes 30–60 minutes. Styling the shelving unit with a decorative tray and ceramics is quick once you group items. The framed wall art DIY is the only “waiting” part—after painting, it just needs time to dry before you swap it into the frame.
Is this renter-friendly if I have to pack everything up at the end of my lease?
Yes. Rugs, throw blankets, textured throw pillows, plants in pots, and framed wall art prints all come with you. The layering is also forgiving: the two rugs can be repositioned or reduced to one rug if your next place is smaller.
What if my living room is smaller than the photo?
In a smaller layout, keep the layered rug effect but reduce the footprint—use one rug as the base and one smaller overlay, placed only under the front legs of the sofa and chairs. For the plants, prioritize one larger potted plant plus one smaller plant rather than multiple similar pots.
What if my space has less daylight than this hero?
Because daylight drives the “bright-airy” feel here, compensate by choosing warmer cream textiles and a sage rug with contrast that still reads at dusk. If daylight is limited, avoid very muted greige rugs with low contrast patterns; the leaf design needs enough separation from the background.
Where should I shop differently to stay move-friendly?
For rugs and textiles, look for options that come in standard sizes (so you can reuse them later). For the framed wall art print, consider buying a budget frame once and changing the insert when you want a new look. Plants can be sourced locally, then repotted only if needed once you’re sure the light is right.
Biggest mistake to avoid in a sage-and-cream plant setup?
Overloading shelves with too many small items. The shelving unit in the hero works because it has a decorative tray grouping that reads as one composition. If every shelf square is filled, the eye can’t settle, and the rugs and plants end up feeling louder than intended.
More in Living Room
Cream-and-sage biophilic living room refresh, $600
A renter-friendly plant-filled living room refresh built around two sage leaf rugs, a beige throw blanket, and no-drill styling. This $600 …
Make the sofa lounge feel pulled-together for $700
A renter-friendly living room lounge refresh under $700, built from 7 visible swaps. The look centers on a patterned rug, a round wicker co…
7 no-drill swaps for a $600 orange-sofa living room
An orange-sofa living room refresh with renter-safe, move-friendly swaps: a warm rug base, a comfy seating anchor, and layered textiles. Th…