- Best for
- Layered renter dining styling (art + rug + centerpiece)
- Cost
- About $500 total
- Difficulty
- Easy to moderate (mostly placement + styling)
- Time
- 1–2 weekends
Why terra-cotta and olive textures are the dining corner of 2026
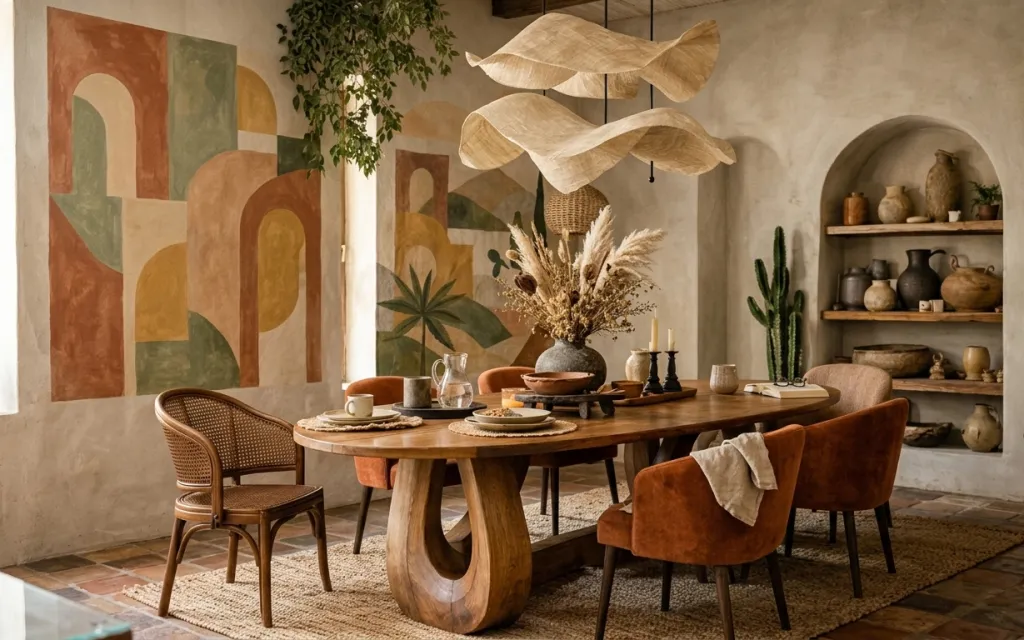
The magic here isn’t a single “statement” item—it’s how the colors echo across textures. The patterned area rug anchors the warm wood dining table, while the framed abstract wall art brings the terra-cotta and olive palette up to eye level. On the table, small candleholders and a dried-flower vase add height and rhythm, and the leafy plant softens the whole corner. This is renter-achievable because it relies on swap-in decor (textiles, art, plants, and tabletop pieces) rather than landlord changes.
I used to overdo renter dining styling by buying matchy sets—same wood tone, same shape, same height. In photos, it can look “finished,” but in real life it flattens everything. What changed my mind was noticing how this setup mixes one strong geometry (the rug and table) with softer irregular shapes (the dried bouquet and plant leaves). That contrast is what keeps it feeling styled instead of staged.
Layer 1 — patterned area rug ($150) Grounds the wood and hides tile seams
{{LAYER_1_FIGURE}}
A patterned area rug works as the visual floor under a dining table, especially when your actual flooring is busy or cold underfoot. In the photo, the rug’s warm neutrals and mottled pattern echo the table’s walnut tone while also adding cushion and sound dampening. The trade-off: a rug doesn’t fix where light hits the floor, so it’s best paired with warm lighting (like the pendant you already have) and warm-table accents. The obvious alternative is bare tile, but that makes the table feel like it’s floating and it also shows mess faster.
Pick a rug pattern that matches your art colors
Even one thread color (terra-cotta or olive) is enough to make the room feel intentional instead of “decor overload.”
Layer 2 — wood dining table ($80) Adds warmth without changing the layout
{{LAYER_2_FIGURE}}
This refresh keeps the dining table’s warm wood tone as the base. In the image, the table’s chunky, carved edges make the whole corner look grounded, and that’s why the decor reads cohesive instead of mismatched. Since you can’t move fixed architecture, the easiest way to make the look renter-friendly is to style the table surface rather than replace the structure. The trade-off is that tabletop styling takes a little time each week—small adjustments matter. The alternative is swapping chairs only, which leaves the table feeling visually unfinished.
Use trays so items don’t creep
A tray lets candles, a vase, and small ceramics stay “composed” even after normal use.
Layer 3 — small candleholder candlesticks ($25) Creates soft, vertical drama
{{LAYER_3_FIGURE}}
Small candleholders bring vertical height and that “evening-table” feeling without installing anything new. You can see how the candlesticks sit near the center, close enough to be noticed but not so tall they block sightlines across the table. For renters, the upside is huge: candles and holders can be packed away and reused in multiple rooms. The trade-off is that candles are seasonal—if you hate maintenance, swap to battery flameless candles with the same holder shape. Choosing a single tall centerpiece alone usually looks top-heavy instead of layered.
Skip glass hurricane pieces if you move often
They look pretty, but they’re fragile and can be a pain to pack and protect.
Layer 4 — large framed abstract wall art panels ($80) Pulls the color palette up to eye level
{{LAYER_4_FIGURE}}
Large framed abstract wall art panels do the heavy lifting for color and personality, especially in a room with textured plaster walls. In the photo, the terra-cotta rectangles and olive green shapes echo what’s on the table and rug, so everything feels related. For renters, the smart move is to hang art with removable hooks (Command Strips or picture-rail hooks if you have a rail) so there’s no damage. The trade-off is placement: you want the center of the art around eye level, not too high. The alternative—smaller prints—can still work, but it usually takes many pieces to get the same impact.
Hang by the frame edges, not the art “vibe”
Measure the frame width so it stays centered over the rug and table line.
Layer 5 — potted dried-flower bouquet in vase ($35) Adds texture that looks good longer
{{LAYER_5_FIGURE}}
Make it instead of buying it
DIY a foraged dried-floral arrangement so the centerpiece has the same airy, neutral height without spending on a pre-made bouquet.
Materials
- Foraged dried stems bundle — 1 — neighborhood walks — $10
- Dried grasses or wheat-like stems — 1 bundle — craft supply — $6
- Neutral filler sprigs (undyed) — 1 pack — craft supply — $5
- Vase or small reused jar (for the look) — 1 — thrift or reuse — $7
- Floral tape/wire ties — 1 roll — craft supply — $4
Steps
- Collect a mix of stems with 2–3 different heights so the bouquet reads layered.
- Lay stems out on a table and decide your “spine” (the tallest center section).
- Trim ends so they sit at different depths when you build the cluster.
- Tape or tie the tallest stems together to form the bouquet core.
- Add the medium stems around the core, slightly offset, so edges don’t look too symmetrical.
- Fill gaps with the smallest filler sprigs to create wispy texture.
- Secure the base again with floral tape/wire ties.
- Place into the vase and adjust angles until the silhouette has an airy, curved profile.
- Set the bouquet in the brightest spot you can (near a window) to help it look crisp.
- Shake gently to remove loose bits, then wipe the vase opening clean.
Total DIY cost: $32 — saves about $3 over buying.
In this spot, the dried bouquet matters because it adds organic texture without needing fresh water or replacing flowers. The neutral creams and beiges also calm down the brighter terra-cotta on the wall art, so the table doesn’t compete with the shelves. DIYing it is the same idea as buying: you’re building height first, then filling with wispy stems for movement. The trade-off is that dried stems shed a little—keep a lint roller nearby and expect a quick cleanup after adjustments. If you’d rather not fuss, a pre-made dried bouquet is the shortcut, but it costs more per similar look.
Choose “airy” stems, not chunky ones
The airy silhouette is what keeps the dining corner from feeling heavy.
Layer 6 — potted leafy plant in the corner ($35) Softens the corner and adds a living echo
{{LAYER_6_FIGURE}}
A leafy plant in the corner brings softness against the warm plaster tones and framed art geometry. In the photo, the plant sits above table height, acting like a visual buffer between wall and furniture. The best part for renters: choose a similar plant size that fits your light and then swap it out later without undoing anything. The trade-off is plant care—if your light is weak, pick a hardy option rather than forcing a delicate plant. The alternative is skipping plants entirely, which makes the room feel styled only on surfaces instead of “styled in space.”
Scale the plant to your wall height
A plant that reaches table-and-then-some looks deliberate instead of accidental.
Layer 7 — decorative ceramic vases ($30) Brings texture to the sideboard shelves
{{LAYER_7_FIGURE}}
Decorative ceramic vases keep the shelves from looking like storage and make the room feel lived-in. In the photo, the mix of matte stoneware shapes and neutral tones ties back to the warm wood and the dried bouquet. For renters, ceramic decor is easy to audition: you can rearrange until the shelf looks balanced, then pack it away when the lease ends. The trade-off is styling time—shelves look best with odd-number groupings and a little negative space. Choosing one vase alone can look sparse; adding too many small objects can feel cluttered.
Mix matte and slightly textured finishes
That variety reads more expensive than perfectly matching ceramics.
The cost, layer by layer
| Layer | Item | Cost |
|---|---|---|
| 1 | Area rug 8×10 | $150 |
| 2 | Tabletop tray for styling | $80 |
| 3 | Small candleholder candlesticks | $25 |
| 4 | Framed art print 16×20 (large panel set) | $80 |
| 5 | Foraged dried floral arrangement (DIY) | $35 |
| 6 | Indoor plant (4–6 ft) | $35 |
| 7 | Decorative ceramic vases | $30 |
| Total | $435 | |
If you want a cheaper version, swap the rug for a smaller vintage-look 5×7 size and pick one larger framed piece instead of a panel set; you can keep the candles and dried florals for the same height.
What worked, what didn't (across the whole room)
The biggest win is how the palette repeats: terra-cotta and olive show up on the wall art, the rug pattern, and the table accessories. The second win is vertical styling—candlesticks and the dried bouquet create height without blocking the sightline across the table.
What worked
- The patterned area rug anchors the table so the tile floor looks intentional underfoot.
- Framed abstract wall art brings the palette upward, making the corner feel “designed,” not improvised.
- Small candlesticks add a soft glow that reads expensive even with simple tabletop items.
- The dried-floral centerpiece creates airy texture that doesn’t require daily maintenance.
- The leafy plant softens hard lines from the art and the table, adding a natural rhythm.
- Ceramic objects on shelves add tactile variety without taking space from the dining area.
What didn't
- Too-perfect symmetry on the table makes it look staged; leaving gaps feels more natural.
- A single tall centerpiece alone can dominate the room and flatten the layered effect.
- Buying only matching ceramics can feel flat against textured walls and the rug’s pattern.
- If the rug pattern clashes with the art colors, the whole palette starts to feel chaotic.
- Overstuffing shelves removes the “breathing room” that makes the corner look curated.
What we'd skip if we did it again
Skip swapping big furniture or painting anything. In a rental, the fastest path is stacking renter-safe layers—rug, art, plant, and tabletop styling—so the look survives a move.
Skip a perfectly matchy set approach. The photo works because warm woods, matte ceramics, and airy dried stems mix, so it reads lived-in instead of catalog-flat.
Skip candles that require too much fuss. If the lifestyle doesn’t match the decor, go for flameless candles in the same candlestick holders so the mood stays without the maintenance.
Frequently asked
How long does this kind of dining corner refresh usually take?
Most of the time goes into placement: centering the rug, deciding where the framed art sits, and building the table centerpiece so the heights look intentional. Plan on about 2–4 hours the first day for layout, then another 1–2 hours to fine-tune styling (candles, ceramics, and the dried stems). If you’re making the dried arrangement yourself, add 45–90 minutes.
Will this work in a smaller dining area?
Yes—just scale down one anchor. If your space is tight, use a smaller rug size (like 5×7) so chairs still move comfortably, and choose one larger framed piece instead of a multi-panel feel. Keep the candleholders and dried centerpiece, but reduce the number of ceramic objects on the shelves so the corner stays airy.
What if my ceilings or wall space are limited for hanging art?
Go for the same look with fewer pieces: one framed abstract print centered over the rug line is usually enough. If you can’t hang at all, swap the framed wall art for a large freestanding leaning frame, or mount art using renter-safe picture-rail hooks (only if a picture rail already exists).
Where can a renter shop for these exact pieces?
For the rug, look for washable or stain-resistant patterned options at home goods stores or marketplaces. For framed abstract art, focus on neutral-terra-cotta and olive colorways so the palette matches your ceramics. Candlesticks, small trays, and ceramic vases are widely available at thrift stores and craft retailers; aim for matte or lightly textured finishes.
Biggest mistake to avoid with this style?
Overmatching. If everything is the same shade of wood and the same finish, the room loses texture. Another common miss is buying a rug with the right colors but the wrong scale—make sure the pattern doesn’t fight the framed art shapes. Finally, leave some negative space on shelves; crowded styling reads messy instead of curated.
More in Living Room

How to build an earthy dining corner for under $500
A renter-friendly way to get an earthy, boho dining corner look using 7 no-drill swaps, including a patterned rug, framed abstract art, and…
6 no-drill swaps for a sage-and-rust coffee table zone, $600
A sage-and-rust coffee table zone, styled for shared housing and easy moves. This $600 refresh leans boho-modern with an abstract rug, warm…
7 budget-friendly desert living room upgrades for $800
A desert living room refresh with 7 weekend upgrades, including a woven area rug, layered throw texture, and bold wall art. This $800 plan …