- Best for
- Adding warmth with natural textures
- Cost
- $800
- Difficulty
- Confident DIY
- Time
- 1 weekend
Why a sage-and-emerald palette is the bedroom of 2026
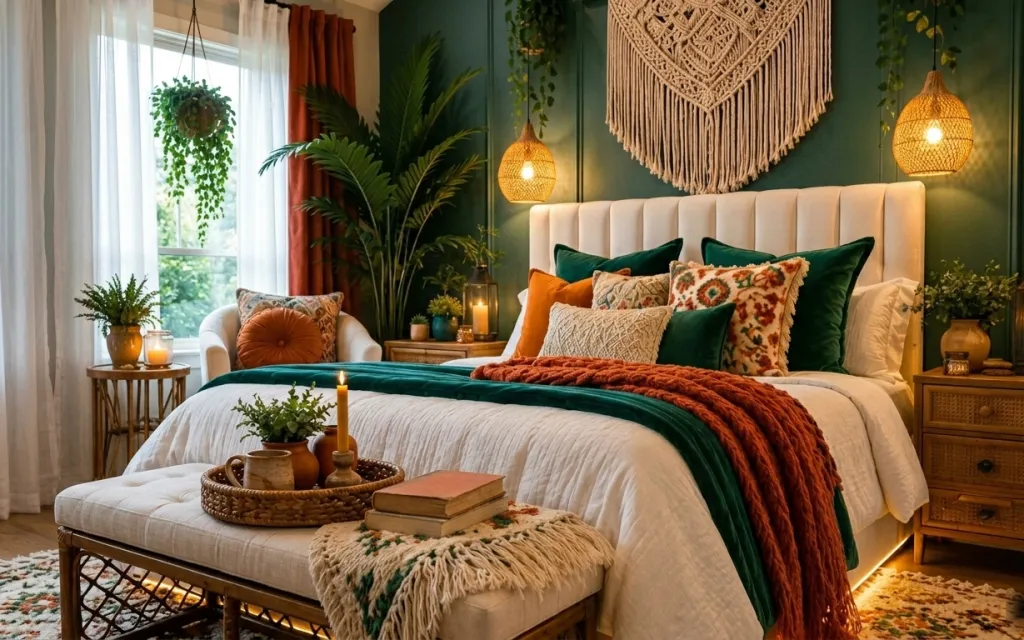
The quickest way to make a bedroom feel finished is to anchor it with texture in three places: underfoot (the large area rug), in the bedding (the white quilted bed cover), and in the light (woven pendant glow). In this setup, warm white and sage green do the heavy lifting, while burnt orange and deep green blankets keep it from reading flat. The sheer curtain panels soften the window so the room feels lighter than it looks.
I used to overdo wall decor first, then wonder why the room still felt “unfinished.” One weekend, I switched the order: floor, bedding, then one statement light, and the whole place finally made sense. The lesson stuck—this look works because the big visual blocks stay simple, and the personality comes from layering fabric and natural textures.
Layer 1 — large area rug ($200) grounds the whole palette
This large area rug sits under the bed and bench, which is why it works even though the pattern is busy. The warm, earthy tones pull the burnt orange throw and the green pillows into the same family, and the texture helps hide everyday life—boots by the door, pet hair, and that inevitable coffee spill during a “quick” project. A smaller rug would have left the bed floating; an oversized one gives you a clear boundary for the whole scene. Trade-off: rug padding matters, or the pattern can feel too loud underfoot.
Rug sizing rule for beds
Let the rug extend past the foot of the bed so at least the front bench area still reads “centered,” not cropped.
Layer 2 — curtain panels ($80) softens the window and edges
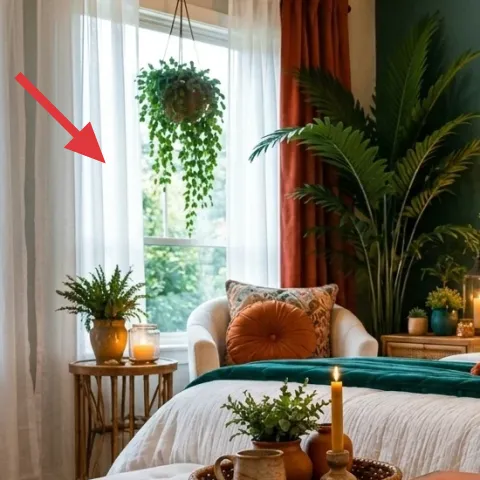
These curtain panels frame the window and make the morning light feel intentional instead of harsh. Because the fabric reads sheer but not flimsy, it gives privacy while still letting the room stay bright and airy. Going with panels (not blinds-as-a-finish) is the difference between “decorated” and “actually lived in.” The trade-off is planning: measure for height so the curtains land high enough to visually lengthen the room. If you’ve had curtains that just stop at the window sill, this is the weekend to fix that.
Keep the hem light
Even a neutral sheer looks taller and cleaner when the hemline doesn’t bunch near the floor.
Layer 3 — sage green wall paint ($70) makes everything feel calmer
A sage green painted accent wall is the quiet “backdrop” that lets the rest of the textures do their thing. In this photo, the green is deep enough to feel cozy, but still neutral enough that warm white bedding doesn’t compete. The big win is how it changes the room’s temperature: the warm pendant glow looks richer against green, and the botanicals pop without needing more color. The trade-off is coverage—paint sheen and undertone matter—so doing prep and using painter’s tape is worth the time.
Make it instead of buying it
Repaint one wall in a sage green to create the same calming backdrop without replacing the furniture.
Materials
- Interior paint (1 gallon) — 1 — paint store — $40
- Painter’s tape — 1 roll — hardware store — $7
- Mini roller kit — 1 — paint supply store — $6
- Angle brush — 1 — hardware store — $5
Steps
- Clean the wall with a damp cloth so the finish isn’t fighting dust.
- Apply painter’s tape around trim, outlets, and the ceiling line.
- Cut in around the edges with an angle brush for crisp borders.
- Roll the main sections in even vertical passes, then lightly cross-roll.
- Let the first coat dry fully (follow the can for dry time).
- Check for thin spots under daylight, then spot-fill and roll again.
- Let the second coat dry fully.
- Remove tape while the paint is still slightly firm to keep edges sharp.
Total DIY cost: $58 — saves about $12 over buying.
Layer 4 — nightstands with drawers ($80) add storage without visual clutter
The two nightstands with drawers create symmetry—one on each side of the bed—and that instant order makes the room feel designed. They also bring practical surface space for candles, plants, and books, which keeps “stuff” from migrating onto the bed. I’d rather pay for one functional nightstand with drawers than rely on baskets later, because drawers make bedtime feel calmer. The trade-off is footprint: you don’t want a nightstand that blocks the lamp cord or crowds the walkway, so keep the top surface clear and let the objects be intentional.
Don’t overload the top surface
Two small items max reads styled; a third turns into visual clutter fast.
Layer 5 — woven pendant lamp with exposed bulb ($60) brings warm, textured light
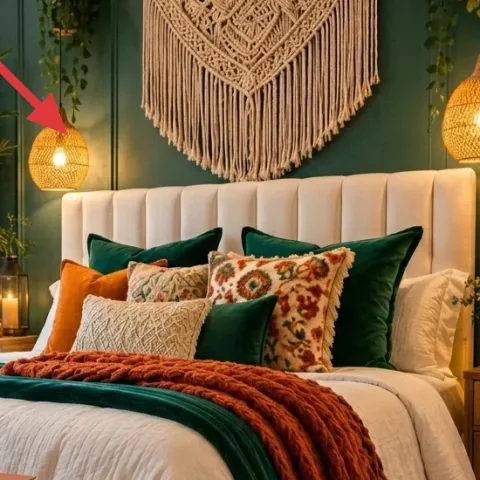
This woven pendant lamp with exposed bulb adds a warm glow and a natural texture that echoes the rug and plants. It’s doing more work than an overhead fixture swap because the material throws a softer pattern than flat glass shades. That matters in a bedroom where you want nighttime comfort without needing brighter light. Trade-off: pendants can feel “too statement” if the room is already busy—here, the sage wall and sheer window keep the look balanced. Hang it at a height where it doesn’t crowd the headboard area.
Match the light height to your styling
If books and candles sit on the nightstand, lower the pendant slightly so the glow feels like it wraps the bed.
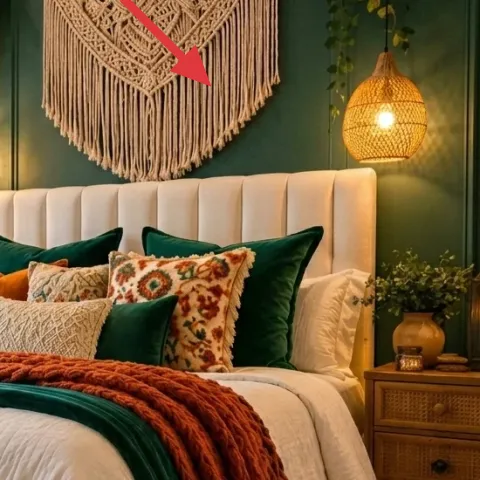
Layer 6 — macramé wall hanging ($110) adds handmade texture at eye level
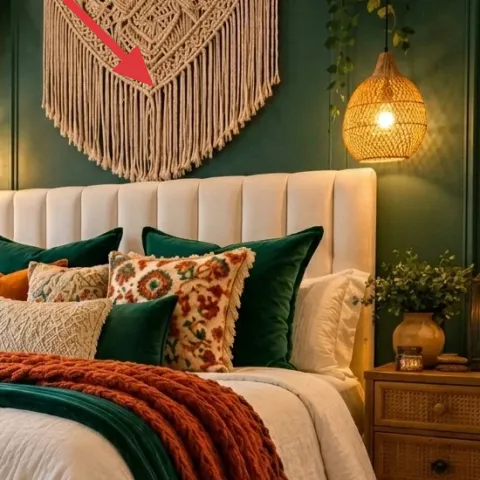
The macramé wall hanging pulls texture up to eye level, which is what makes the room feel layered instead of flat. It also bridges the natural elements: the plant leaves and the woven lamp share the same earthy language, so everything reads cohesive. I used to think macramé looked best only in boho-heavy rooms, but it works even when your palette is mostly sage and warm white—because the pattern gives structure. Trade-off: keep the rest of the wall calm so the hanging remains the focal point.
Anchor it with empty wall space
Leave breathing room around the hanging so it doesn’t compete with art, shelves, or outlets.
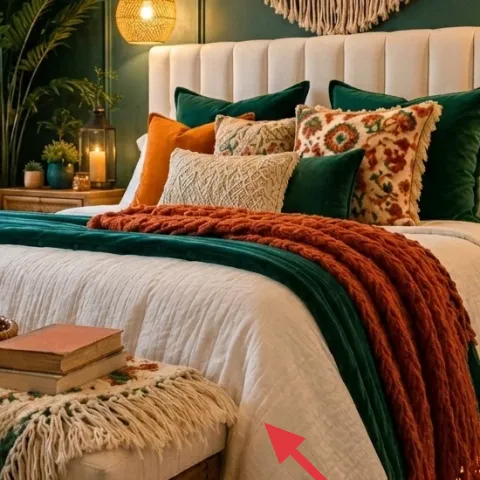
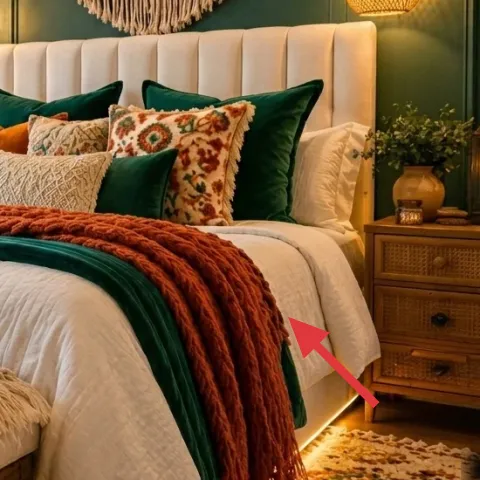
Layer 7 — white quilted bed cover ($120) gives the bed that “ready to relax” base
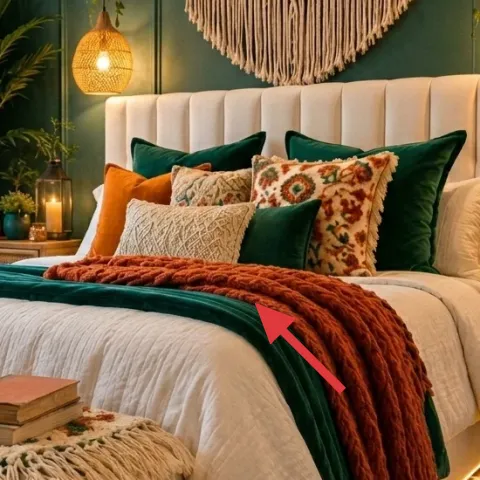
The white quilted bed cover sets the foundation: it’s bright enough to keep the room airy, but textured enough to handle bold pillows and throws. Quilting adds depth even when you’re using neutrals, and it helps the green and burnt-orange layers look intentional instead of randomly piled. The trade-off is maintenance—white shows lint faster than darker throws—but the payoff is that fresh, clean base that makes everything else feel more expensive. Style it with the green throw blanket and at least one patterned pillow so the textures stack without looking chaotic.
Layer by contrast, not by volume
Use fewer pillows with more texture variety rather than adding extra sizes and shapes.
The cost, layer by layer
| Layer | Item | Cost |
|---|---|---|
| 1 | Area rug 8×10 | $200 |
| 2 | Curtain panel pair (84") | $80 |
| 3 | Paint, 1 gallon (homeowner) | $70 |
| 4 | Side / bedside tables (set of 2) | $80 |
| 5 | Woven pendant lamp with exposed bulb | $60 |
| 6 | Macramé wall hanging | $110 |
| 7 | White quilted bed cover | $120 |
| Total | $720 | |
If you want a cheaper variant, start with the rug and curtains only, then keep the existing bed cover. Swap in a smaller macramé piece or choose a simpler woven lamp, and repaint with a matte tester that covers a larger area than you expect.
What worked, what didn't (across the whole room)
The strongest pattern is texture layering: rug underfoot, quilted bedding, and woven light all share a natural rhythm against sage green. The result looks cohesive without needing complicated matching furniture. The one place it can go wrong is over-stuffing surfaces—nightstands and bed tops stop reading as styled and start reading as piled.
What worked
- The sage green wall makes warm white bedding feel crisp instead of yellow.
- The large rug visually centers the bed and makes the bench feel intentional.
- Sheer curtain panels soften edges and keep daytime light flattering.
- Woven pendant lighting adds texture, not just brightness.
- Macramé wall decor brings “handmade” detail without adding more furniture.
- Nightstands with drawers reduce clutter by giving bedding-adjacent items a home.
What didn't
- If the curtain rod is set too low, the room suddenly feels shorter.
- Overloading the nightstand top blurs the focal points of the light and candle.
- Too much patterned fabric at once makes the bed look busy instead of layered.
- A rug that’s too small leaves the bed floating and the palette unanchored.
What we'd skip if we did it again
Skip replacing multiple furniture pieces at once. In a bedroom like this, two upgrades do most of the visual work: the rug and the window treatment. If budget is tight, keep the existing bed base and focus your money where your eye lands first.
Skip chasing “perfect matching” across items. The woven lamp, macramé hanging, and plants don’t need to be the same exact tan tone—just close enough to share warmth. Matching exact shades can flatten the room instead of making it feel collected.
Skip a dark accent wall everywhere. One sage green wall is cozy; repeating that tone across all walls can make the bedroom feel smaller and heavier than intended. Keep the other walls warm and bright so the room stays breathable.
Frequently asked
How long does this kind of bedroom refresh take in real life?
A realistic weekend timeline is: one morning for curtain measuring and hanging, plus a couple hours to lay the rug and style the first pass on bedding and pillows. The repaint is usually the longest part because of drying time—plan for two coats and don’t rush tape removal. If you keep the rest of the furniture, you can finish everything in 1–2 weekends.
What if I rent and can’t repaint the accent wall?
For renters, skip the paint layer and go with a peel-and-stick wallpaper option on one wall, or use a large framed art print in a sage-green palette behind the bed. You can still keep the rest of the plan—rug size, curtain height, woven lighting, and macramé texture do the heavy lifting visually. Choose removable fixtures and avoid changes that leave holes.
My room is smaller—should I downsize the rug?
Keep the rug as large as you can, even in smaller rooms. The goal is that the bed feels seated on the rug rather than hovering above the floor. If 8×10 feels too big, choose the largest rectangle you can fit while still letting the front edge extend past the foot of the bed. Then scale down decor objects instead of shrinking the rug drastically.
Where should I shop if I want this look on a budget?
For budget versions, start with curtains and rugs at discount home stores or marketplaces with frequent markdowns. Woven lighting and macramé wall hangings often show up at seasonal sales, but you can also thrift one piece and replace only the simplest hardware. If you’re buying online, double-check dimensions—especially curtain length and pendant cord length.
What’s the biggest mistake people make in bedrooms like this?
The most common miss is layering too many patterns and not enough anchor texture. In this style, the rug and quilted bedding are the calm base, and the macramé and pillows are the detail. If every item is loud, nothing feels intentional—so pick one strong pattern and repeat the palette across throws, plants, and light.
More in Bedroom

Sage-and-emerald bedroom refresh, $800
A sage-and-emerald bedroom refresh that leans warm modern: replace the rug and curtains, repaint the accent wall, then finish with a macram…
How to refresh a bedroom for under $700 with mustard and emerald
A bedroom refresh that leans on mustard curtains, deep green accents, botanical art, and warm lighting. This weekend project fits a $700 bu…
7 no-drill bedroom swaps for $600
A warm, olive-and-wood bedroom refresh that packs into boxes: update a beige patterned rug, swap in dark velvet curtains, add a bedside lam…