
- Best for
- vanity wall refresh
- Cost
- $770 total for 7 layers
- Difficulty
- Moderate DIY
- Renter-safe
- Yes, if you keep faucet/toilet changes optional and focus on paint with peel-and-stick
Why warm oak-and-terracotta is the bathroom vanity wall of 2026
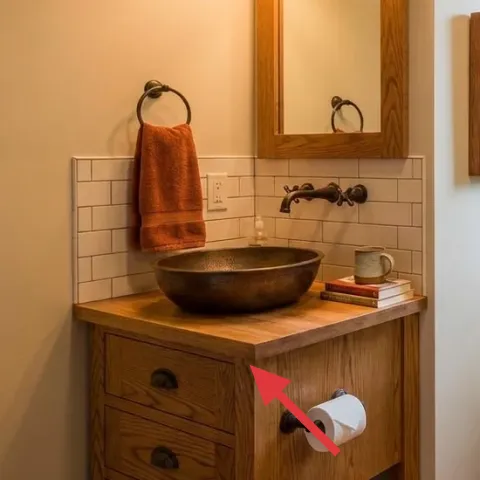
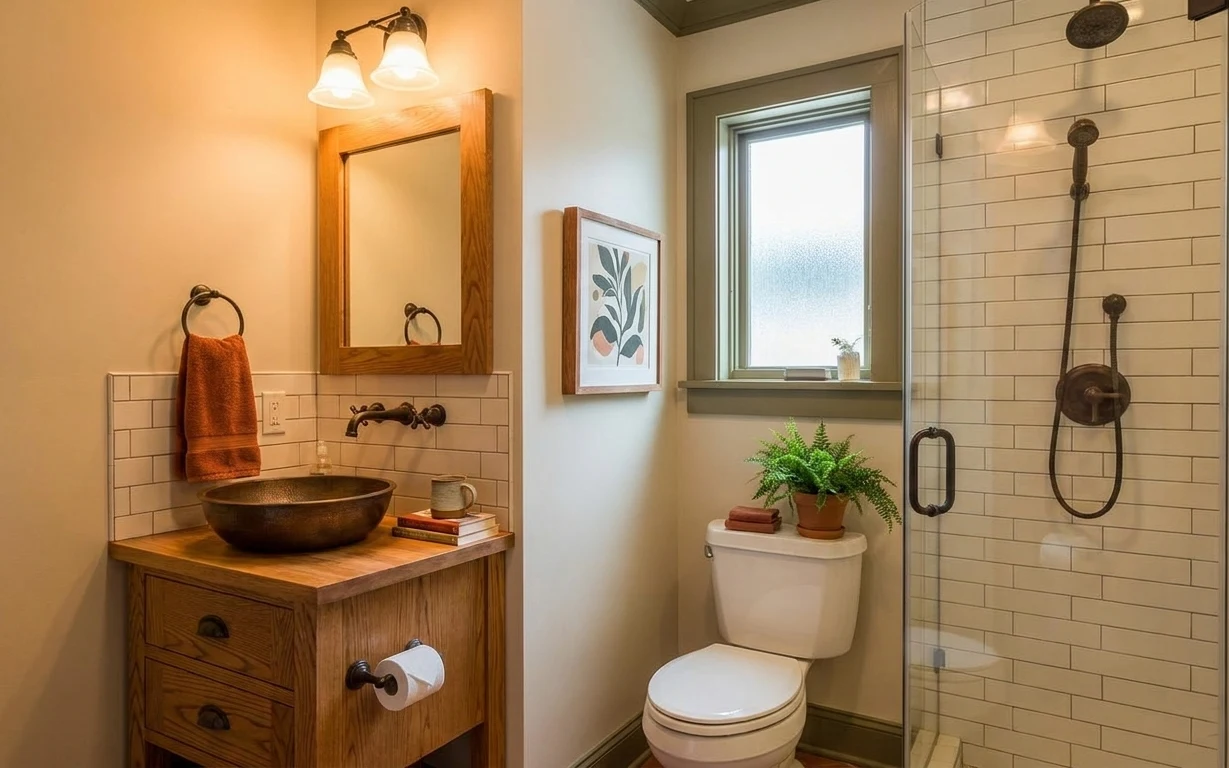
Warm honey oak paired with terracotta reads intentional in a bathroom, even when the layout stays the same. In this photo, the off-white painted wall and white subway tile create a clean grid, while the wood vanity countertop and towel bar add real texture. The wood-framed wall mirror pulls the eye upward, and the framed botanical print adds soft color without being loud. Since you own the place, you can choose the highest-impact changes for the weekend—paint, one hardware swap, and a couple of styling fixes that don’t require a contractor.
I used to overthink bathroom styling and end up doing too much “decor” before the surfaces looked cohesive. What changed for me was choosing a paint tone that looks warm next to both the wood and the tile, then styling only after that felt right. Once the off-white wall matched the oak, the mirror and faucet looked like they belonged together. That’s the same order this refresh follows.
Layer 1 — terracotta hand towel ($25) Quick color that stays useful
This terracotta hand towel sits on the towel bar under the mirror, so it’s one of the first things your eyes catch when you walk in. Keeping the color in the same warm family as the wood vanity helps the whole “bathroom vanity wall” feel edited, not accidental. The trade-off with towels (versus adding a new cabinet or shelf) is that you’re working with small changes—so the towel has to be fresh and neatly hung. A wrinkled or too-small towel makes the space look fussy; a properly sized, evenly folded towel looks styled with almost no effort.
Fold for height, not just neatness
Fold the towel into thirds and hang it so it reaches roughly the same height as the mirror’s lower edge—small proportions make it look curated.
Layer 2 — framed botanical print ($25) Soft pattern that matches tile lines
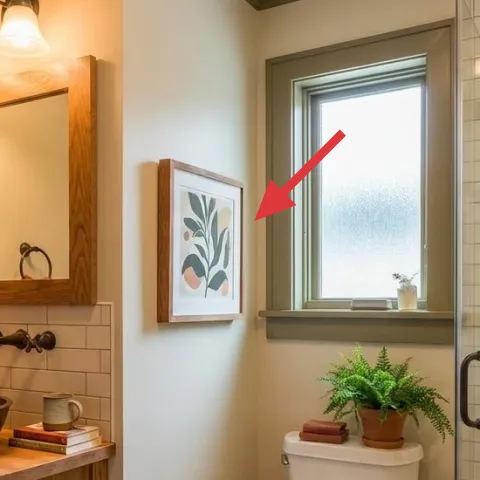
The framed botanical print adds a botanical motif without turning the wall into a busy gallery. Because the shower wall is white subway tile, the straight grout lines already give structure; the print’s gentle shapes add movement. If you swap prints, aim for something with muted greens or warm creams so it doesn’t fight the oak. I usually see people go too bold here—like bright oranges or saturated blues—and then the whole vanity wall feels loud. The win with this one is scale: a single framed piece makes the area feel finished while still keeping the room calm.
Keep it a single focal point
One framed print above or near the vanity reads more intentional than multiple small frames competing with the mirror.
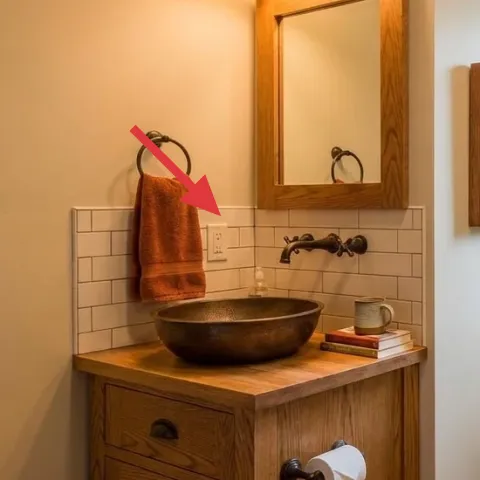
Layer 3 — bathroom faucet ($120) The hardware detail your tile can’t hide
The faucet is small compared to the vanity, but it’s visible every day—so it needs to feel current. In this photo, the faucet finishes blend with the warm wood and the darker shower hardware, which makes the whole bathroom feel cohesive. Swapping the faucet (or at least choosing a matching finish) is a weekend change with a big “newness” factor because it affects reflections and highlights. The trade-off is cost: hardware isn’t as cheap as paint or a towel, but it’s still far less than redoing the vanity. A finish that’s too cool-toned (like chrome) can make the wood look dull next to it, so match the undertone.
Don’t mix finishes randomly
If the faucet finish doesn’t harmonize with the shower hardware, you’ll feel it every time you glance toward the glass.
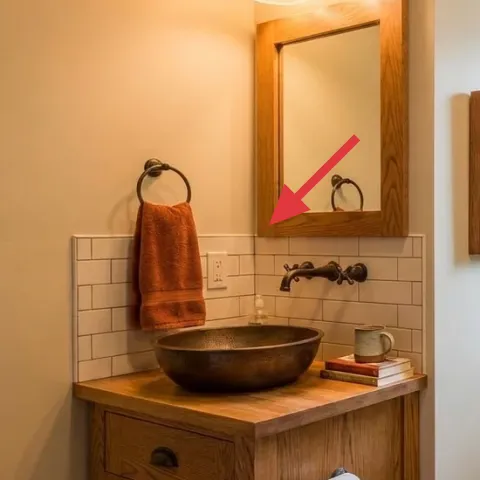
Layer 4 — wood-framed wall mirror ($80) Height that makes the vanity feel bigger
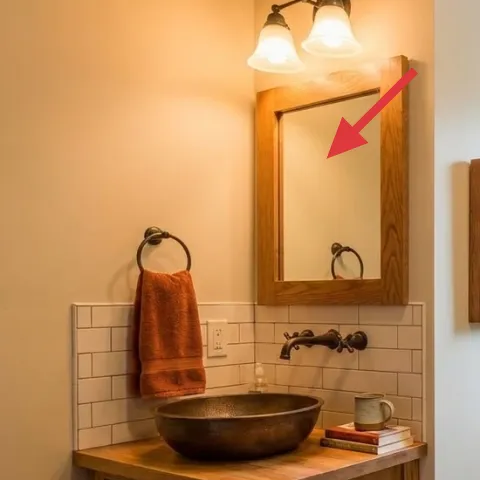
The wood-framed mirror lifts the whole vanity wall, especially because it sits between the towel bar and the top of the vanity. Mirrors do two jobs here: they reflect light from the two-bulb vanity light fixture and they extend the eye upward. If you’re choosing a mirror update, keep the frame wood tone warm rather than gray, so it stays in the same palette as the vanity countertop. The trade-off with going too trendy (ultra-thin metal frames or overly ornate shapes) is that it can date the space quickly. A simple wood frame is a longer-living choice, and it keeps the bathroom in the modern farmhouse lane.
Hang it so the towel bar feels “anchored”
Aim for the mirror’s bottom edge to align visually with the towel bar area—your eye reads that as one system.
Layer 5 — wood bathroom vanity ($300) Storage you see every day
The wood bathroom vanity is the heaviest visual element in the scene, with drawers that add built-in storage and a countertop that holds the sink. If the vanity is solid but looks tired, a refresh can still feel like a full remodel because it changes the warmth of the whole room. When you’re deciding what to do first, the vanity matters more than adding small decor because it sets the color and texture background for everything else. The trade-off is that a true vanity swap takes more effort; this layer is for an “upgrade path,” like refinishing, replacing the top hardware, or choosing a similar-style replacement that matches the oak tone. Keep the finish warm so it stays compatible with off-white walls and tile.
Match the undertone, not just the species
Oak can swing golden or honey or more amber—pick a finish that looks good next to your off-white paint and subway tile.
Layer 6 — white toilet ($150) Fresh base makes styling look intentional
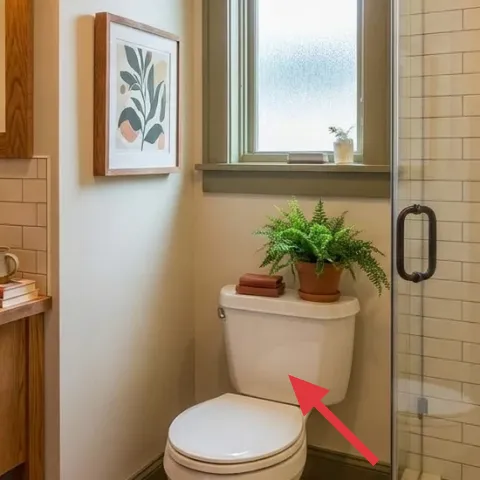
A clean, bright toilet base changes the bathroom’s overall perception because it sits in the same line of sight as the mirror and vanity. In a mostly light palette (white tile, off-white walls), the toilet is where grays and dinginess show up first. Upgrading this isn’t just about aesthetics; it also makes the bathroom easier to keep looking tidy. The trade-off is that this is the least “decor” layer—more like a functional refresh—so it works best when the toilet already needs attention. If yours is in good shape, focus on the vanity wall first; the visual payoff comes faster. But if the finish is off, replacing can make everything else look more cohesive.
Clean lines matter more than extra decor
Keeping the toilet area visually crisp helps the framed print, towel, and mirror read as a planned set.
Layer 7 — bathroom wall paint (off-white) ($70) Warm the tile without losing brightness

Paint is the fastest way to make the off-white walls feel deliberate next to the white subway tile and honey oak vanity. In this photo, the walls read soft and warm rather than stark, which is why the wood and terracotta towel look richer. The trade-off with paint is that it won’t fix a mismatched hardware finish—so pair it with the faucet and mirror decisions. If you go too cool, the oak turns orange-dull; too yellow, and the space can feel dim. Choose a warm off-white that still lets the tile look clean and bright when the two-bulb vanity light fixture comes on.
Make it instead of buying it
DIY-paint the bathroom wall a warmer off-white so the wood vanity and terracotta towel look cohesive next to the subway tile.
Materials
- Painter’s tape & plastic sheeting — 1 set — store — $8
- Primer (for scuffs/uneven sheen) — 1 quart — store — $15
- Satin bathroom paint (warm off-white), 1 gallon — 1 can — store — $35
- Roller cover + angled brush — 1 kit — store — $6
Steps
- Clean the wall with a mild degreaser and let it dry completely.
- Apply painter’s tape and plastic to protect the vanity edge and tile grout lines.
- Spot-prime scuffs or shiny patches with primer, using a small foam roller.
- Sand lightly on primer spots for a smooth finish (quick pass only).
- Cut in edges with an angled brush around the mirror area.
- Roll the wall in 2 thin coats, keeping a wet edge to avoid lines.
- Let the first coat cure per the paint label before the second coat.
- After the final coat, remove tape while paint is slightly firm to reduce peeling.
- Let the wall fully cure before hanging towels and decor.
Total DIY cost: $58 — saves about $12 over buying.
The cost, layer by layer
| Layer | Item | Cost |
|---|---|---|
| 1 | Terracotta hand towel (fresh set) | $25 |
| 2 | Framed botanical print 16×20 | $25 |
| 3 | Bathroom faucet (replace or upgrade finish) | $120 |
| 4 | Wood-framed wall mirror | $80 |
| 5 | Wood bathroom vanity (upgrade/replace) | $300 |
| 6 | White toilet (replace) | $150 |
| 7 | Paint, 1 gallon (warm off-white walls) | $70 |
| Total | $770 | |
If you want a cheaper version, keep the vanity and toilet as-is and spend on the faucet finish, a warm framed print, and fresh wall paint. That trio gives the biggest “before-to-after” shift while leaving the plumbing items for only when they truly need replacing.
What worked, what didn't (across the whole room)
The biggest win is how the warm wood and terracotta details stay tied together by an off-white wall color. Hardware and styling are pulling focus in the right order: towel first, mirror next, then faucet reflections. The scene looks finished without needing a complicated makeover.
What worked
- Warm-toned wood plus a terracotta towel keeps the vanity wall from feeling sterile.
- A single framed botanical print adds pattern while the tile still provides the main structure.
- Refreshing the faucet finish makes the whole sink area look updated even at a glance.
- The wood-framed mirror improves both light reflection and vertical balance.
- A brighter, cleaner toilet base helps the light palette stay crisp.
- Painting the walls warm keeps subway tile looking clean instead of gray.
What didn't
- Too-cool paint would fight the oak undertone and make the vanity look dull.
- Mixing faucet finish with the shower hardware would create visual “almost matching.”
- Over-styling the vanity wall makes the towel and mirror feel cluttered.
- Choosing a large statement print would overpower the mirror and towel bar layout.
- Letting the toilet finish look dingy makes every other upgrade feel less polished.
What we'd skip if we did it again
Skip chasing a complicated new “look” with too many decor pieces at once. On a bathroom vanity wall, the mirror, faucet finish, and towel placement already do most of the job. Swapping decor without syncing those basics usually just makes the wall feel busy in a hurry.
Skip changing the shower tile or glass when you only need the vanity wall to feel modern farmhouse. Tile work is expensive and slow, and your eye doesn’t focus on it the way it focuses on the mirror and sink. Put your energy into paint, mirror, and one hardware detail first.
Skip buying a cool-toned off-white if your vanity reads warm oak. The wrong undertone makes the whole palette look mismatched, even if everything else is “nice.” A warm off-white that flatters the wood keeps the room bright while still feeling soft.
Frequently asked
How long does a bathroom vanity wall refresh take on a weekend?
Plan for about a full Saturday for painting, plus a couple of extra hours for styling and hardware decisions. If your faucet requires a careful swap, treat it as the main Saturday task and keep decor for Sunday. The mirror and framed print are quick wins. The biggest time sink is prep—tape, clean surfaces, and let paint cure before moving towels back into place.
What if I rent—can I still get this look?
The renter-friendly part is the visual system: warm off-white paint (only if allowed), a framed botanical print, and a fresh terracotta towel. For truly no-drill updates, swap the frame style but keep hardware alone, and use removable options only where your landlord permits. The faucet and toilet are usually not realistic for rentals, so treat them as optional if you’re refreshing your own home.
My bathroom is smaller—should I scale anything down?
For smaller bathrooms, prioritize proportion and spacing over larger items. A single framed botanical print in a similar size keeps the wall calm, and the towel should be neatly folded rather than doubled up. If the vanity feels crowded, keep the countertop minimal—one plant if it looks tidy, then stop. The key is leaving negative space around the mirror.
Where should I shop for these specific upgrades?
Look for the faucet and mirror first, because finishes and scale affect everything else. Hardware stores and home improvement retailers are reliable for matching metal tones. For the framed botanical print, use a home decor retailer or an art-focused marketplace, but keep the palette warm. For paint, a big-box store’s bathroom line is usually easy to match to your lighting.
What’s the most common mistake with this kind of bathroom refresh?
The most frequent mistake is choosing an off-white that’s too cool next to warm oak. The room may look fine in daylight but feel off when the bathroom light turns on. Another common issue is mixing faucet finishes with the shower hardware—so the whole area feels “almost matching.” Start by matching undertones, then add styling.
More in Bathroom
Under $1,000: a modern farmhouse bathroom vanity refresh
A warm off-white bathroom vanity wall can look polished without a renovation. This modern farmhouse refresh uses 7 visible upgrades—from a …
What $350 buys: a plant-filled renter-friendly bathroom refresh
A plant-filled bathroom refresh for renters built around no-drill swaps. Focused on a patterned bath rug, stacked towels, and renter-safe p…
7 no-drill upgrades for a $200 vanity corner refresh
A warm, botanical bathroom vanity corner is achievable for $200 with move-friendly swaps: a softer towel, a better bath mat, a styled tray,…