
- Best for
- Cozy warmth with a focal wall
- Cost
- $845 total for 7 layers
- Difficulty
- Confident DIY
- Time
- 1–2 weekends
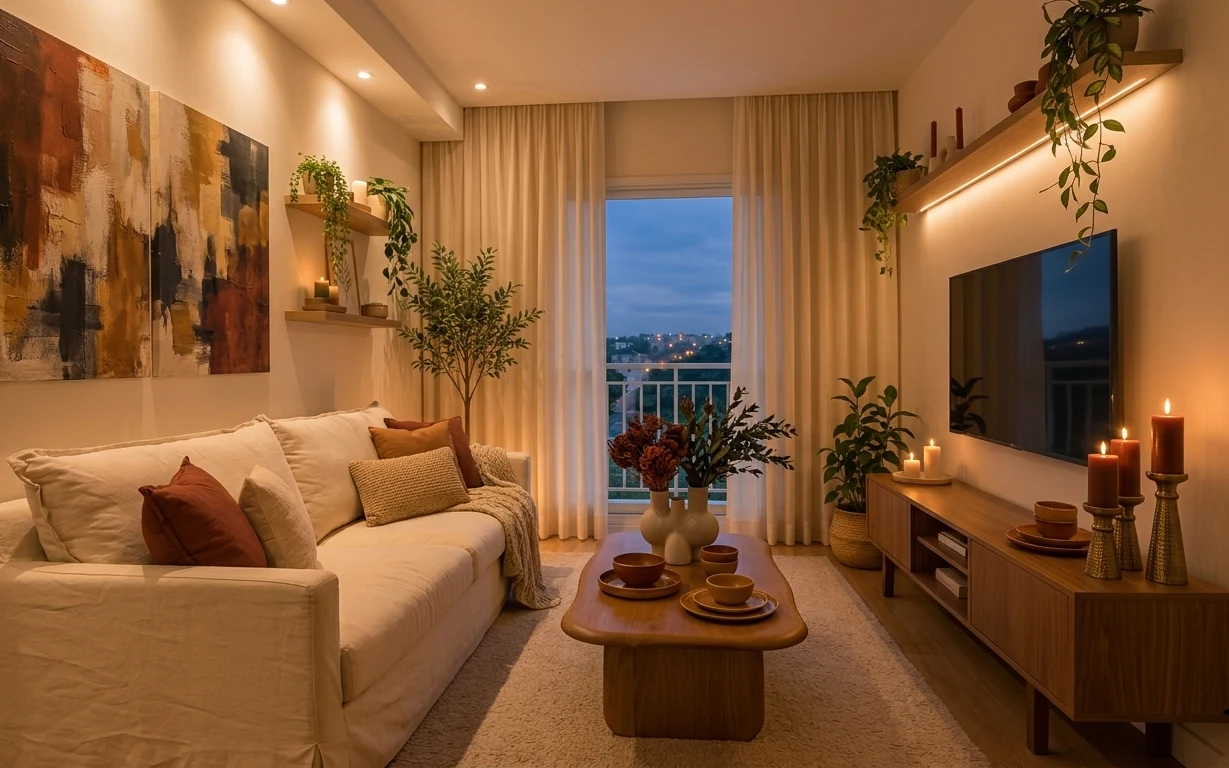
Why candles-and-abstract-art refresh is the living room of 2026
This photo nails a specific kind of calm: warm light bouncing off a framed mirror, soft cream curtains, and lots of organic shapes—tree leaves, a textured rug, and that big abstract on the left wall. The palette reads creamy and golden, but it’s kept grounded by warm wood furniture and the matte texture of the gray throw. I’ve recreated this kind of mood by treating the window and the wall art like equal teammates instead of separate projects, and it still holds up even when you’re working with a weekend timeline and existing furniture.
My mistake in the past was making everything “nice” at once—new lamp, new side table, new art—then realizing none of it belonged to a single focal plan. Here, the plan is clearer: the abstract frame anchors the left side, while the mirror and warm console lighting complete the right. Once I started assigning each piece a job (texture, light, or focus), shopping got faster and the room stopped looking staged.
Layer 1 — Area rug (jute-style look) ($200) Adds texture under everything

The jute-style area rug grounds the room where the sofa meets the coffee table. It’s a big visual anchor, and because it’s neutral, it lets the brown-and-cream pillows and the warm wood console read as the “color.” The trade-off is that you’ll want to vacuum often and keep it away from big spills—but that’s still easier than replacing furniture or repainting walls. Compared with a small accent rug, the extra coverage makes the whole room feel intentional, not pieced together.
Vacuum with the grain
For a woven, use a suction setting that won’t pull fibers, and vacuum in the direction of the weave for a cleaner look.
Layer 2 — Curtain panels (cream) ($80) Softens the window like a frame
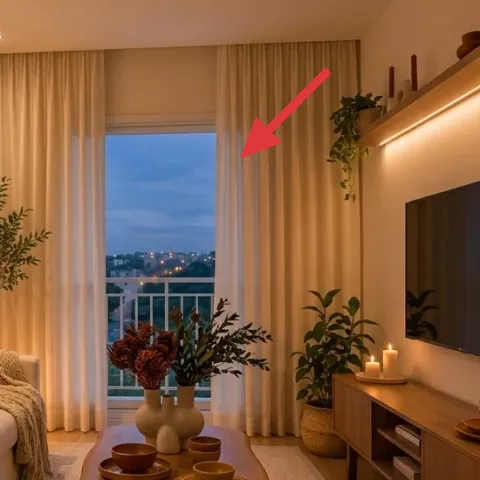
Cream curtain panels do two jobs here: they add softness and they pull the eye upward toward the warm ceiling light. The length and fullness matter more than the color—when the panels hang high and pool slightly at the bottom, the room looks taller. If you went with lighter sheers only, you’d lose that cozy, layered fabric feeling. This choice also plays well with the warm wood console because cream reads warmer than white-on-white.
Layering beats sheer-only
Even if you keep them single-panel, look for a fabric with body (not clingy) so it still reads “curtained,” not “hung.”
Layer 3 — Large abstract framed wall art ($80) Gives the left wall a clear focal point
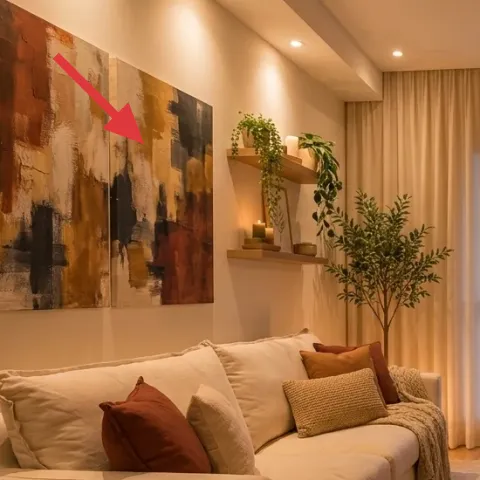
That large abstract framed piece is what makes the room feel designed instead of merely decorated. The colors are dusty and warm, and the vertical brushy shapes echo the tall forms—like the tree and the window’s vertical lines—so everything feels connected. I wouldn’t try to match it exactly; instead, pick a palette that includes warm brown/umber and cream, then repeat those tones elsewhere with pillows or styling. The trade-off: a big frame takes space visually, so you’ll want it to sit at eye level where it can actually land.
Make it instead of buying it
Paint a warm abstract on a canvas board so you get the same “big vertical texture” look for less than a store-bought framed print.
Materials
- Canvas board (16×20) — 1 — craft store — $15
- Acrylic paint set (warm neutrals) — 1 — craft store — $20
- Painter’s tape — 1 roll — hardware store — $8
- Matte sealer or clear acrylic medium — 1 — craft store — $12
- Foam brushes — 2-pack — craft store — $5
Steps
- Sand the canvas surface lightly so paint grips evenly.
- Tape off a loose grid of vertical rectangles for your main blocks.
- Paint the largest cream/umber fields first, then let dry completely.
- Use foam brushes to add dry-brush strokes in darker tones and a few warm accents.
- Peel tape to reveal crisp edges, then smooth any overlaps with a damp brush.
- Seal with matte sealer after everything is fully dry, then let cure before hanging.
- Find the best placement by taping the finished art to the wall at eye level.
Total DIY cost: $60 — saves about $20 over buying.
Don’t rush the seal cure
If the sealer isn’t fully cured, fingerprints and smudges show under warm light—wait until it’s truly dry.
Layer 4 — Large framed mirror ($120) Adds depth and makes the room feel bigger
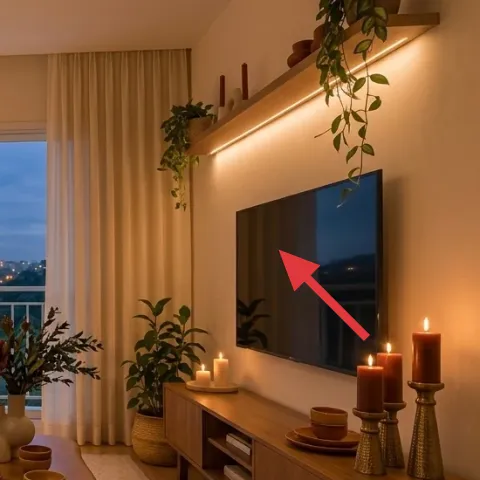
A large framed mirror above the console bounces the warm light around and gives the wall extra “air.” It also helps visually connect the left wall art with the right-side furniture, so the room doesn’t feel split into two halves. The obvious alternative is another framed print, but prints don’t bounce light the same way, especially at night. The mirror’s frame finish is also part of the look—warm wood tones make the mirror feel integrated with the console instead of pasted on.
Angle for light bounce
Line it up so it reflects the warm sconce/ceiling glow, not the floor—your evenings will look instantly different.
Layer 5 — Wood console cabinet with drawers ($300) Creates storage and a styling “landing zone”
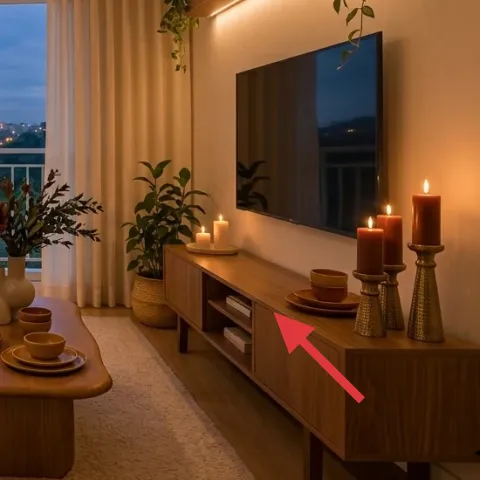
The wood console cabinet is where the room’s everyday items get visually organized: candles, trays, and plants all have a place to “sit” without cluttering the sofa. Warm wood also keeps the look human—rather than cold or overly minimal—so the cream textiles stay cozy. A smaller stand would make the candles feel crowded and would shrink the visual scale next to the mirror. The trade-off is surface maintenance: dust shows on wood quickly, so use a microfiber cloth as part of your weekly routine.
Keep styling low and grouped
Cluster a few pieces together (candles + one plant + one tray) instead of scattering singles across the top.
Layer 6 — Candles on console ($35) Softens the room after dark
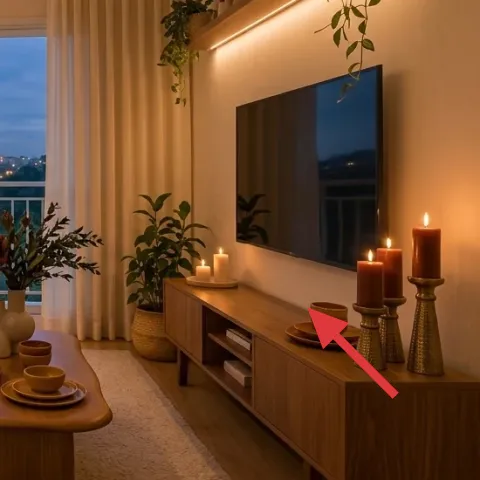
The candles make the whole setup feel “finished” because they create that warm, intimate glow you only get at night. They also add height variety next to the mirror—tall shapes against the horizontal line of the console. I’d skip replacing the whole lighting plan just for ambiance; candles are cheaper and you can move them as the seasons and moods change. The trade-off is that they’re temporary—so plan on a light wipe-down and a quick reset whenever you rearrange other styling.
Use the same warm metal accents
If you’re mixing candle holders, repeat the same finish so the glow looks intentional, not accidental.
Layer 7 — Potted indoor tree on shelf ($30) Brings vertical life to the right side
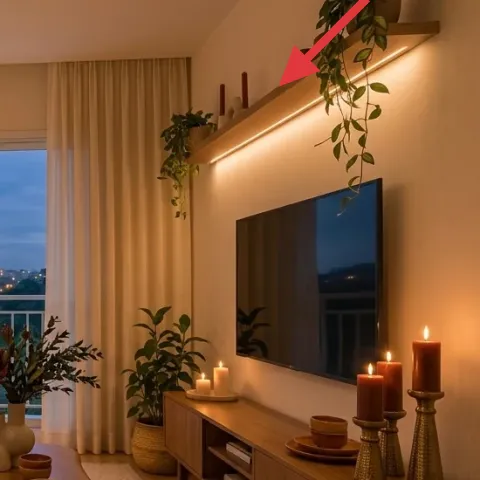
That potted indoor tree gives the room instant height and movement, balancing the heavier shapes: the large framed art and the console. Plants are also forgiving—if the exact pot shape isn’t the same, the leaves still do the visual work. The choice here is better than adding another small decor object because foliage reads from across the room, not just up close. The trade-off is light needs: put it near the brighter window side and rotate it so it grows evenly.
Rotate weekly for an even canopy
A quick turn once a week keeps leaf growth balanced, so the silhouette stays full.
The cost, layer by layer
| Layer | Item | Cost |
|---|---|---|
| 1 | Area rug (jute-style look) | $200 |
| 2 | Curtain panels (cream) | $80 |
| 3 | Large abstract framed wall art (DIY ~$60 in materials) | $80 |
| 4 | Large framed mirror | $120 |
| 5 | Wood console cabinet with drawers | $300 |
| 6 | Candles on console | $35 |
| 7 | Potted indoor tree on shelf | $30 |
| Total | $845 | |
If you want it cheaper, swap the mirror and console for used pieces, then keep the big “anchor” moves: a rug with full coverage and cream curtains with real length. DIY the abstract art to avoid one expensive wall focal point. You’ll still get the warm, balanced look for a lot less.
What worked, what didn't (across the whole room)
This room comes together because the upgrades all do different jobs—texture from the rug, height from the curtains and plant, and bounce from the mirror. The styling stays readable since the console holds everything in a tight cluster.
What worked
- The jute-style rug makes the sofa-and-coffee-table zone feel intentionally planned.
- Cream curtain panels soften the window and keep the warm sconce glow flattering.
- The large abstract wall art gives the left wall a clear focal point instead of visual clutter.
- The framed mirror adds light bounce and ties the left and right furniture sections together.
- The wood console creates a stable styling surface for candles, trays, and plants.
- The candle heights add depth, especially when everything else is mostly horizontal.
What didn't
- Too many small objects on the console makes the arrangement look busy instead of curated.
- Skipping curtain length (hanging too low) flattens the room visually.
- Choosing a framed art color palette that’s too cool can fight the warm gold lighting.
- Placing the mirror without checking reflections can bounce the wrong angles after dark.
- Under-sized rugs leave a “floating” sofa feeling, even when the colors match.
What we'd skip if we did it again
Skip adding a second large wall piece on the left when the abstract framed wall art already holds that job. Two big anchors can compete, especially with a busy botanical styling setup and a mirror on the opposite side. Keep the left wall bold and the right wall reflective, then let smaller decor do the supporting work.
Skip buying a rug that’s noticeably smaller than the sofa-and-coffee-table footprint. It’s one of the fastest ways to make a room feel unfinished because the “zone” doesn’t read as one. If budget is tight, downsize styling objects first—protect the rug size.
Skip trying to match every wood tone perfectly. Warm-modern rooms look better when the wood finishes relate, but don’t perfectly match; otherwise it starts to feel showroom-clean. Use the console tone as the reference, then let pillows and the abstract art provide the softness and contrast.
Frequently asked
How long does this kind of living room refresh take on a weekend?
Plan for 6–10 hours total the first weekend if most pieces already exist. Curtains and rug positioning take the longest to get right (especially length and coverage). The abstract DIY is usually the project driver, because paint needs full dry and cure time before sealing and hanging.
What if I rent—can I still do this look without permanent changes?
The rug, candles, mirror placement, and plant styling are fully renter-friendly. For the curtains, a proper curtain rod (installed with screws/anchors) is often still feasible when permission isn’t an issue for your rental timeline. If not, use a tension rod only for small window widths and keep the vibe consistent by matching the cream palette.
My living room is smaller. Should I use a smaller rug and art?
Yes—downscale proportion, not the concept. Choose a rug sized so the front sofa legs can land on it, and pick wall art that’s still big enough to act as a focal point from across the room. In a smaller room, one larger focal piece reads more cohesive than two medium pieces fighting for attention.
What if my budget is under $600—what should I prioritize first?
Prioritize the two anchors: rug size and wall art scale. After that, curtains with the right length make the room feel finished more than an extra small decor purchase. The mirror is next if you want more light bounce at night; candles are the low-cost finishing layer.
Where can I shop differently to get this vibe for less?
For the rug and mirror, consider reputable resale and local home stores first. For the abstract art, thrift frames and DIY the painting so you control color and texture. Curtains often cost less when you buy a fabric set on sale, but pay attention to length so the hang looks intentional.
Biggest mistake people make in warm-neutral living rooms like this?
Overbuying small items that don’t have a job. When everything is “decor,” nothing feels planned. Assign each purchase a role—texture (rug), softness (curtains), focus (abstract art), bounce (mirror), and mood (candles)—and stop once those roles are covered.
More in Living Room
Under $1000: warm modern living room refresh with 7 layers
A warm-modern living room refresh with 7 weekend-friendly upgrades: cream curtains, an abstract focal artwork, a mirror, and styling lighti…

Under $600: sunlit living room refresh with earthy layers
A sunlit living room starts with a green sofa and warm daylight. This renter-friendly refresh adds a jute rug, rust throw, framed artwork, …
Under $500: 7 move-friendly swaps for a plant-filled living room
A plant-filled living room refresh for shared housing: 7 budget-friendly, packable swaps totaling under $500. The look stays warm and mid-c…