
- Best for
- Shared-housing bathroom refreshes you can pack and repeat
- Cost
- Under $400 ($365 total)
- Time
- ~5–8 hours total (most shopping + one DIY day)
- Easy to pack
- Yes—everything is textile or freestanding décor
Why this moving-friendly bathroom is the bathroom of 2026
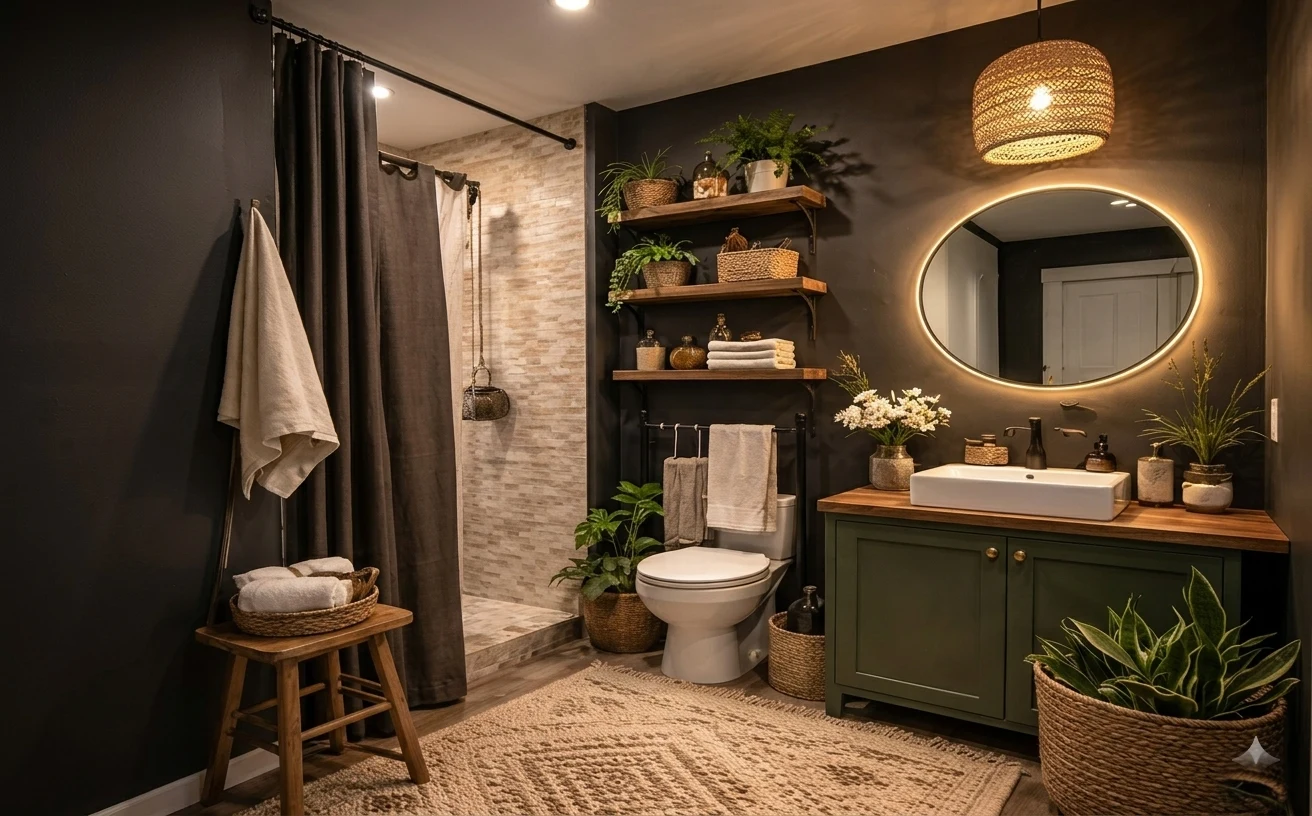
Bathrooms are getting the “designed, not decorated” treatment in 2026, and the key is layering—especially in shared housing where nothing can be permanent. The halo glow around the mirror and the warm pendant overhead create a soft, spa mood, but the real magic comes from movable textures: a heavy-looking shower curtain, a textured bath rug, and stacked towels that make the room feel cared for instead of temporary. You can lean into the trend of earthy-neutrals and quiet contrast—think a Peppercorn-like charcoal backdrop—then balance it with woven baskets, terracotta planters, and matte ceramic details. In a lot of modern bathroom spreads, the styling reads expensive because the materials look “intentional,” not because the fixtures were replaced. For this audience, it’s achievable because the investments are all soft goods and freestanding décor you can pack flat and carry room-to-room.
I noticed how quickly the whole scene clicked once I focused on staging, not installation. In my first shared house, I tried to “fix” the bathroom by going down the peel-and-stick and hardware rabbit hole—until I realized the visual weight still came from what you touch every day: the curtain fabric, the rug pile, and the towel presentation. I also caught myself wanting matching everything, but that’s when the bathroom started to look like a themed product display. Here, the mix of dark textiles with light, folded towels and small plants keeps it warm instead of themed, and it’s all stuff I can re-create in a new rental in a weekend.
Layer 1 — Shower curtain panel ($35) Charcoal drape on the existing rod
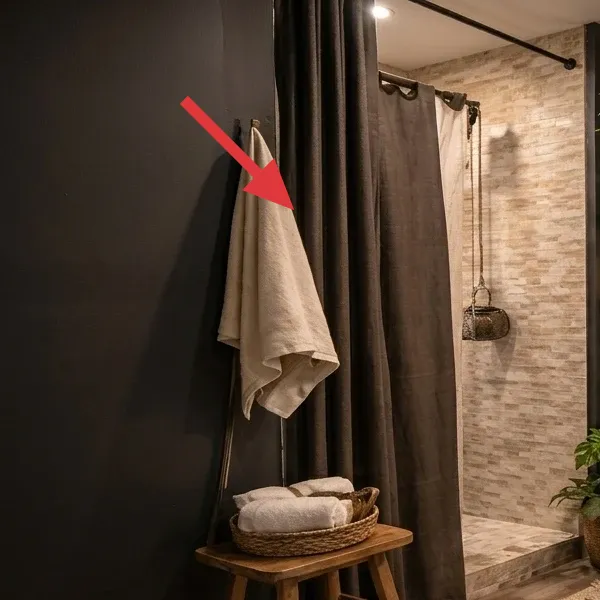
This layer is the charcoal shower curtain panel, hanging in wide, soft folds that visually “frame” the shower. It sits between the darker wall and the lighter tile in the wet area, adding a grounded, fabric texture that instantly makes the bathroom feel finished. The curtain’s top hangs from black rings/hooks on the rod, so the look is doing work even when you’re not thinking about design. Because it’s a textile, it’s also the easiest swap to pack and repeat in the next place.
Choosing a curtain over, say, heavier wall changes is the shared-housing move: it gives privacy and softness without any drilling or permanent installs. I’d skip a shiny, plastic-feeling liner look because it reads cheap fast, especially under overhead lighting. A medium-weight, dark neutral curtain is the sweet spot—dramatic enough against the room’s warm lighting, but still easy to fold into a flat bundle. If you want the “spa hush” effect, curtain fabric is the loudest lever.
Pick a curtain that hangs wide enough to pool slightly
If your curtain is too short, the folds tighten and the whole vibe turns cramped. Aim for a long panel that folds into relaxed layers so the fabric looks intentional, not functional.
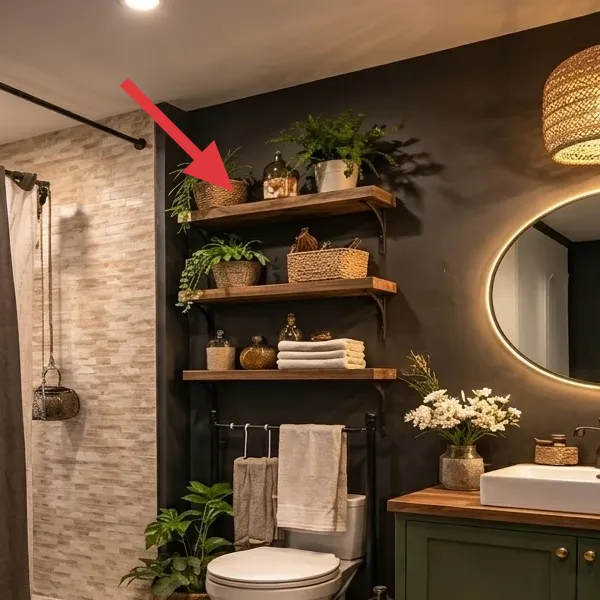
Layer 2 — Textured bath rug ($110) 5x7 rug plus non-slip pad
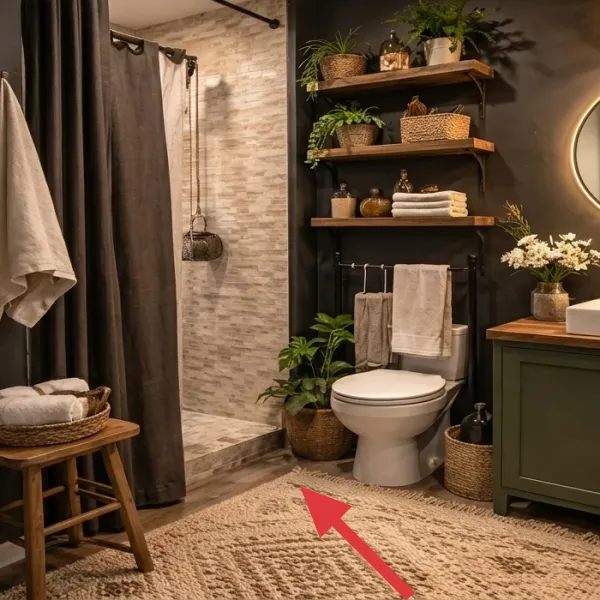
This is the textured bath rug laid on the floor in front of the vanity area. You can see the warm, speckled surface pattern and the plush pile that changes how the tile reads—less “cold tile,” more “soft landing.” It spans the main walking zone, which means it takes on the job of anchoring the styling around everything else: towels, countertop items, and plants. Unlike fixed flooring, a rug disappears into a couple of folds when it’s time to move.
A rug like this is the swap I make first because it solves two problems at once: comfort and visual cohesion. The trade-off is that texture rugs show water marks less forgiving than flat mats, so you need a quick shake and occasional light wash. Still, it’s worth it—because under warm lighting, this kind of pile reads cozy instead of temporary. If you’re deciding between “nice look” and “safe step,” a non-slip pad beneath it is the part that keeps it from sliding after a shower.
Texture hides the real-life stuff
Speckled or patterned rugs mask wet footprints and minor splashes better than solid light mats, which is a big deal in shared bathrooms where you’re not the only careful person.
Layer 3 — Rolled white towel set ($45) Mix of bath and hand towels
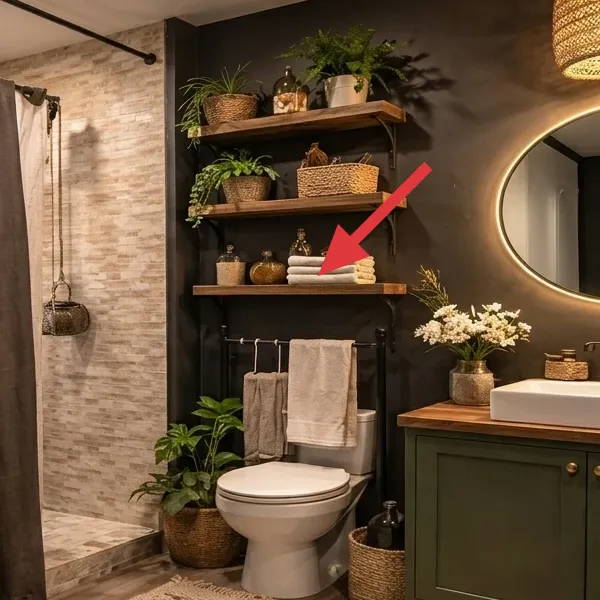
This layer is the folded and rolled stack of white towels staged on the open shelving. The towels add bright contrast against the darker wall and bring a “reset” feeling every time you walk in. You can see the way the folds create shape: a few rolls, a few stacked pieces, and the small texture of the terry loops. It’s not just decorative—towels are also what you’ll actually use, so the styling is doing practical work.
I’d rather build a small towel system than buy one matching “bath set” for two reasons. First, towels look best when they’re stacked in different thicknesses—too-perfect matching reads like a showroom. Second, mixing hand and bath sizes lets you stage what’s currently dry and available. The trade-off is that you’ll do laundry more than you think, because people notice how good the towel stack looks. That’s the point: it keeps the bathroom feeling cared-for.
Stage by “roll height,” not by towel type
Keep one roll low, one medium, and one taller stack. That subtle height variation is what makes the shelf feel styled instead of random.
Layer 4 — Vanity soap & jar trio ($40) Two pump bottles and one lidded container
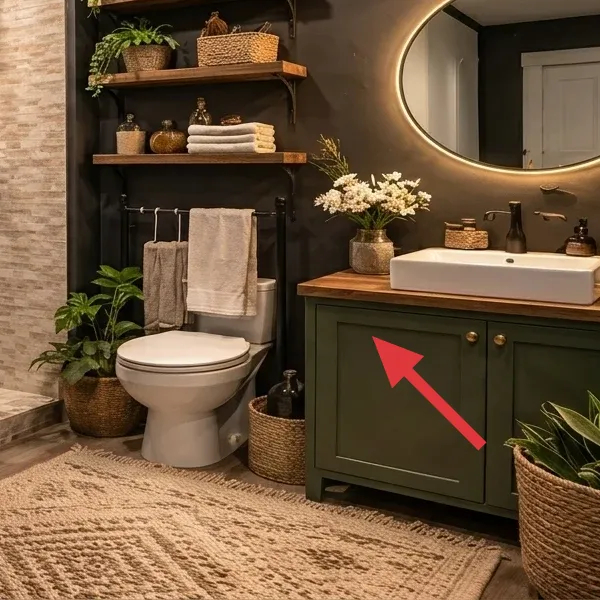
This layer is the countertop styling: the soap pump bottles and small jar/canister positioned near the sink. They’re small, but they’re visually important because they sit at eye level every time you wash your hands or brush your teeth. The bottles’ matte, dark-and-neutral look blends with the room’s moody tones, while their placement keeps the surface from reading cluttered. Since these are freestanding, they’re easy to pack with paper padding and move to the next vanity.
Countertop “systems” beat decorative clutter because they look organized even in short, in-between weeks. The pitfall is buying novelty scents or dyes that stain: some colored soaps can leave marks on light ceramic, and you only notice once you move out. I’d also skip random mismatched bottles if you can—spend the same total money on fewer, cleaner shapes so the set looks intentional. A tight, curated countertop is how the bathroom stays calm instead of chaotic.
Skip heavily scented soaps if your bathroom reads dry
In dry, well-lit bathrooms, strong formulas can leave residue and smudges on sink edges. Choose mild, label-clean products so your “system” stays picture-ready without extra scrubbing.
Layer 5 — Terracotta planter set ($45) Acrylic-painted pots for a spa shelf
This layer is the terracotta planter look—those warm, clay-brown pots with small green growth that sit on the shelving area. The color ties directly into the room’s earthy palette, while the plant’s foliage softens the straight lines of shelves and cabinetry. Even though the plants are small, they carry a lot of visual weight because they repeat across the scene: pot + greenery + negative space. The best part for shared housing is that the pots can be repotted into a nursery liner and packed like regular containers.
I’m choosing terracotta (instead of ceramic in a single brand-new matching set) because terracotta’s “imperfect” texture keeps the bathroom feeling lived-in. The trade-off is you can’t ignore moisture: terracotta can dry out faster, and it can also get marks if you set it directly on porous surfaces. That said, it’s still one of the most move-friendly ways to get a spa-adjacent look—no drilling, no wall work, just a few removable planters that immediately warm up dark walls.
Make it instead of buying it
Paint a small batch of terracotta pots with matte acrylic for a coordinated planter look—then tuck plants in a nursery pot liner so you’re not sealing anything permanently.
Materials
- Small terracotta pots (4–5 in), 3 count — Walmart — $28
- Acrylic craft paint set (2 colors, 2 oz bottles) — Michaels — $10
- Painter’s tape roll — Walmart — $3
- Foam brush pack — Walmart — $4
Steps
- Rinse the terracotta pots to remove dust, then let them fully air-dry.
- Use painter’s tape to mark simple bands or a geometric “frame” so your look stays intentional.
- Apply a thin first coat of acrylic paint with the foam brush, covering the outside only.
- Wait 30 minutes for the first coat to dry completely.
- Apply a second, slightly thicker coat (and add the second color only after the base is even).
- Wait 45 minutes for the second coat to dry to a non-tacky finish.
- Remove painter’s tape slowly while the paint is dry enough not to peel.
- Let the pots air-dry for 2 hours to fully set before using them as plant covers.
- Place each plant in a removable nursery pot liner, then set it inside your painted terracotta shell.
Total DIY cost: $45 — saves about $20 versus buying a pre-styled terracotta planter set.
Layer 6 — Glass vase + white blossoms ($25) Short vase with airy stems
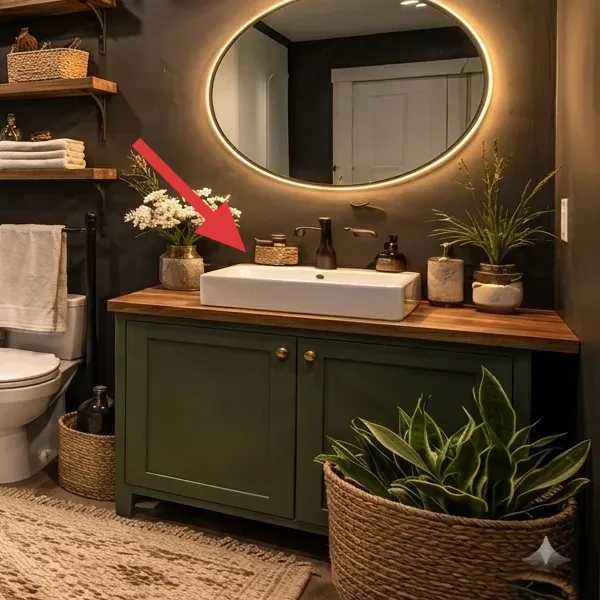
This layer is the white-blossom arrangement in a short glass vase on the vanity. The blooms bring crisp lightness to the scene and create a focal point that feels styled without being fussy. The glass container catches the warm glow from the mirror area lighting, which makes the whole bathroom feel intentional. Because it’s just a vase plus a bouquet, it’s also one of the easiest layers to pack: wrap the glass, coil stems, and tuck into a single box.
I like flowers here because they add “motion” in a bathroom that’s mostly straight lines—cabinet fronts, shelf edges, mirror shape. The trade-off is that fresh flowers don’t last, so you’ll either replace them often or choose a high-quality faux bundle. In 2026, faux white blossoms look better when they’re airy and not too perfect, like a little natural mess. If you rent, that choice keeps your look consistent through move-out dates.
Use a short vase so it doesn’t overwhelm the sink
A tall vase blocks the countertop and makes the sink area feel tighter. A lower glass vessel keeps the mirror focus while still adding that fresh “white pop.”
Layer 7 — Woven floor basket plant ($65) Large basket with tall leafy greenery
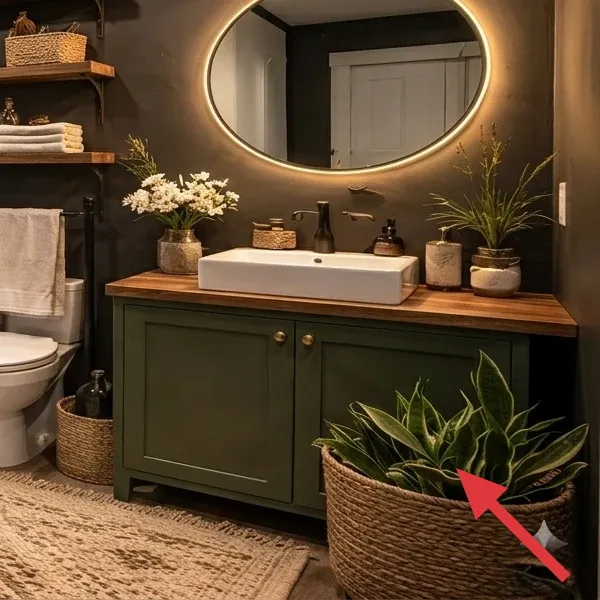
This layer is the large woven basket in the foreground with tall, spiky leafy greenery inside. It acts like a floor-level anchor: the basket’s warm texture echoes the terracotta pots, while the plant height balances the room so it doesn’t feel only countertop-and-shelf deep. You can see how the basket’s woven pattern adds visual softness against the darker wall and the smooth vanity surfaces. It’s also ideal for shared housing because you can move it as one freestanding object and re-style it at the next address.
Choosing a woven basket (instead of a single small tabletop pot) is a styling shortcut: it reads fuller and more intentional even when the plant is still small. The trade-off is the basket needs protection—water, damp mopping, and drips can damage woven fibers over time. I’d always place a plastic liner or keep the plant in its nursery pot so the woven shell stays clean. It’s the kind of plant styling that looks designed on day one and still packs easily for your next move.
Keep a removable liner inside the basket
It’s the difference between “plant looks good for months” and “plant basket smells like damp.” A liner makes re-styling and cleanup faster.
The cost, layer by layer
| Layer | Item | Cost |
|---|---|---|
| 1a | Charcoal shower curtain panel (84 in) | $30 |
| 1b | Shower curtain ring/hooks pack | $5 |
| 2a | Textured bath rug (5x7) | $80 |
| 2b | Non-slip rug pad | $30 |
| 3a | Bath towels (2) | $30 |
| 3b | Hand towels (2) | $15 |
| 4a | Soap dispenser set (2 pumps) | $30 |
| 4b | Small lidded jar/canister | $10 |
| 5a | Small terracotta pots (4–5 in, 3) | $28 |
| 5b | Acrylic craft paint set (2 colors) | $10 |
| 5c | Painter’s tape roll + foam brush pack | $7 |
| 6a | Short glass bud vase | $15 |
| 6b | White blossoms stem bundle (faux) | $10 |
| 7a | Large woven storage basket | $40 |
| 7b | Tall leafy plant (~3 ft) | $25 |
| Total | $365 | |
If you want the same look for less, keep the curtain, rug, and towel stack, then downsize the plant styling: go with one woven basket and one terracotta pot (painted DIY) instead of two different plant moments. That cuts the budget quickly while keeping the “layered texture” logic that makes this bathroom feel styled, not temporary.
What worked, what didn’t (across the whole room)
This bathroom reads warm and intentional because the updates are all movable layers: fabric, rug texture, clean countertop staging, and greenery. The result is a spa mood without any drilling, and the styling survives real shared-bathroom life.
What worked
- The charcoal curtain softens the shower zone and makes the darker walls feel designed instead of bare.
- The textured bath rug grounds the floor visually, and it makes the tile area feel less “public bathroom.”
- Rolled and stacked white towels create brightness where you need it most: at shelf eye level.
- Freestanding countertop bottles and a lidded jar keep the sink zone tidy even when other people use it.
- Terracotta planters add earthy warmth that connects the shelves, countertop, and floor plant into one palette.
- The white blossoms give a focal point on the vanity without cluttering the sink edge.
- The large woven floor basket adds height and texture so the room doesn’t feel flat behind the mirror glow.
What didn’t
- Textured rugs look best when they’re vacuumed or shaken often; water spots accumulate faster than on flat mats.
- Some faux flower stems shed a little dust; I learned to keep an extra lint roller in the cabinet.
- Woven baskets need a liner; without one, dampness can show up as discoloration over time.
- Terracotta pots can dry out quickly if you’re using live plants, so keep the care routine realistic.
- When curtain fabric is too thin, the folds don’t hold and the shower area looks “install-basic,” not styled.
What we'd skip if we did it again
Skip buying a full “matching bathroom set” (towels, soap, containers) that all looks like it came from the same photo shoot. In this kind of moody, warm-tinged bathroom, matching everything tends to read themed instead of lived-in. I’d rather repeat one idea—like white towels for brightness or terracotta for warmth—then let the other pieces vary in shape. The trade-off is you have to be slightly more deliberate when shopping, but it pays off with a look that stays believable in your next rental.
Skip the impulse to go heavy on scent and specialty formulas for the soap layer. On a dark, humid-leaning bathroom scene, scented residue can build up around pump nozzles and leave marks where you don’t notice them until you’re already busy. If you want a “spa” feeling, rely on the visible system (bottles, jar, tidy placement) and add scent only through a removable option you can replace. That keeps your countertop looking good without extra scrubbing before move-out.
Skip high-maintenance plants in decorative containers unless you already have a routine. The basket plant and terracotta pots make the bathroom feel intentional, but they also add a small care job. I’d choose plants that tolerate your schedule—plus keep nursery-pot liners ready—so you’re not trying to “save” a plant while also packing for finals or a lease change. If you know you’ll be busy, start with fewer plants and add one at a time once the habits stick.
Frequently asked
How long does it take to do a refresh like this?
For most shared-housing bathrooms, plan on about 2–3 hours of shopping and pickup, then another 2–4 hours to stage everything. The DIY terracotta planter step is the main time chunk: you’ll spend ~30–40 minutes painting and taping, then the rest is drying/air-drying time. Add another hour for rug placement, towel staging, and getting the curtain folds to look intentional. If you’re doing it in one day, choose the DIY first so everything else is “final touches” later.
Is this renter-safe if my lease doesn’t allow changes?
Yes—this look is built around changes you can reverse instantly. You’re swapping a shower curtain and adding rugs, towels, and freestanding countertop décor—none of those require drilling, painting, or replacing any fixed fixtures. Even the plants are container-based, so you can remove them and repot in a nursery liner before moving. The key is to treat everything like a portable kit: keep receipts if you bought new textiles, and wrap glass (like the vase) so it’s move-out-proof.
What if my bathroom is smaller or the rug feels too big?
Start with the rug’s job, not its size: it needs to anchor the walking zone. If your space is tighter, choose a 4x6 rug equivalent (or a narrower runner) and keep the rug centered in front of the sink area, so it still frames the countertop zone. The styling logic stays the same: curtain for softness, towel stack for brightness, plants for height, and a couple of countertop items for order. The mistake to avoid is letting every item compete for surface space—pick one “hero” rug and keep other surfaces uncluttered.
Where would you shop differently in 2026 to build this look?
I’d shop textiles and rug supplies at big-box retailers for reliable sizes—then do the personality items (vase, jar, planter shapes) at home goods stores or Etsy for specific silhouettes. For the plants, I’d buy live plants only when you have a repotting plan (nursery liner + removable pot shell), and I’d choose faux white stems if you want zero maintenance. For terracotta painting DIY, buy simple clay pots so the DIY is about the finish, not expensive materials. That keeps the look designed without overspending.
What’s the biggest mistake people make when styling a rental bathroom?
They over-index on decorative clutter and under-index on repeatable, everyday staging. You’ll get more “bathroom looks good” payoff from three systems—curtain for texture, rug for comfort and grounding, and a tidy towel/soap presentation—than from buying lots of small knickknacks. Another common slip is picking curtains or rugs that don’t match the room’s lighting mood: dark textiles + warm light need fabrics that hang well and patterns that don’t look flat. Keep the plan simple, and the room will read intentional instead of random.
Can I reuse everything when I move, or do some items wear out?
Most items here are reuse-friendly because they’re soft goods and containers. Towels can be packed like bedding; rugs roll or fold and re-style easily; baskets and planters move as freestanding objects; and countertop items are designed to be handled. The things that may need replacing are the rug if it gets permanently stained, and live plants if your care routine changes between moves. The glass vase and painted terracotta pots are the easiest to protect—wrap and pad carefully, and they’ll make it to your next address.
If I only have one weekend, what should I do first?
First, buy and place the rug and shower curtain, because those two set the bathroom’s texture foundation and mood. Second, stage towels on the shelving right away—bright white folds make the room look “done” even before you perfect placement. Third, add the plant and the countertop bottle/jar grouping to control visual noise. Finally, paint the terracotta pots during the DIY window so they can dry while you finish other staging. If you do only one DIY, prioritize the planter pots—they bring the earthy palette together.
More in Bathroom
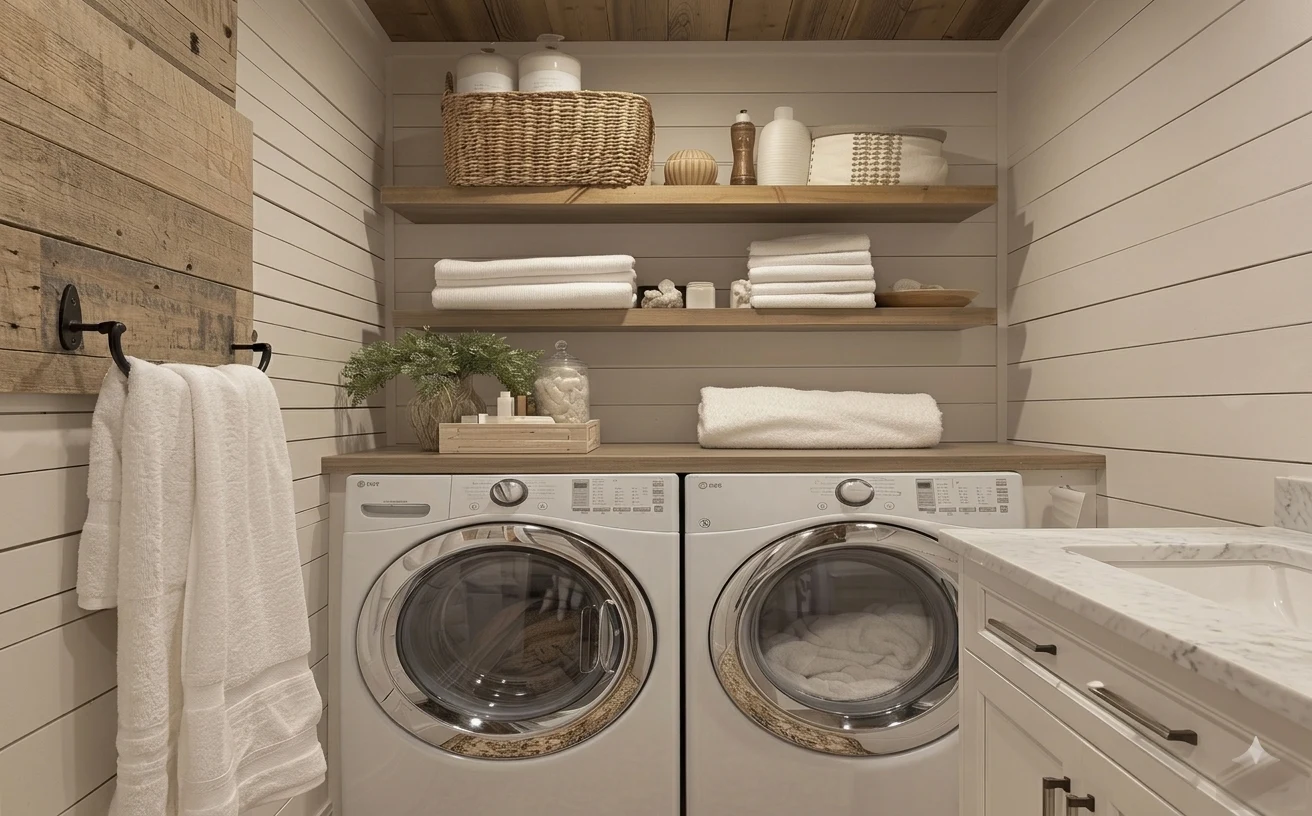
Weekend laundry-room refresh: 7 styling upgrades for under $400
This weekend laundry-room refresh uses seven simple upgrades—stacked white towels, a tidy shelf hamper, a small plant, and one DIY pine org…

Under $400: 7 moving-friendly bathroom layers for shared renters
This moving-friendly bathroom refresh gives you the spa-like, layered look without swapping landlord fixtures—just seven renter-safe layers…
Under $600 weekend spa bathroom refresh: dark walls, rug, warm shelves
This spa bathroom refresh delivers a hotel-like glow on a real homeowner weekend budget of Under $600. By layering a patterned area rug, wa…