- Best for
- Weekend bathroom glow-up
- Cost
- About $425 total (aim for $500 budget)
- Difficulty
- Moderate
- Time
- 1–2 weekends
Why terracotta-and-brass tile is the bathroom vanity corner of 2026
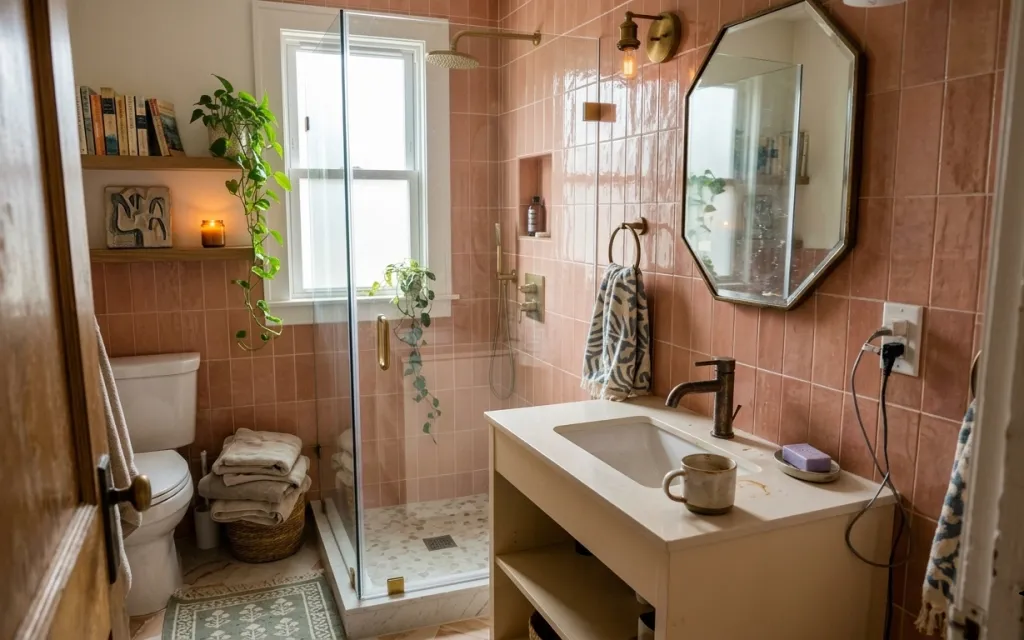
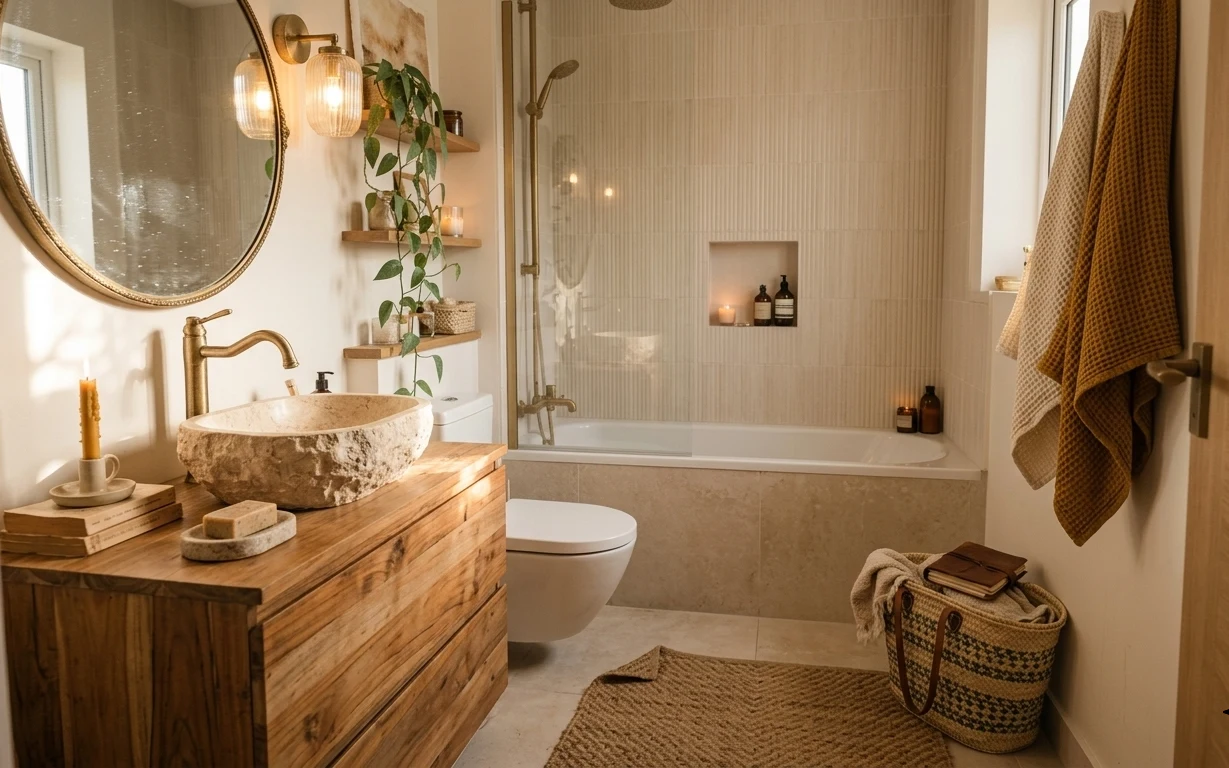
When I redo a bathroom corner, the “first glance” has to be earned. In this photo, the warm brass wall sconce, terracotta tile, and octagonal mirror already set a rich baseline—then the rug pattern and small shelf styling make it feel lived-in. A good weekend refresh keeps the textures you already have (glossy ceramic tile, matte towels, woven basket texture) and adds contrast where you’ll actually notice it. That’s why this plan leans on one accent wall, a bath mat rug, and a few surface-level upgrades that work with the existing palette.
I once tried to fix a bathroom by changing too much at once—new fixtures, new towel color, new art—only to realize the room was losing its coherence. This time the move is simpler: pick one area (around the mirror/vanity) and repeat the same warm tones in more than one place. Terracotta + brass already reads cohesive, so the updates become about placement and scale: a rug that grounds the floor, a framed print that pulls the eye, and styling objects that look like they belong together.
Layer 1 — bath mat rug ($80) Grounds the sink area with a pattern
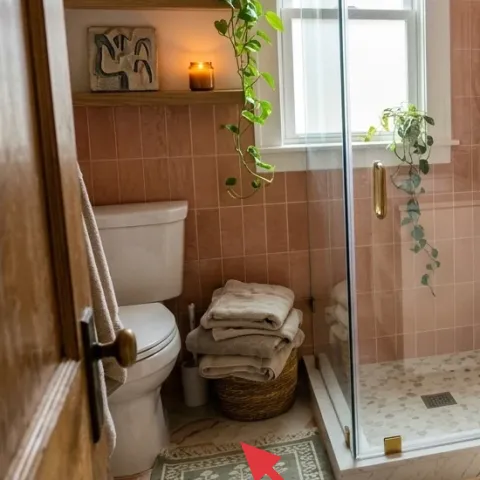
That patterned bath mat sits directly under the line of sight from the shower and makes the floor feel styled, not just functional. A 5×7 size also helps you avoid the “small rectangle” look that can happen when you buy a cheaper runner instead. Choose a rug with low-contrast background cream and a grounding green or clay tone so it echoes the terracotta tile without turning the room into one flat color. The trade-off is that patterned rugs show less dirt than you’d think—just keep it vacuumed and rotate when possible to keep the pile looking even.
Match undertones, not exact colors
If the rug’s cream is warmer than the tile grout, it will blend more naturally next to the vanity.
Layer 2 — peel-and-stick wallpaper (one accent wall) ($120) Adds depth without a full tile redo
The accent-wall option is the fastest way to change how the mirror-and-vanity area feels, while staying weekend-friendly. Because the walls are terracotta tile, go for a wallpaper pattern that reads like a subtle plaster or a small-scale motif—something that won’t fight the grout lines. The visual win here is creating a “framing” effect behind the mirror so the octagonal shape feels intentional. The trade-off is moisture planning: keep the wallpaper limited to a protected section (not where direct shower spray hits), and use it where it won’t sit in constant humidity.
One wall is enough in a tile-heavy bathroom
Two accent walls would compete with the terracotta grid and make the corner busier than it needs to be.
Layer 3 — small framed artwork on the left wall ($50) Pulls your eye up and balances the shelf
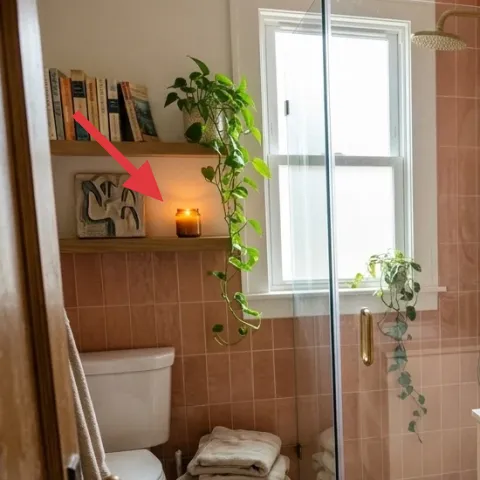
The framed piece on the left wall works like punctuation: it stops your gaze from dropping straight from the shelf books down into the room. For a weekend update, the goal isn’t to replace your decor taste—it’s to make the artwork echo the terracotta-and-brass temperature already in the sconce and tile. A warm cream background with a simple terracotta pattern keeps everything cohesive while still adding personality. The trade-off is that you’ll need to get the scale right; oversized prints can feel cramped in a narrow bath.
Make it instead of buying it
Stencil a warm cream-and-terracotta geometric print and swap it into the existing framed artwork spot for a custom look.
Materials
- Cardstock or lightweight art paper — 1 sheet — craft store — $14
- Stencil sheet (geometric or small motif) — 1 — craft store — $8
- Acrylic paint in terracotta + cream — 2 colors — craft store — $6
- Painter’s tape — 1 roll — hardware store — $5
- Clear craft sealer spray (matte) — 1 can — craft store — $6
Steps
- Clean and dry the paper, then tape down the stencil corners so it can’t shift while painting.
- Use a foam stencil brush to apply terracotta paint in light layers; re-dab instead of dragging.
- Remove the stencil carefully, let the design dry fully, then repeat for any second motif pass.
- Fill small gaps with a fine craft brush for crisp edges.
- Let everything dry completely, then mist with matte clear sealer to protect the surface.
- Swap the finished print into the frame and hang it at the same height as before.
Total DIY cost: $39 — saves about $11 over buying.
Don’t laminate art in humid spots
Even framed prints can warp if the room stays very steamy; keep the artwork away from direct splash zones.
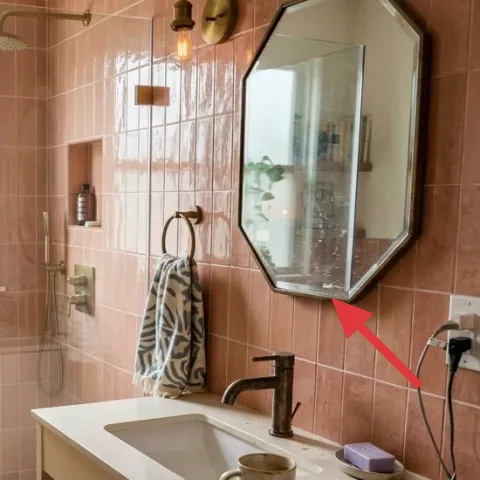
Layer 4 — brass wall sconce with a bare bulb ($100) Makes the corner feel warm after dark
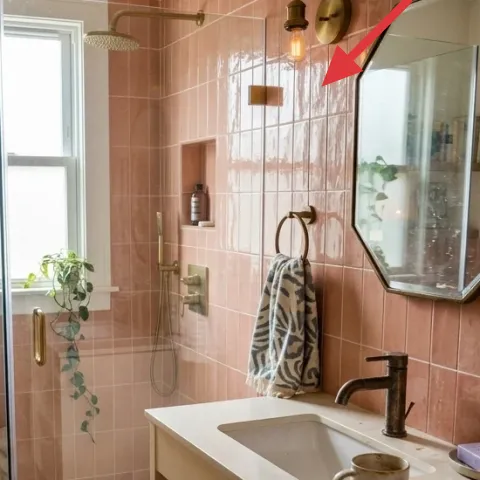
The brass sconce is already the “anchor light,” and swapping to a similar style (or a better bulb) is one of the most noticeable changes you can make. In a bathroom, lighting color matters more than the fixture material because it affects how terracotta tile reads—cool bulbs make it look flat and slightly muddy. A warm, dimmable bulb keeps the tile glowing and makes the mirror reflections feel softer. The trade-off is that brighter isn’t better here; aim for warm, not white, and keep glare under control by matching the bulb style to the fixture shade shape.
Use warm white for terracotta
Choose a warmer color temperature so the tile stays rich instead of grayish.
Layer 5 — tall potted plant on a shelf ($25) Brings the vertical line up and softens tile
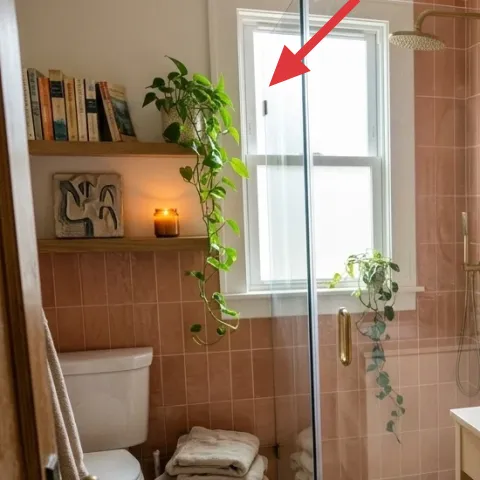
That tall potted plant breaks up the hard edges of tile and glass with leafy texture, and it also gives the shelf styling height. The best part of this layer is that it doesn’t compete with the mirror shape—plants sit naturally near windows and shelves, and they make the space feel less “showroom.” For a refresh, focus on keeping the plant healthy and the leaves dust-free, because a slightly droopy plant reads tired even with good styling. The trade-off is maintenance: shelf plants need consistent light and a quick wipe of the pot rim so it doesn’t look grimy next to clean countertop lines.
Trim only when the plant is dry
Pruning when the leaves are dry helps you keep the look even and reduces sloppy regrowth.
Layer 6 — woven storage basket ($30) Hides clutter while keeping texture
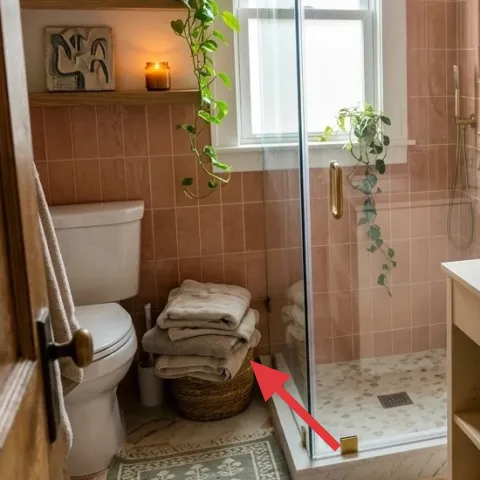
The woven basket holds towels in a way that looks intentional, not like “spare laundry overflow.” Texture matters here because the room is full of smooth surfaces: glossy mirror glass, ceramic tile, and a clean white countertop. Woven fibers add a matte, tactile layer that makes the brass sconce feel warmer and the rug pattern feel less stark. Keep the basket sized so it fits the towel stack without compressing the fabric; compressed towels look messy and also flatten the visual rhythm. The trade-off is that baskets can collect dust—quick vacuuming of the weave helps a lot.
Hide less, stack better
Use the basket for folded towels only; loose piles start looking untidy fast.
Layer 7 — soap bar on a small tray ($20) Makes the vanity read finished
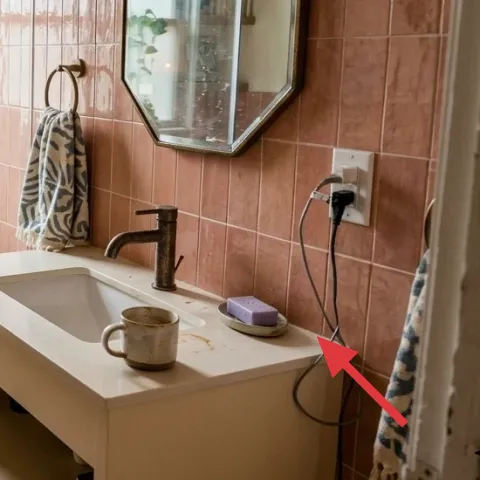
Small items on a vanity are what give a bathroom its “done” feeling, and this soap bar on a small tray does that job without taking visual space away from the sink lines. A tray also prevents the creeping mess problem—water spots and drips collect in one place instead of spreading across the countertop. Choose a tray material that plays nicely with brass, like warm wood tone or a simple ceramic look, so the objects don’t feel random. The trade-off is using fewer pieces overall; when a tray is too crowded, it reads cluttered even if everything matches.
Keep your tray to 2–3 items
Soap, a mug, and one small accent is enough for a styled look.
The cost, layer by layer
| Layer | Item | Cost |
|---|---|---|
| 1 | Area rug 5×7 (bath mat) | $80 |
| 2 | Peel-and-stick wallpaper (one accent wall) | $120 |
| 3 | Small framed artwork (16×20) | $50 |
| 4 | Brass wall sconce (hardwired or replaceable unit) | $100 |
| 5 | Indoor plant (4–6 ft potted) | $25 |
| 6 | Basket (woven storage) | $30 |
| 7 | Decorative tray for soap | $20 |
| Total | $425 | |
If you want a cheaper version, skip the wallpaper and focus on the bath mat rug, the framed print, and one styling cluster on the vanity. A basic rug and frame swap can still make the mirror/vanity area feel “finished” without committing to a second texture layer.
What worked, what didn't (across the whole room)
The biggest wins came from changing what the eye hits first: the floor with a patterned rug, the mirror area with a framed print, and a single accent wall behind the vanity. Brass lighting plus terracotta tones already reads cohesive, so the best updates were the ones that amplified warmth instead of competing with it. The only spot that can go wrong is humid-area placement—items that should stay dry need to be located with the shower’s spray line in mind.
What worked
- The bath mat rug anchors the sink area and prevents the tile floor from feeling too bare.
- Warm light from the brass sconce keeps terracotta tile looking richer instead of flat.
- The framed artwork balances the left shelf so the room feels intentional, not accidental.
- The accent wallpaper behind the vanity creates depth without a full demolition.
- Woven storage adds texture that plays nicely with mirror glass and glossy tile.
- The small tray collects soap drips so the countertop stays visually clean.
What didn't
- Trying to match exact terracotta colors can look muddy—undertones matter more than shades.
- Wallpaper placed too close to shower spray can curl at edges over time.
- A tray that holds too many small items makes the vanity read cluttered, even when colors match.
- Leaving a shelf plant dusty makes the whole corner feel less polished than the rest.
- If the rug is too small, it won’t visually “hold” the vanity zone.
What we'd skip if we did it again
Skip replacing the whole vanity or countertop. In a tile-forward bathroom, the money is better spent on one high-visibility lighting decision, a rug that anchors the floor, and a single accent wall that changes the backdrop behind the mirror.
Skip wallpaper on every wall. Choose one protected accent area only—bathrooms are humid, and a second wall upgrade usually costs more time and creates more edge-lift risk than it’s worth.
Skip overcrowding the vanity tray. Two functional objects (soap + one styled item like the mug) read cleaner and calmer than a curated stack of five.
Frequently asked
How long does this kind of bathroom refresh take?
Plan on 1–2 weekends. The quickest wins are the bath mat rug swap and styling moves around the octagonal mirror. Peel-and-stick wallpaper usually takes the most time because you’ll measure, cut cleanly, and smooth carefully around edges. If you DIY the framed print, build time into drying and resealing so it’s ready to swap into the frame without smearing.
What if I rent—can I still do the wallpaper?
If renting, ask first about wallpaper in general, but you can still stay cautious with the same approach: keep it to one non-permanent accent wall and avoid areas that get direct shower spray. For a rental-safe path, use removable wallpaper in a protected zone and consider sticking to rug + framed print + tray updates if the landlord prefers no wall coverings.
My bathroom is smaller—what changes?
In a smaller bath, prioritize “scale and spacing.” Use a bath mat rug that still extends under the vanity line of sight, and keep the framed print and plant arranged so the shelf doesn’t feel crowded. If you worry about pattern overload, choose a wallpaper design with lots of negative space and a rug pattern with a similar undertone temperature.
Where should I shop differently to stay under budget?
For the rug and woven basket, thrift and discount home stores are often the best way to find the right texture without overspending. The framed artwork and plant are easy to source from big-box home sections or craft stores, especially when you’re open to DIY the artwork. If a sconce swap is part of your plan, check lighting aisles at home improvement stores for the best pricing.
What’s the biggest mistake with bathroom vanity corner styling?
The most common miss is buying items that are individually pretty but don’t share undertones. Terracotta tile can go muddy fast if the rug and artwork pull too cool or too bright. Another mistake is placing wallpaper where steam hits regularly—keep your accent wall in a protected zone so it stays crisp instead of peeling at the edges.
More in Bathroom

Under $500: a terracotta-bathroom vanity refresh
A budget-friendly bathroom vanity refresh with warm brass lighting, a new bath mat rug, and a single peel-and-stick wallpaper accent wall. …
Brass-and-stone bathroom vanity nook refresh, $800
A soft-brass bathroom vanity nook refresh that leans on warm mirror light, a simple plant shelf, and a grounded jute-style rug. Built with …
How to build a bathroom vanity nook under $500
A bathroom vanity nook refresh built around renter-safe swaps: a tile-friendly rug, a patterned towel, two live plants, and warm botanical …