
- Best for
- small daybed corners
- Cost
- $635 total
- Difficulty
- Confident DIY
- Time
- 1 weekend (plus drying)
Why this sage-and-cream daybed nook is the cozy reading corner of 2026
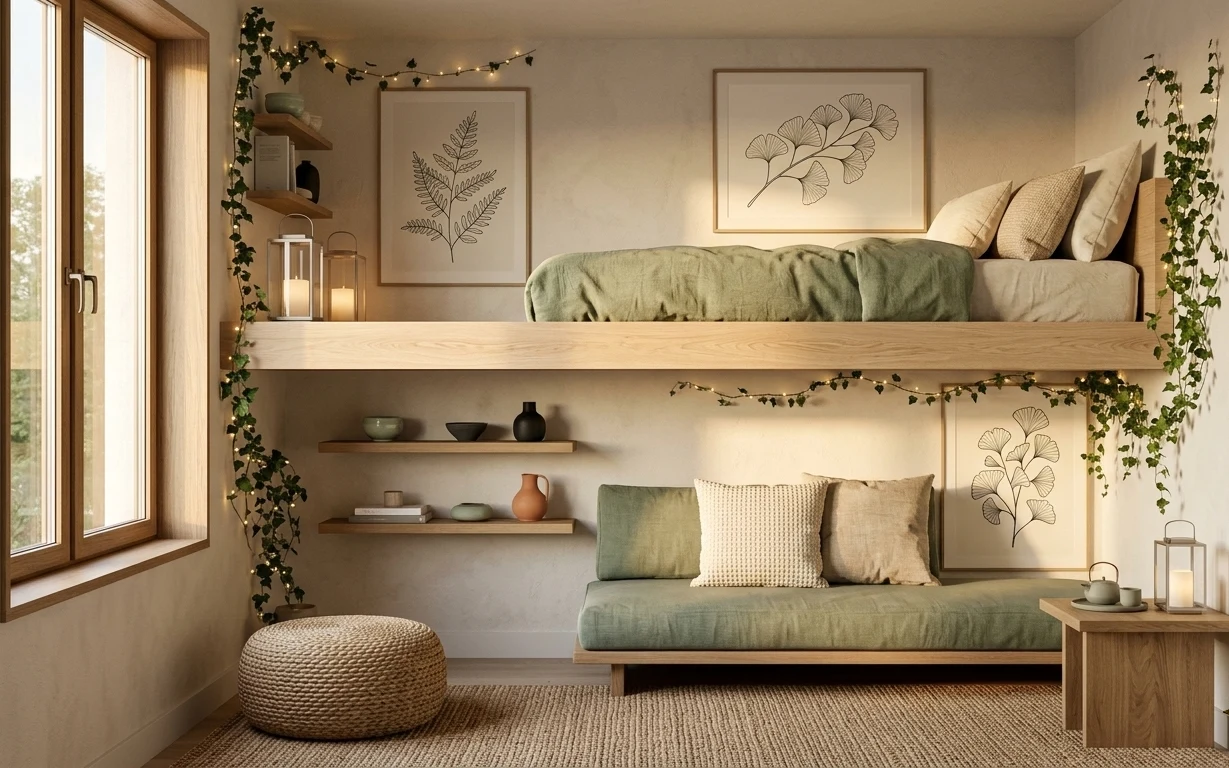
The quickest way to make a small daybed nook feel intentional is to treat it like a mini living room: layer in soft textures and repeat materials. Here, the sage green pillows meet warm cream accents and the light wood trim, while the woven pouf adds a grounded, tactile note. I’m a fan of the japandi approach—keep the forms simple, then let texture (linen, woven, and matte painted walls) do the heavy lifting. For homeowners, the best part is you can choose the highest-impact piece first and build around it.
I used to buy whatever “matched” the paint color, then wonder why my rooms still looked unfinished. This setup clicked for me when I started repeating one theme across different heights: a framed print for the eye line, string lights for the mid-height, and pillows and rug for the base. Once those anchors matched, everything else felt effortless—even the hanging vines. The mistake to avoid is adding more items without a clear visual rhythm.
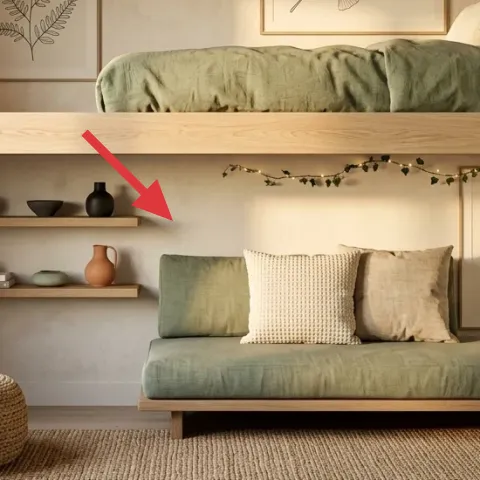
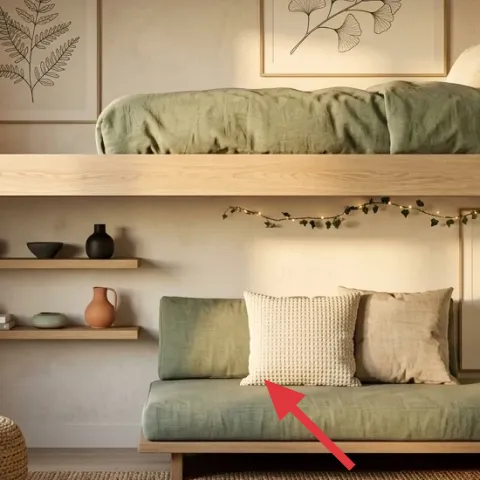
Layer 1 — linen-textured throw pillow ($25) softens the sage daybed

This linen-textured throw pillow sits against the sage-green cushion on the daybed, adding a dry, natural look that reads “calm” instead of “decorative.” The trade-off is that linen-textured fabrics don’t look crisp forever; they develop soft creases, especially in a lived-in nook. I’d rather own one great pillow texture than chase multiple patterned cushions. If you’re tempted to go all matchy-matchy, resist it—this pillow’s neutral tone keeps the sage from looking too saturated.
Layer by texture, not just color
Mix one linen-like piece with one smoother cotton or knit so the pillows don’t blend into the daybed cushion.
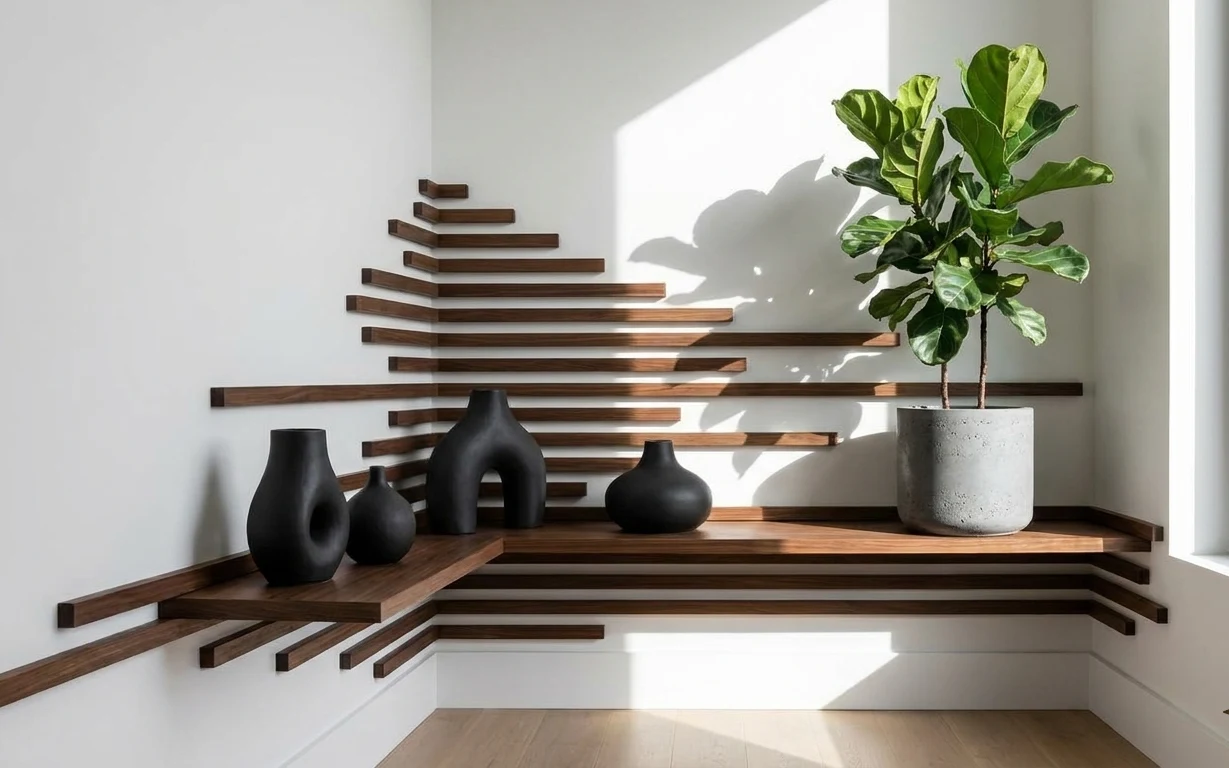
Layer 2 — decorative tray ($35) gives the shelves a “set table” feel
The decorative tray on the niche shelf makes the ceramics and small objects feel curated instead of accidental. In the photo, the tray visually groups a few pieces at once, so your eye has an order to follow. You could try arranging items without a tray, but it usually turns into a scatter of different heights and finishes. The downside is you have to commit to a style: choose one tray material (wood, ceramic, or metal) and repeat it once elsewhere—like near the daybed—to keep the room from feeling random.
Use it to control height
Stack your tallest object toward the back of the tray, then let the smaller pieces sit forward.
Layer 3 — hanging vine plants ($30) add movement beside the niche
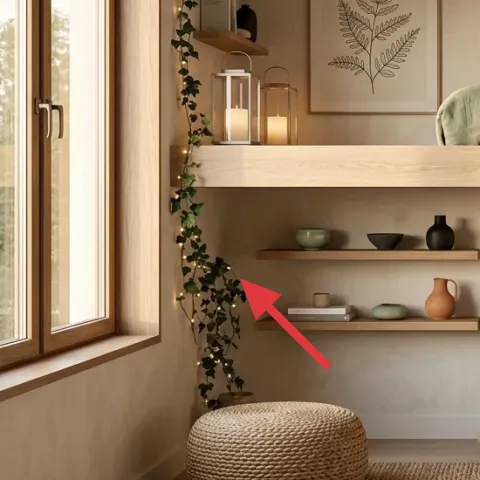
These hanging vine plants on both sides frame the daybed nook and soften the straight lines of the niche trim. They’re especially good in small spaces because they bring interest vertically without taking floor area. The trade-off is maintenance: vines need occasional trimming and some watering, depending on how long they are. If you skip them, the room can feel too “flat,” especially with all the neutral wall color. If you love a low-effort look, pick vines with leaves that can handle indoor light and don’t shed constantly.
Don’t overcrowd the wall
If vines get too dense, they can hide the clean lines of the niche and make the whole corner feel heavier.
Layer 4 — string lights ($15) make the niche glow after dark
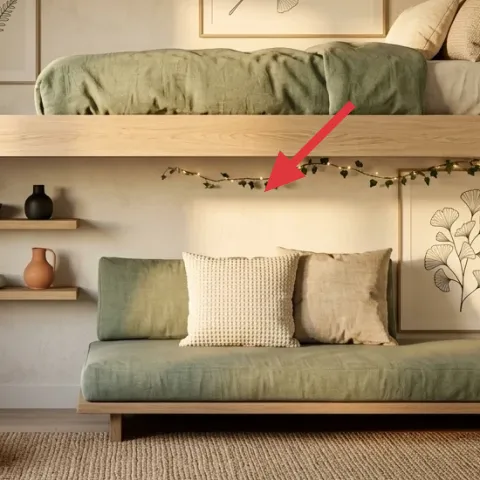
String lights wrapped along the niche edge create the warm, layered lighting that makes this corner feel inviting even when the room is dim. The reason they work here is placement: they sit at a mid-height band, so they glow through the shelves and around the daybed rather than only lighting one spot. The trade-off is you’ll need to take a few minutes to route the cord neatly so it doesn’t look like a temporary fix. Compared to swapping a fixture, this is faster, less expensive, and totally renter-and-homeowner friendly.
Test your length before you hang
Drape the strand in place and step back—then adjust so the spacing feels even.
Layer 5 — area rug ($200) anchors the daybed base
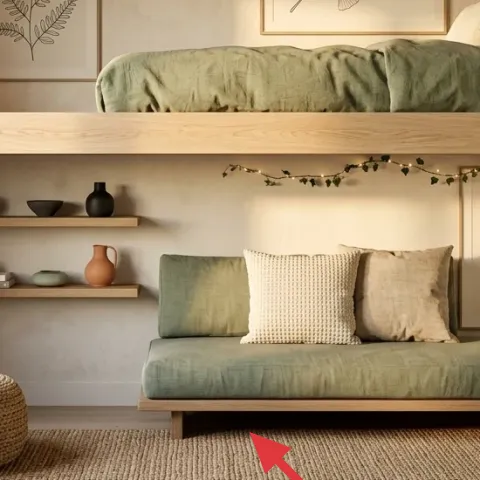
The area rug under the daybed pulls the whole nook together and makes the floor feel warmer than paint alone. In this photo, the neutral, textured weave works because it ties into the woven pouf and keeps the sage pillows from standing out too sharply. A rug is an “expensive-looking” upgrade, but it’s also one of the only items that changes how sound and temperature feel in a small corner. Trade-off: a texture rug can trap lint, so plan on regular vacuuming—especially if you have pets or lots of outdoor traffic.
Choose a size that sits under the daybed
Even if the whole daybed can’t fit, make sure the front legs (or edge) land on the rug for cohesion.
Layer 6 — framed botanical print above daybed ($80) sets the calm focal point
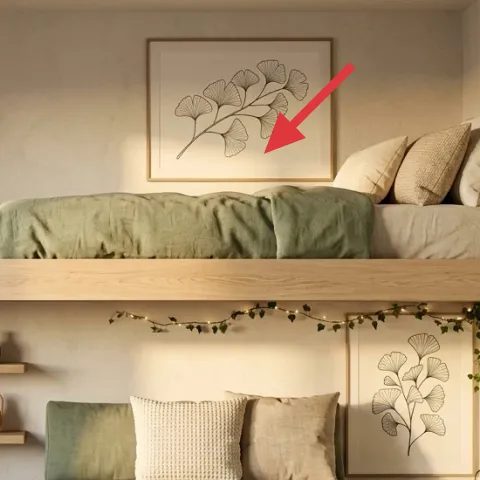
A framed botanical print above the daybed gives the eye a clean, centered focus and ties into the plant theme without adding more greenery everywhere. The trade-off is straightforward: art placement is picky, so you’ll want the frame level and the scale right for the niche wall height. If you choose something too small, it feels lonely; too large, and it competes with the daybed pillows. This is the piece I’d spend time on first, because once the focal print reads well, the rest of the decor can be simple and still look intentional.
Make it instead of buying it
DIY a botanical print by hand-painting simple leaf silhouettes on a small canvas board, then sealing it so it looks crisp inside a standard frame.
Materials
- Canvas board, 16×20 (or similar) — 1 — craft store — $20
- Acrylic paint set (greens + warm gray + black) — 1 — craft store — $25
- Fine-tip black marker or micron pen — 1 — craft store — $8
- Transfer paper (optional for outline) — 1 pack — office supply — $7
- Matte clear varnish spray — 1 — hardware store — $10
Steps
- Sketch a basic branch-and-leaf layout lightly in pencil, keeping stems off the frame edges.
- Paint the largest leaves first with watered acrylic, then let them dry completely.
- Add vein lines with a fine-tip marker for the crisp botanical look.
- Layer mid-tone leaf shapes on top to create depth, then dry again.
- Touch up outlines and connect stems so the whole print reads as one composition.
- Seal with matte varnish in thin passes; let fully dry.
- Slide the finished art into your frame and check level against the niche.
- Hang and adjust spacing so it sits centered above the daybed.
Total DIY cost: $70 — saves about $10 over buying.
Layer 7 — daybed frame ($250) turns a corner into a destination
The daybed frame is the structural “why it works” here: it creates a built-in-feeling zone with a clear line of sight to the niche shelves and wall art. Even without doing any major demolition, choosing (or refinishing) a clean-lined frame with a light wood tone keeps the japandi vibe intact and lets the textiles look intentional. The trade-off is practicality—daybeds are visually dominant—so the finish and scale matter more than with a regular couch. If you’re deciding between a darker frame and a lighter one, go lighter: it prevents the nook from feeling heavy.
Pick a frame that matches your trim
That small alignment between frame wood and light trim makes the whole corner feel cohesive.
The cost, layer by layer
| Layer | Item | Cost |
|---|---|---|
| 1 | Linen-textured throw pillow | $25 |
| 2 | Decorative tray | $35 |
| 3 | Hanging vine plants | $30 |
| 4 | String lights (set) | $15 |
| 5 | Area rug 5×7 | $200 |
| 6 | Framed botanical print (16×20) | $80 |
| 7 | Daybed frame | $250 |
| Total | $635 | |
If you want a cheaper variant, swap the framed botanical print for a gallery-ready print from a discount art store and choose a lower-cost rug texture in a similar warm neutral. Keep the string lights and one vine plant—those two carry the mood more than the extras do.
What worked, what didn't (across the whole room)
The best overall results came from repeating warm neutrals across multiple heights: rug at the base, framed print at eye level, and string lights mid-height. The hanging vines also made the niche feel softer without adding bulky furniture. The few rough spots were all about density—too many objects on the shelves made the nook feel busy instead of calm.
What worked
- The 5×7 area rug grounded the daybed nook and reduced the “bare floor” look.
- The linen-textured throw pillow softened the sage tones without introducing new colors.
- String lights created a warm glow that looked styled even with limited overhead light.
- The framed botanical print gave the corner a centered focal point for the eye to rest on.
- Hanging vine plants added vertical movement that balanced the niche’s straight lines.
- The decorative tray kept shelf objects grouped by height and finish.
What didn't
- Packing the niche shelves with too many small pieces made the look feel cluttered fast.
- Placing string lights too close together created a band that looked accidental rather than intentional.
- Skipping the woven pouf detail made the rug feel less connected to the rest of the textures.
- Choosing a frame with a shiny finish made the botanical print feel less calm against the matte walls.
What we'd skip if we did it again
Skip adding extra framed prints. One botanical print above the daybed is enough structure—more art nearby usually competes with the wall shelves and makes the niche feel visually crowded.
Skip a second rug layer or thick runner. In a daybed nook, you already have multiple textures (woven pouf, pillow fabrics, shelf objects). A second soft layer turns the corner heavier than it looks in photos.
Skip overloading the niche shelves. Keep the decorative tray and just a few ceramics or small objects; leaving some wall space is what keeps the japandi vibe airy.
Frequently asked
How long does this kind of daybed nook refresh take on a weekend?
Most of the work is quick ordering and placement. Plan on 2–4 hours for rug + pillow swaps + shelf styling, and another 1–2 hours to hang the framed botanical print and route string lights. If you DIY the botanical print, add drying time for paint and varnish. In practice, it’s a solid “one weekend” project if the frame and supplies are ready to go.
Can I do this if I rent or don’t want to make permanent changes?
Yes—keep the changes that don’t affect the structure. Choose a daybed frame you can live with long-term, but for wall work use a removable hanging method for the framed print and keep string lights plug-in. Vines can be positioned with freestanding stands or styled where they don’t require new mounting. The rug and pillows are fully removable and usually give the biggest immediate payoff.
What if my nook is smaller or the daybed isn’t centered like in the photo?
Centering helps, but it’s not required. Use the framed botanical print as your main anchor: make sure it’s roughly centered over the daybed backrest area. Then choose the rug so the front edge of the daybed sits on it or close to it. For shelves, keep fewer objects and rely on the decorative tray to create structure even if the shelf width is smaller.
What if my ceiling is high and the framed print feels too low?
Raise it incrementally. Make a small mock-up with painter’s tape on the wall and step back from the daybed height. Aim for the print’s center to land around the viewer’s eye line when seated. Because this corner uses soft textures and warm light, a slightly higher print tends to look more balanced than a print hung too low.
Where should I shop for these specific pieces without overspending?
Start with the rug and string lights, since they set the tone. Look for a 5×7 area rug in neutral warm fibers and choose string lights sold as a set. For the framed botanical print, you can buy a ready frame or source a print and frame separately. For vines and the decorative tray, home goods and craft stores are often the fastest route.
Biggest mistake to avoid in a daybed nook refresh?
Over-styling the shelves. It’s easy to add “just one more” ceramic when you like the look of a curated arrangement. But in a small niche, too many objects make the corner feel busy and reduce the calm effect the rug, pillows, and warm lighting are creating. Use the tray as the grouping tool and stop at three to five well-spaced items.
More in Small Spaces
Under $700: japandi daybed nook refresh with weekend upgrades
A calm japandi daybed nook refresh you can pull off for under $700. Swap in one bold botanical frame, add warm string lights and a plush 5×…
Under $400: move-friendly dining nook refresh in warm reds
A warm-wood dining nook with red accents can look intentional without permanent changes. This $400 (max) refresh uses 7 move-ready swaps—ch…
Under $300: ceramic-and-walnut window-side shelf nook refresh
A bright window-side shelf nook can look styled, not fussy, with 7 move-friendly swaps. This $300 refresh focuses on matte black vases, a c…